ChevyParts
My Garage
My Account
Cart
OEM 2000 Cadillac Escalade Drive Shaft
Axle Shaft- Select Vehicle by Model
- Select Vehicle by VIN
Select Vehicle by Model
orMake
Model
Year
Select Vehicle by VIN
For the most accurate results, select vehicle by your VIN (Vehicle Identification Number).
2 Drive Shafts found

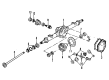
2000 Cadillac Escalade Axle Shaft, Rear Part Number: 26020040
Product Specifications- Other Name: Shaft, Rear Axle Drive; Axle Shafts
- Position: Rear
- Item Weight: 17.40 Pounds
- Item Dimensions: 37.6 x 4.7 x 4.7 inches
- Condition: New
- SKU: 26020040
- Warranty: This genuine part is guaranteed by GM's factory warranty.

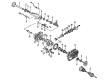
2000 Cadillac Escalade Axle Shaft, Front Part Number: 26056795
Product Specifications- Other Name: Shaft, Front Wheel Drive; Shaft
- Position: Front
- Condition: New
- SKU: 26056795
- Warranty: This genuine part is guaranteed by GM's factory warranty.
2000 Cadillac Escalade Drive Shaft
With a comprehensive array of OEM 2000 Cadillac Escalade Drive Shaft, from fuel pumps to door handles, our website is a one-stop-shop for your needs. All our genuine 2000 Cadillac Escalade Drive Shaft are backed by the manufacturer's warranty and are offered at competitive prices in the market. Rest assured, you can shop with complete confidence.
2000 Cadillac Escalade Drive Shaft Parts Questions & Experts Answers
- Q: How to replace a two-piece drive shaft on 2000 Cadillac Escalade?A: You must start by hoisting the vehicle then marking all driveline parts according to their positions relative to the propeller shaft and axles before disassembly to maintain the correct assembly relationship. Please mark the connection between the propeller shaft and pinion flange as well as the Slip Yoke transmission interface to achieve proper reassembly. When using pop-on seals on propeller shafts do not take off the seal from the sleeve because it will cause damage but you should replace it when needed with new components. Proceed by removing the retainer bolts followed by retainers while paying attention to both the yoke ears and the area between yoke and Universal Joint to protect against possible fractures. The yoke operations need removal together with cross assembly components while placing tape on bearing cups to stop roller loss. The Slip Yoke removal for dana two-piece shafts involves pulling it from the stub shaft while the american axle and manufacturing two-piece units require unscrewing the threaded center Slip Yoke cap. You should lower the propeller shaft forward while also removing it by keeping the Universal Joint from experiencing major inclines. After you remove the center bearing support bolts and nuts together with washers, you can proceed to remove the center bearing support and front propeller shaft. Maintain stability of the Universal Joint to avoid deep bending. Use an approved solvent for part cleaning then check the transmission yoke outer diameter for burrs while inspecting Slip Yoke splines for wear and conduct wear checks of Universal Joint bearings before needing replacements. To execute an installation the transmission requires propeller shaft entry while adding slip joint spline lubrication before setting the transmission yoke to its lowest position. The center bearing support must receive installation at a 90-degree angle to the propeller shaft center lines followed by tightening the support bolts to 35 nm (26 ft. Lbs.). To install the Slip Yoke use a coordinated motion that joins the missing tooth part of the Slip Yoke to the bridged tooth section on the splined shaft while supporting the propeller shaft until you achieve ear-level position for Slip Yoke elements then establish reference markers before fixing the propeller shaft at the rear differential yoke. Restrainers and bolts should be installed while torquing them to 20 nm (15 ft. Lbs.) before inspecting the joint fit and lubricating the two-piece shaft's center slip joint.
Related 2000 Cadillac Escalade Parts
 2000 Cadillac Escalade Differential
 2000 Cadillac Escalade Axle Shaft Retainer
 2000 Cadillac Escalade CV Boot
 2000 Cadillac Escalade CV Joint
 2000 Cadillac Escalade Differential Bearing
 2000 Cadillac Escalade Differential Cover
 2000 Cadillac Escalade Differential Seal
 2000 Cadillac Escalade Driveshaft Yokes
 2000 Cadillac Escalade Pinion Bearing
 2000 Cadillac Escalade Pinion Washer
 2000 Cadillac Escalade Slip Yoke
 2000 Cadillac Escalade Universal Joint