ChevyParts
My Garage
My Account
Cart
OEM 2001 GMC Yukon XL 1500 Shift Cable
Transmission Shift Cable- Select Vehicle by Model
- Select Vehicle by VIN
Select Vehicle by Model
orMake
Model
Year
Select Vehicle by VIN
For the most accurate results, select vehicle by your VIN (Vehicle Identification Number).
1 Shift Cable found

2001 GMC Yukon XL 1500 Parking Brake Cable Part Number: 26082803
Product Specifications- Other Name: Cable, Automatic Transmission Parking Lock; Cable; Cable, Transmission Control Cable
- Item Weight: 0.40 Pounds
- Item Dimensions: 15.1 x 1.4 x 0.9 inches
- Condition: New
- Fitment Type: Direct Replacement
- SKU: 26082803
- Warranty: This genuine part is guaranteed by GM's factory warranty.
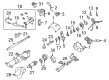
2001 GMC Yukon XL 1500 Shift Cable
With a comprehensive array of OEM 2001 GMC Yukon XL 1500 Shift Cable, from fuel pumps to door handles, our website is a one-stop-shop for your needs. All our genuine 2001 GMC Yukon XL 1500 Shift Cable are backed by the manufacturer's warranty and are offered at competitive prices in the market. Rest assured, you can shop with complete confidence.
2001 GMC Yukon XL 1500 Shift Cable Parts Questions & Experts Answers
- Q: How to replace the shift cable on 2001 GMC Yukon XL 1500?A: The shift cable features two separate parts that function as individual elements which enables maintenance for its front (column end) or rear (transmission end) sections. Begin shift cable replacement by positioning the steering column shift lever to Park then carefully raising the vehicle. The transmission manual shaft needs to be in mechanical park before you remove the retainer securing the shift cable to the transmission bracket. You can then detach the shift cable terminal shaft end from the transmission shift lever ball stud before extracting the cable from the bracket while depressing both tangs on the conduit end fitting. Find the center connector on the transmission shift cable. Then unfold the white plastic cover. Next lift the lock button's center tabs while keeping the transmission in mechanical park position. Discard the E-clip then separate the shift cable center connector ends before taking the cable half from the vehicle. Reposition the steering column shift lever to park and then remove both the steering column shroud and driver's seat before installing an E-clip onto the shift cable end. We must remove carpeting and insulation followed by the retainer claw that holds the shift cable to the steering column then extract the terminal shaft from the ball stud on the steering column. Take the conduit end fitting off the steering column bracket by being cautious not to let the shift cable experience avoidable flexing. Raise the vehicle a second time to detach the two retaining clips which secure the shift cable onto the floor panel reinforcement. Pop off the transmission manual shaft ball stud terminal end fitting while removing the E-clip for disposal. New shift cable front section arrives with already installed E-clip. When installing the steering system place the steering column shift lever in parking position while keeping the transmission manual shaft lever immeadiatly in mechanical park. After positioning the two clips on the shift cable to its floor panel reinforcement slot direct the cable through the floor panel opening where you will install the grommet. Lower the vehicle next before fitting the conduit end fitting to the steering column bracket while verifying complete tang engagement. Secure the shift cable terminal shaft end to the steering column ball stud through the retainer. First install the shift cable to its support before tightening the bolt to 10 Nm (89 inch lbs.) and later reinstall all components including carpet and insulation and driver's seat and steering column shroud. Hold the vehicle at its height while aligning the transmission cable front and rear portions through contact before compressing the blue spring entirely by pushing the rear section towards the front. Move the rear half of the cable away to let the blue spring adjust then remove the white cover before engaging the natural colored lock button to activate the locking teeth. The white cover should properly hide the lock; check it again. Repeating the required steps becomes necessary if the shield is not covered properly. A final step tests the transmission for proper shifting followed by shift cable adjustment when gear positions fail to function correctly. Check for corrosion on the shift lever pin then replace it if needed.
Related 2001 GMC Yukon XL 1500 Parts
 2001 GMC Yukon XL 1500 Automatic Transmission Filter
 2001 GMC Yukon XL 1500 Automatic Transmission Seal
 2001 GMC Yukon XL 1500 Automatic Transmission Shifter
 2001 GMC Yukon XL 1500 Clutch Disc
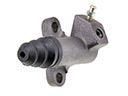 2001 GMC Yukon XL 1500 Clutch Slave Cylinder
 2001 GMC Yukon XL 1500 Flywheel
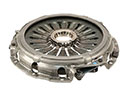 2001 GMC Yukon XL 1500 Pressure Plate
 2001 GMC Yukon XL 1500 Transfer Case
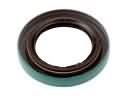 2001 GMC Yukon XL 1500 Transfer Case Seal
 2001 GMC Yukon XL 1500 Transmission Assembly
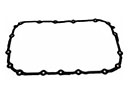 2001 GMC Yukon XL 1500 Transmission Gasket
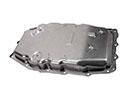 2001 GMC Yukon XL 1500 Transmission Pan