ChevyParts
My Garage
My Account
Cart
OEM 2003 Buick Rendezvous CV Boot
Axle Boot- Select Vehicle by Model
- Select Vehicle by VIN
Select Vehicle by Model
orMake
Model
Year
Select Vehicle by VIN
For the most accurate results, select vehicle by your VIN (Vehicle Identification Number).
3 CV Boots found

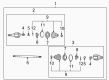
2003 Buick Rendezvous Boot Kit, Rear Part Number: 88891074
$50.08 MSRP: $122.21You Save: $72.13 (60%)Product Specifications- Other Name: Boot Kit, Rear Axle Universal Joint; CV Boot; Boots
- Position: Rear
- Item Weight: 1.00 Pounds
- Item Dimensions: 11.6 x 5.3 x 5.0 inches
- Condition: New
- Fitment Type: Direct Replacement
- SKU: 88891074
- Warranty: This genuine part is guaranteed by GM's factory warranty.

2003 Buick Rendezvous Inner CV Joint Boot, Front Part Number: 88897263
$55.42 MSRP: $111.28You Save: $55.86 (51%)Product Specifications- Other Name: Boot Kit, Front Wheel Drive Axle Shaft; CV Boot; Inner Boot
- Position: Front
- Item Weight: 1.20 Pounds
- Item Dimensions: 11.4 x 5.0 x 5.0 inches
- Condition: New
- Fitment Type: Direct Replacement
- Require Quantity: 2
- SKU: 88897263
- Warranty: This genuine part is guaranteed by GM's factory warranty.

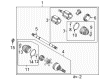
2003 Buick Rendezvous Outer CV Joint Boot, Front Part Number: 88897262
Product Specifications- Other Name: Boot Kit, Front Axle; CV Boot; Outer Boot; Boot Kit, Front Wheel Drive Axle Shaft
- Position: Front
- Item Weight: 1.20 Pounds
- Item Dimensions: 11.8 x 4.9 x 4.9 inches
- Condition: New
- Fitment Type: Direct Replacement
- Require Quantity: 2
- SKU: 88897262
- Warranty: This genuine part is guaranteed by GM's factory warranty.
2003 Buick Rendezvous CV Boot
With a comprehensive array of OEM 2003 Buick Rendezvous CV Boot, from fuel pumps to door handles, our website is a one-stop-shop for your needs. All our genuine 2003 Buick Rendezvous CV Boot are backed by the manufacturer's warranty and are offered at competitive prices in the market. Rest assured, you can shop with complete confidence.
2003 Buick Rendezvous CV Boot Parts Questions & Experts Answers
- Q: What tools are required to service and repair the front outer CV Boot and seal replacement on 2003 Buick Rendezvous?A: To service and repair the constant velocity joint boot for the front wheel drive shaft outer joint and seal replacement the following tools will be needed; drive shaft seal clamp pliers (J42572). First, start by wrapping a shop towel around the Axle Shaft and set the wheel drive shaft horizontally in a bench vise. Take off the large seal retaining clamp store on outer joint seal with the help of a side cutter or the appropriate tool and dispose of it. Do the same for the small seal retaining clamp. Frame and insert the joint outer race (large diameter end) such that the seal is separate from it and is placed at the rear of the joint face. Scrape the grease out of the joint inner race, cage, and balls and separate the outer joint from the Axle Shaft holding the joint housing and put a wood block between the seal and the joint and strike the wood block with a hammer to expel the Axle Shaft retaining clip. Remove the Axle Shaft retaining ring and the seal from the Axle Shaft and remove the wheel drive shaft from vise. Wrap shop towel around the outer race splined shaft of the joint and stick the outer race in a stand up in a bench vise. Tap gently on the joint cage with the brass drift and hammer to push a ball to the bottom of the track to expose the opposite ball for removal. Erect all six balls, ensuring to clean the inner race, outer race, cage, balls, and the Axle Shaft exposed end properly using clean solvent and dry all elements of parts. For assembly, take the larger radius ends of the cage's window and position the cage with the cage window up, secure the inner race into the cage, align the inner race to the cage ball tracks to the cage window. Take a shop towel, and wrap it around the joint outer race splined shaft, then take the outer race vertically and mount it in a bench vise, and then you want to align the cage and inner race to the outer race. Put in the cage and inner race into the outer race with the large radius corners of the cage windows up and the inner race grooved surface seen. Mounting balls according to the given sequence without leaving a gap area between the ball and the inner race ball track. Fill about 60 percent of the grease from the service kit in the outer joint spreading over the ball tracks, balls, cage, and inner race. Take out the outer joint from the bench vise, put a shop towel around the Axle Shaft, and place the wheel drive shaft horizontally in a bench vise. Mount a new small seal retaining clamp and then the seal, as well as a new chucking ring on the Axle Shaft. Place the outer joint horizontally, insert the inner race splines into the Axle Shaft splines and squeeze the Axle Shaft retaining ring into position with a flat-bladed tool. Drive the outer joint on to the shaft using a hammer until seated. With the remaining grease from the service kit, apply into the seal and place the small seal retaining clamp on onto the neck of the seal and adjust it to make sure there is a 2.5mm, (0.10 inch) width between the edge of the seal and the edge of the last Axle Shaft groove closing edge. Using the drive shaft seal clamp pliers (J42572), crimp the small seal retaining clamp to 136 nm (100 ft. Lbs.) and check the gap width, that lays within 2 and 3 mm (0.079 and 0.118 inch). Mount one of the large seal retaining clamps on the seal, adjust the fit to give 0.8mm (0.03 in.) space between the seal and the outer edge of the joint outer race last groove closing edge, and inspect the seal for shape and damage. Use the drive shaft seal clamp pliers (J42572) to crimp the seal retaining clamp to 136 nm (100 ft. Lbs.) and re-measure the gap width to verify good aspect between 2-3mm (0.079-0.118 inch). Finally, test the outer joint for smoothness via observing the wheel drive shaft by lifting it up vertically while turning it in a circular motion of four or five times.
Related 2003 Buick Rendezvous Parts
 2003 Buick Rendezvous Shift Cable
 2003 Buick Rendezvous Automatic Transmission Filter
 2003 Buick Rendezvous Differential
 2003 Buick Rendezvous Drive Shaft
 2003 Buick Rendezvous Flywheel
 2003 Buick Rendezvous Transfer Case
 2003 Buick Rendezvous Transmission Assembly
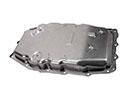 2003 Buick Rendezvous Transmission Pan