ChevyParts
My Garage
My Account
Cart
OEM 2004 Chevrolet Monte Carlo Intake Manifold
Engine Intake Manifold- Select Vehicle by Model
- Select Vehicle by VIN
Select Vehicle by Model
orMake
Model
Year
Select Vehicle by VIN
For the most accurate results, select vehicle by your VIN (Vehicle Identification Number).
5 Intake Manifolds found


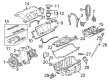
2004 Chevrolet Monte Carlo Intake Manifold Part Number: 24507501
Product Specifications- Other Name: Manifold, Engine Fuel Intake Manifold; Intake Plenum; Manifold
- Position: Upper
- Item Weight: 6.40 Pounds
- Item Dimensions: 8.3 x 21.0 x 12.2 inches
- Condition: New
- Fitment Type: Direct Replacement
- SKU: 24507501
- Warranty: This genuine part is guaranteed by GM's factory warranty.


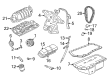
2004 Chevrolet Monte Carlo Intake Manifold Part Number: 89017272
Product Specifications- Other Name: Manifold Kit, Engine Fuel Intake Manifold; Intake Plenum
- Position: Upper
- Item Weight: 8.10 Pounds
- Item Dimensions: 24.5 x 14.2 x 7.8 inches
- Condition: New
- Fitment Type: Direct Replacement
- SKU: 89017272
- Warranty: This genuine part is guaranteed by GM's factory warranty.

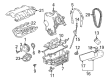
2004 Chevrolet Monte Carlo Intake Manifold Part Number: 19417844
Product Specifications- Other Name: Manifold, Engine Fuel Intake Manifold
- Replaces: 24505728, 24508923
- Item Weight: 13.10 Pounds
- Item Dimensions: 6.1 x 26.3 x 13.7 inches
- Condition: New
- Fitment Type: Direct Replacement
- SKU: 19417844
- Warranty: This genuine part is guaranteed by GM's factory warranty.
- Product Specifications
- Other Name: Manifold Assembly-Lower Intake; Manifold; Manifold, Engine Fuel Intake Manifold
- Position: Lower
- Item Weight: 13.30 Pounds
- Item Dimensions: 19.8 x 13.3 x 5.6 inches
- Condition: New
- Fitment Type: Direct Replacement
- SKU: 24505729
- Warranty: This genuine part is guaranteed by GM's factory warranty.

2004 Chevrolet Monte Carlo Intake Manifold Part Number: 12590280
Product Specifications- Other Name: Manifold, Engine Fuel Intake Manifold; Manifold
- Position: Lower
- Replaces: 12579681, 12582983, 24507497
- Item Weight: 13.20 Pounds
- Item Dimensions: 20.1 x 14.1 x 8.0 inches
- Condition: New
- Fitment Type: Direct Replacement
- SKU: 12590280
- Warranty: This genuine part is guaranteed by GM's factory warranty.
2004 Chevrolet Monte Carlo Intake Manifold
With a comprehensive array of OEM 2004 Chevrolet Monte Carlo Intake Manifold, from fuel pumps to door handles, our website is a one-stop-shop for your needs. All our genuine 2004 Chevrolet Monte Carlo Intake Manifold are backed by the manufacturer's warranty and are offered at competitive prices in the market. Rest assured, you can shop with complete confidence.
2004 Chevrolet Monte Carlo Intake Manifold Parts and Q&A
- Q: How to replace the lower intake manifold on 2004 Chevrolet Monte Carlo?A: To replace the lower Intake Manifold, disconnect the negative Battery Cable first then take out the upper Intake Manifold, left, and right valve Rocker Arm covers, as well as off the engine coolant temperature (ECT) sensor electrical connector. Next, the Fuel Injector and manifold absolute pressure (MAP) sensor wiring harness, fuel pipe clip bolt and clip and then Fuel Injector rail need to be removed. Change the position of the Power Steering Pump, disconnect the heater inlet pipe and the heater hose, disconnect the radiator inlet hose as well as the Thermostat bypass hose. Remove the lower Intake Manifold bolts and the manifold itself, the valve rocker arms, and pushrods and clean the surfaces of the gaskets. You need to remove and clean all the rtv sealant from the lower Intake Manifold and the engine block next, remove the ect sensor, water outlet bolts, and water outlet and then remove the Thermostat. Installation begins with the installation of the Thermostat and water outlet where the water outlet bolts are tightened up to 25 nm (18 ft. Lbs.). Install ect sensor making sure that all the possible gasket-mating surfaces are free from oil and foreign material using gm p/n 12346139 (Canadian P/N 10953463) or equivalent. Install the lower Intake Manifold gaskets, put a little drop of rts sealer, gm p/n 12346141 (Canadian P/N 10953433) or its equivalent, to the Intake Manifold obstruct block joint angles, and join the drops with a strip of rts sealer. Mount the valve rocker arms and pushrods while ensuring all lower Intake Manifold bolts will be cleaned and recycled when new bolts are unavailable, with a gm p/n 12345382 (Canadian P/N 10953489) or its equivalent. Torque down center bolts completely before diagonal ones for sealability, and apply crows foot type tool on bolted positions wt6 and wt. Hang in the lower Intake Manifold and tighten bolts in sequence to 7 nm (62 inch lbs.) on the first pass, followed by 13 nm (115 inch lbs) for bolts (1, 2, 3, 4), and 25 nm (18 ft. Lbs) for bolts (5, 6, 7, 8) on the tight pass. Replace the Thermostat bypass hose, radiator inlet hose, the heater inlet pipe, and fasten the heater inlet pipe nut 25 nm (18 ft. Lbs.). Put back the Power Steering Pump then the Fuel Injector rail assembly, not pressing on the fuel pressure regulator valve, and install the Fuel Injector O-Ring using gm p/n 12345616 (Canadian P/N 993182) or equivalent. Provide the injector nozzles with the machinations to the underside of the lower Intake Manifold injection bores and press the injector rail till the total deal into the machinations. Tighten the Fuel Injector rail bolts to 10 nm (89 inch lbs.) procedure followed by installing fuel feed and return pipe retaining clip and the bolt which should be tightened to 8 nm (71 inch lbs.). Moreover, connect Fuel Injector and MAP Sensor wiring harnesses, the ect sensor electrical connector and reinstall the valve Rocker Arm covers and upper Intake Manifold and then reconnect the negative Battery Cable and look for leaks.
Related 2004 Chevrolet Monte Carlo Parts
 2004 Chevrolet Monte Carlo Air Intake Coupling
 2004 Chevrolet Monte Carlo Fuel Filler Hose
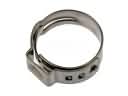 2004 Chevrolet Monte Carlo Fuel Line Clamps
 2004 Chevrolet Monte Carlo Fuel Pressure Sensor
 2004 Chevrolet Monte Carlo Fuel Pump
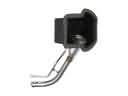 2004 Chevrolet Monte Carlo Fuel Tank Filler Neck
 2004 Chevrolet Monte Carlo Fuel Tank Sending Unit
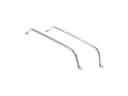 2004 Chevrolet Monte Carlo Fuel Tank Strap
 2004 Chevrolet Monte Carlo Intake Manifold Gasket
 2004 Chevrolet Monte Carlo Throttle Body
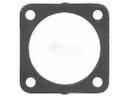 2004 Chevrolet Monte Carlo Throttle Body Gasket
 2004 Chevrolet Monte Carlo Vapor Pressure Sensor