ChevyParts
My Garage
My Account
Cart
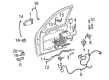
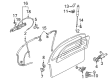
OEM 2005 Chevrolet Venture Door Handle
Inside Door Handle- Select Vehicle by Model
- Select Vehicle by VIN
Select Vehicle by Model
orMake
Model
Year
Select Vehicle by VIN
For the most accurate results, select vehicle by your VIN (Vehicle Identification Number).
23 Door Handles found


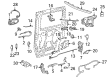
2005 Chevrolet Venture Handle, Outside, Driver Side Part Number: 10322223
$207.07 MSRP: $309.58You Save: $102.51 (34%)Ships in 1-2 Business DaysProduct Specifications- Other Name: Handle, Door Outside Handle; Exterior Door Handle
- Position: Driver Side
- Replaces: 10298454, 10280414
- Item Weight: 1.30 Pounds
- Item Dimensions: 5.2 x 5.3 x 11.3 inches
- Condition: New
- Fitment Type: Direct Replacement
- SKU: 10322223
- Warranty: This genuine part is guaranteed by GM's factory warranty.

2005 Chevrolet Venture Grip Handle, Gray, Rear Passenger Side Part Number: 10365684
$16.39 MSRP: $31.27You Save: $14.88 (48%)Product Specifications- Other Name: Handle, Rear Quarter And Roof Rail Assist Strap; Assist Strap
- Position: Rear Passenger Side
- Replaces: 10259208, 10437269
- Item Weight: 0.90 Pounds
- Item Dimensions: 8.2 x 5.5 x 1.5 inches
- Condition: New
- Fitment Type: Direct Replacement
- SKU: 10365684
- Warranty: This genuine part is guaranteed by GM's factory warranty.

2005 Chevrolet Venture Handle, Outside, Red, Passenger Side Part Number: 10341849
$12.16 MSRP: $49.93You Save: $37.77 (76%)Ships in 1-2 Business DaysProduct Specifications- Other Name: Exterior Door Handle
- Position: Passenger Side
- Item Weight: 0.90 Pounds
- Item Dimensions: 9.5 x 4.8 x 3.9 inches
- Condition: New
- SKU: 10341849
- Warranty: This genuine part is guaranteed by GM's factory warranty.
2005 Chevrolet Venture Handle, Outside, Passenger Side Part Number: 10322222
$160.87 MSRP: $232.18You Save: $71.31 (31%)Ships in 1-2 Business DaysProduct Specifications- Other Name: Handle, Door Outside Handle; Exterior Door Handle
- Position: Passenger Side
- Replaces: 10298455, 10280415
- Item Weight: 1.30 Pounds
- Item Dimensions: 5.2 x 5.2 x 11.1 inches
- Condition: New
- Fitment Type: Direct Replacement
- SKU: 10322222
- Warranty: This genuine part is guaranteed by GM's factory warranty.

2005 Chevrolet Venture Handle, Outside Part Number: 10322225
$8.81 MSRP: $13.12You Save: $4.31 (33%)Ships in 1-3 Business DaysProduct Specifications- Other Name: Handle, Door Outside Handle; Exterior Door Handle
- Position: Rear
- Replaces: 10333953, 10324099, 10322241, 10404749, 10404745, 10404751, 15146528, 15138024, 15928720, 15928724, 15928727, 10404755, 10333957, 10333955, 10404753, 10404735, 15105105, 15138029, 15146530, 15138019
- Item Weight: 1.30 Pounds
- Item Dimensions: 5.2 x 5.2 x 10.6 inches
- Condition: New
- Fitment Type: Direct Replacement
- SKU: 10322225
- Warranty: This genuine part is guaranteed by GM's factory warranty.

2005 Chevrolet Venture Handle, Outside, Black, Front Driver Side Part Number: 10322201
$42.59 MSRP: $63.40You Save: $20.81 (33%)Ships in 1-2 Business DaysProduct Specifications- Other Name: Handle Assembly-Front Side Door Outside *Black; Exterior Door Handle; Handle, Door Outside Handle
- Position: Front Driver Side
- Replaces: 10298451, 10271406
- Item Weight: 0.90 Pounds
- Item Dimensions: 12.0 x 6.6 x 4.4 inches
- Condition: New
- Fitment Type: Direct Replacement
- SKU: 10322201
- Warranty: This genuine part is guaranteed by GM's factory warranty.
2005 Chevrolet Venture Handle, Outside, Passenger Side Part Number: 19257094
$36.05 MSRP: $68.77You Save: $32.72 (48%)Product Specifications- Other Name: Handle, Door Outside Handle; Exterior Door Handle
- Position: Passenger Side
- Replaces: 10341850, 15138021, 10341848, 10344003
- Item Weight: 0.90 Pounds
- Item Dimensions: 9.2 x 4.8 x 4.0 inches
- Condition: New
- Fitment Type: Direct Replacement
- SKU: 19257094
- Warranty: This genuine part is guaranteed by GM's factory warranty.
2005 Chevrolet Venture Handle, Outside, Black, Front Passenger Side Part Number: 10340131
$53.99 MSRP: $77.25You Save: $23.26 (31%)Product Specifications- Other Name: Handle Assembly-Front Side Door Outside *Black; Exterior Door Handle; Handle, Door Outside Handle
- Position: Front Passenger Side
- Item Weight: 0.90 Pounds
- Item Dimensions: 11.5 x 4.9 x 4.9 inches
- Condition: New
- Fitment Type: Direct Replacement
- SKU: 10340131
- Warranty: This genuine part is guaranteed by GM's factory warranty.
- Product Specifications
- Other Name: Handle, Rear Quarter And Roof Rail Assist Strap; Assist Strap
- Position: Rear Passenger Side
- Replaces: 10259210, 10437268
- Item Weight: 0.90 Pounds
- Item Dimensions: 8.5 x 5.5 x 1.5 inches
- Condition: New
- Fitment Type: Direct Replacement
- SKU: 10365683
- Warranty: This genuine part is guaranteed by GM's factory warranty.
- Product Specifications
- Other Name: Handle Assembly-Front Side Door Outside *Blue; Exterior Door Handle
- Position: Front Passenger Side
- Item Weight: 0.90 Pounds
- Item Dimensions: 9.1 x 4.7 x 3.9 inches
- Condition: New
- SKU: 15146526
- Warranty: This genuine part is guaranteed by GM's factory warranty.
- Product Specifications
- Other Name: Handle, Door Outside Handle; Exterior Door Handle
- Position: Passenger Side
- Item Weight: 0.90 Pounds
- Item Dimensions: 9.3 x 4.7 x 4.0 inches
- Condition: New
- Fitment Type: Direct Replacement
- SKU: 15146525
- Warranty: This genuine part is guaranteed by GM's factory warranty.

 Product Specifications
- Other Name: Handle Assembly-Lift Gate Outside *Red T; Tailgate Handle; Handle
- Replaced by: 19257102
- Item Weight: 1.30 Pounds
- Item Dimensions: 6.3 x 6.1 x 28.4 inches
- Condition: New
- SKU: 15782413
- Warranty: This genuine part is guaranteed by GM's factory warranty.
2005 Chevrolet Venture Center Molding, Rear Part Number: 10409804
Product Specifications- Other Name: Handle, Rear Compartment Lid Or Tail Gate Latch; Tailgate Handle; Handle, Outside
- Position: Rear
- Replaces: 10401227, 10401228
- Item Weight: 2.20 Pounds
- Item Dimensions: 26.8 x 7.8 x 10.2 inches
- Condition: New
- Fitment Type: Direct Replacement
- SKU: 10409804
- Warranty: This genuine part is guaranteed by GM's factory warranty.

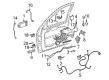
2005 Chevrolet Venture Handle, Inside Part Number: 10404436
Product Specifications- Other Name: Handle, Door Lock Inside Handle; Interior Door Handle
- Position: Rear
- Replaces: 10270448
- Item Weight: 0.60 Pounds
- Item Dimensions: 6.5 x 2.8 x 1.9 inches
- Condition: New
- Fitment Type: Direct Replacement
- SKU: 10404436
- Warranty: This genuine part is guaranteed by GM's factory warranty.
- Product Specifications
- Other Name: Handle, Rear Quarter And Roof Rail Assist Strap; Assist Strap
- Position: Rear Driver Side
- Replaces: 10267767, 10437273
- Item Weight: 1.00 Pounds
- Item Dimensions: 8.7 x 5.6 x 2.9 inches
- Condition: New
- Fitment Type: Direct Replacement
- SKU: 10365686
- Warranty: This genuine part is guaranteed by GM's factory warranty.
- Product Specifications
- Other Name: Handle, Rear Quarter And Roof Rail Assist Strap; Assist Strap
- Position: Rear Driver Side
- Replaces: 10267769, 10437272
- Item Weight: 0.70 Pounds
- Item Dimensions: 8.5 x 5.8 x 2.9 inches
- Condition: New
- Fitment Type: Direct Replacement
- SKU: 10365685
- Warranty: This genuine part is guaranteed by GM's factory warranty.
 Product Specifications
- Other Name: Handle, Door Lock Inside Handle; Interior Door Handle
- Position: Passenger Side
- Item Weight: 0.50 Pounds
- Item Dimensions: 6.3 x 3.3 x 3.0 inches
- Condition: New
- Fitment Type: Direct Replacement
- SKU: 16630672
- Warranty: This genuine part is guaranteed by GM's factory warranty.
- Product Specifications
- Other Name: Handle, Door Lock Inside Handle; Interior Door Handle
- Position: Driver Side
- Item Weight: 0.50 Pounds
- Item Dimensions: 6.3 x 4.1 x 4.2 inches
- Condition: New
- Fitment Type: Direct Replacement
- SKU: 16630673
- Warranty: This genuine part is guaranteed by GM's factory warranty.
- Product Specifications
- Other Name: Handle, Door Outside Handle; Exterior Door Handle
- Position: Driver Side
- Replaces: 10299010, 10271495, 10271511, 10333951, 15146524, 10271507, 10271505, 10333947, 10271501, 10324097, 10299008, 10298449, 10298928, 10298992, 10298994, 10333949, 15146523
- Item Weight: 1.10 Pounds
- Item Dimensions: 12.3 x 6.6 x 4.6 inches
- Condition: New
- Fitment Type: Direct Replacement
- SKU: 10322203
- Warranty: This genuine part is guaranteed by GM's factory warranty.
2005 Chevrolet Venture Handle, Outside Part Number: 15850463
Product Specifications- Other Name: Handle Assembly-Lift Gate Outside *Cashmere; Tailgate Handle; Handle, Rear Compartment Lid Or Tail Gate Latch; Handle, End Gate Lock
- Replaced by: 19257102
- Item Weight: 1.50 Pounds
- Item Dimensions: 5.2 x 5.2 x 26.2 inches
- Condition: New
- Fitment Type: Direct Replacement
- SKU: 15850463
- Warranty: This genuine part is guaranteed by GM's factory warranty.
| Page 1 of 2 |Next >
1-20 of 23 Results
2005 Chevrolet Venture Door Handle
With a comprehensive array of OEM 2005 Chevrolet Venture Door Handle, from fuel pumps to door handles, our website is a one-stop-shop for your needs. All our genuine 2005 Chevrolet Venture Door Handle are backed by the manufacturer's warranty and are offered at competitive prices in the market. Rest assured, you can shop with complete confidence.
2005 Chevrolet Venture Door Handle Parts Questions & Experts Answers
- Q: How to replace the outer door handle of a sliding door on 2005 Chevrolet Venture?A: Replacements for the sliding door outside handle begin with removing the sliding door inner trim panel and sliding door water deflector. After detaching control rods from the locking cylinder you must remove the barrel nut from the assembly before pushing the rod away from the sliding door lock hardware. When equipped, disconnect the sliding door lock module's harness connector followed by removal of sliding Door Handle lock actuator screws and lock assembly separation from the sliding door. Start by separating the lock assembly from its outside cable piece and then remove both the sliding door outside handle bolts. Finally detach the outside handle cable from the outside handle. Begin outside handle installation by connecting the cable to the outside handle before securing the sliding door outside handle onto its corresponding position. Screw down sliding door outside handle nuts with a torque setting of 10 n.m (89 lb in). The outside handle cable must now be attached to the lock assembly before installation of the lock assembly onto the sliding door with handle lock actuator screws reaching 10 n.m torque (89 lb in). Reconnect the sliding door lock module harness connector and push the lock rod toward the sliding door lock assembly before snapping the barrel nut onto its proper place. To finish installation replace the control rods on the sliding door outside handle while making certain lock rod travel functions correctly before reinstalling the sliding door water deflector and its inner trim panel.
Related 2005 Chevrolet Venture Parts
 2005 Chevrolet Venture Window Motor
 2005 Chevrolet Venture Door Hinge
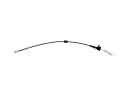 2005 Chevrolet Venture Door Latch Cable
 2005 Chevrolet Venture Door Lock
 2005 Chevrolet Venture Door Moldings
 2005 Chevrolet Venture Door Seal
 2005 Chevrolet Venture Door Striker
 2005 Chevrolet Venture Lift Support
 2005 Chevrolet Venture Liftgate Hinge
 2005 Chevrolet Venture Tailgate Lock
 2005 Chevrolet Venture Trunk Latch
 2005 Chevrolet Venture Window Channel