
Popular OEM Chevrolet Venture Parts
- Body & Hardware Parts View More >
- Steering Parts View More >
- Electrical Parts View More >
- Air & Fuel Delivery Parts View More >
- Charging & Starting Parts View More >
- Engine Parts View More >
- Belts & Cooling Parts View More >
- Suspension Parts View More >
- Emission Control & Exhaust Parts View More >
- Transmission Parts View More >
- Brakes Parts View More >
- Headlights & Lighting Parts View More >


Why Buy Genuine Chevrolet Venture Parts From ChevyPartsGiant.com
Looking for real Chevrolet Venture parts? ChevyPartsGiant.com may be a better choice to find genuine parts at wallet-friendly prices. We sell only OEM Chevrolet Venture parts, ensuring perfect fit, reliability, and long-term performance. With our website, you can easily get access to the same parts found at local Chevrolet stores. All components are produced by Chevrolet and are exclusively fitted on Chevrolet Venture automobiles. By shopping at our store, you can enjoy the quality of the Chevrolet factory without the high prices of brick-and-mortar facilities. We achieve this because we are an online store operating at lower costs, which we pass on to you. We also have a user-friendly platform where you can find and order genuine Chevrolet Venture parts swiftly. We are here to make your process of restoring a Chevrolet Venture or dealing with simple repairs quick and inexpensive. We also make it easy to obtain Chevrolet Venture parts at competitive shipping prices and a team of knowledgeable staff ready to take your order. Choose ChevyPartsGiant.com to save time and money, as well as keep your Chevrolet Venture in the good condition.
Between 1997 and 2005 Chevrolet produced the Venture as a compact passenger van that ran a rugged 3.4L LA1 V6 engine which provided 180 horsepower initially but gained an extra 5 horsepower upon its update in 1999. the Chevrolet Venture's three-point-four liter V6 engine provides constant power output through its automatic transmission system as it sends 285 Nm torque to reach peak performance at 2,800 rpm within urban driving conditions. The fuel efficiency of the Chevrolet Venture reaches 19 mpg in urban driving and 26 mpg on highway trips because it was designed for practical family use. While the 3.4L engine and four-speed automatic transmission perform adequately, newer competitors in the minivan segment now feature more refined and quieter transmissions with improved driving dynamics. During long drives the Chevrolet Venture chassis gives smooth rides by handling bumps efficiently and includes standard anti-lock brakes for safety. Users can select from two different wheelbase models on this vehicle which provides a maximum cargo loading capability of 3,500 pounds. The Chevrolet Venture provides useful dimensions and comfortable features despite its dimensions that fall slightly short of equivalent models. Those who want to preserve their Chevrolet Venture can obtain genuine parts that keep the vehicle compliant with manufacturer standards for quality assurance which extends both performance and durability.
Three concerns have been grouped into Chevrolet Venture as engine sealing, steering hydraulics, and emissions evaporative control. In engine sealing, Venture has a tendency to leak at the intake manifold gasket. Rough idle and bearing damage may result because coolant and oil can mix. Use pressure tests on the system, repair the intake manifold gasket, and seal any external guide post. Change contaminated oil, coolant, and ensure stable temperatures and a clean exhaust pipe. The Chevrolet Venture can lose its power steering through high high-pressure power steering hose in the steering hydraulics. Low supply and aeration are indicated by the fluid drips and a whining pump. Check all power steering hoses; check pump and rack connections, bleed system thoroughly, and check or replace water pumps. Clean the area and ensure dry lines following a road test. The Chevrolet Venture could also cause a worn gas cap to light up in the evaporative controls. Damaged seal/loose cap, this voids the seal, allowing vacuum loss and EVAP leakage. Install a new gas cap, clear the gas caps, and run a smoke test to ensure it is sealed. The Venture needs to be looked at through the eyes when inspecting grounds and connectors. The repairs must pass monitors, the Chevrolet Venture should exhibit clean starts, quiet steering, and quiet starts.
Chevrolet Venture Parts Questions & Answers
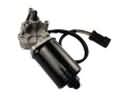
- Q: How to replace the alternator on Chevrolet Venture?A:Firstly, disconnect the battery ground (negative) cable. Pull out the windshield wiper system module cover and turn the engine to the front position to gain access. Next, disconnect the generator b+ terminal nut and generator b+ lead with the electrical connector. Take out the bolts at the rear and in front of the generator. Take the Drive Belt off the generator. Gently remove the generator from the bracket and place it over the drive axle. Take off the Drive Belt tensioner unit, generator bracket, and then separate the power steering pipes from the retainer without taking them off from the pump. Pull off the fuel pressure test port cap of the fuel injector rail and relocate the Power Steering Pump ahead of the timing chain cover to gain access for the generator. Finally, take the generator out from the vehicle. When installing, place the generator over the driver axle and lock it to the vehicle. Replace the Power Steering Pump, fuel pressure test port cap, and power steering pipes. Mount the generator bracket and Drive Belt tensioner and secure the generator to the bracket with the front bolt and rear bolts, tighten to 50 n.m (37 lb ft). Replace the Drive Belt, the generator electrical connector, b+ lead, and b+ terminal nut and tighten it to 13 n.m (115 lb in). Rotate the engine rearwards and drive in the engine mount strut bracket bolts but replace your windshield wiper system module cover and reconnect your battery ground (negative) cable.
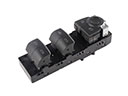
- Q: How to replace the front center console on Chevrolet Venture?A:For replacement of the front floor console, first of all, it is necessary to unsnap the CD player plate and remove the CD player in case it is equipped. Then, unscrew the bolts/screws from the front floor console and the bracket and pull out the console from the bracket. The installation involves aligning the front console tabs to the rear bracket and then to the front bracket and sliding in the tabs for it. Insert the bolts/screws into the front floor console at the bracket and tighten them to 2.5 N.m (22 lb in). Finally, reinstall the CD player when well as CD player trim plate if equipped.
- Q: How to replace or repair an emblem/nameplate on a door on Chevrolet Venture?A:You need to secure the installation area with tape before placing alignment marks to put on or fix a door emblem/nameplate. Apply heat from the J 25070 heat gun over the emblem/nameplate in circular motions for 30 seconds while keeping the gun 152 mm away from the surface. You can take out the emblem/nameplate using a plastic tool and flat blade. Body parts need the 3M(TM) Scotch Brite molding adhesive remover disk (3M(TM) P/N 07501) while plastic parts should be cleaned with a lint-free cloth dipped in VMP naphtha or a 50/50 isopropyl alcohol-water mix. Use the same cloth with cleaning solution to wipe the prepared area afterward and dry it completely. Apply tape to indicate the spot when no marking already exists. Mount the LS emblem/nameplate properly while placing the MONTANA emblem/nameplate 33.35 mm (1.313 in) from top of the side molding down and 38.1 mm (1.50 in) from the door front edge to its front edge. Position the WB emblem/nameplate 5.512 inches above and 2.640 inches away from its specific installation point. Fix the PREMIERE emblem/nameplate at 41 mm (1.614 in) down from the top and 60 mm (2.362 in) across from the left edge. To install the MONTANA THUNDER emblem/nameplate position it with dimensions of 70mm x 195mm and 95mm. The ends should measure 30mm and 70mm respectively. You must heat the installation spot to 27-41°C using J 25070 (Heat Gun) until it reaches 80-105°F. Keep the emblem/nameplate surface at 29-32°C. Place the emblem/nameplate according to the reference marks and remove the protection film. Then press it firmly while ensuring proper surface contact all around. Dispel the protective backing from the surface where it will be attached.
- Q: How to remove and install a steering wheel on Chevrolet Venture?A:Before you begin to remove the Steering Wheel you should first disable the sir system by turning off the ignition key. Next, remove the inflator module. Mark an alignment reference point into the Steering Wheel hub when Steering Wheel hub alignment marks are absent. Do this by aligning the mark with the Steering Shaft mark. Set the Steering Wheel nut to the surface of the steering column shaft end before you loosen it. The j 1859-a Steering Wheel puller (J 1859-A) with j 42578 Steering Wheel puller legs (J 42578) must be used on pontiac vehicles to loosen the Steering Wheel. Both chevrolet and oldsmobile vehicles need only the j 1859-a to loosen their steering wheels. First disconnect any available Steering Wheel control electrical connector followed by removing the horn switch lead from the steering hub. Start by removing the Steering Wheel nut before pulling out the Steering Wheel from the Steering Shaft. Follow the instructions to disconnect and remove the Steering Wheel controls when they are equipped. Posting the Steering Wheel controls and harness onto the Steering Wheel should be accompanied by steering sir connector routing and precise Steering Shaft and wheel mark alignment before final Steering Wheel installation. Secure the Steering Wheel nut with 45 nm of torque (33 ft. Lbs.). Reinstall the horn switch lead and steer wheel controls electrical connector before placing the inflator module. Complete the sir system activation process then ensure all equipment works correctly including horn operation when vehicle has Steering Wheel controls.


