ChevyParts
My Garage
My Account
Cart
OEM 2005 GMC Canyon CV Boot
Axle Boot- Select Vehicle by Model
- Select Vehicle by VIN
Select Vehicle by Model
orMake
Model
Year
Select Vehicle by VIN
For the most accurate results, select vehicle by your VIN (Vehicle Identification Number).
2 CV Boots found


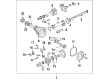
2005 GMC Canyon Outer Boot Part Number: 89040354
Product Specifications- Other Name: Boot Kit, Front Axle; CV Boot
- Position: Front
- Item Weight: 2.20 Pounds
- Item Dimensions: 8.0 x 6.9 x 6.7 inches
- Condition: New
- Fitment Type: Direct Replacement
- SKU: 89040354
- Warranty: This genuine part is guaranteed by GM's factory warranty.

2005 GMC Canyon Inner Boot Part Number: 89040355
Product Specifications- Other Name: Boot Kit, Front Axle; CV Boot
- Position: Front
- Item Weight: 1.60 Pounds
- Item Dimensions: 6.4 x 4.4 x 4.2 inches
- Condition: New
- Fitment Type: Direct Replacement
- SKU: 89040355
- Warranty: This genuine part is guaranteed by GM's factory warranty.
2005 GMC Canyon CV Boot
With a comprehensive array of OEM 2005 GMC Canyon CV Boot, from fuel pumps to door handles, our website is a one-stop-shop for your needs. All our genuine 2005 GMC Canyon CV Boot are backed by the manufacturer's warranty and are offered at competitive prices in the market. Rest assured, you can shop with complete confidence.
2005 GMC Canyon CV Boot Parts and Q&A
- Q: How to replace the outer CV boot on the wheel drive shaft on 2005 GMC Canyon?A: The replacement of the outer wheel drive shaft outer joint together with boot requires these essential tools: the replacement requires drive axle seal clamp plier j 35910 alongside snap ring pliers j 8059. Drive axle seal clamp plier (J 35910) and snap ring pliers (J 8059). First remove the inner seal before you cut the large retaining clamp at the c/v joint using a hand grinder. After cutting discard this clamp. Cut through and eliminate the small retaining clamp on the outer seal's little end. Keep the c/v joint connected to the driveshaft bar since removing it would require a new complete driveshaft replacement. Replace the outer c/v joint seal with new grease then dry the c/v joint completely before packing it with cleaning debris. Begin by filling the c/v joint assembly with pre-packaged grease from the kit followed by installation of the new small retaining clamp then new large retaining clamp onto the outer seal. Place the small end of the outer seal into the c/v joint outer seal groove of the driveshaft bar using only the proper fasteners at their assigned locations. Gather a torque wrench and breaker bar with the drive axle seal clamp plier (J 35910) to tighten the small retaining clamp to the outer seal at 136 nm (100 lb ft). Guide the large exterior part of the seal onto the c/v joint before placing the lip into its groove and smooth out air bubbles through outer seal manipulation. User must install the large retaining clamp to the c/v joint housing by using the drive axle seal clamp plier (J 35910) together with a breaker bar and torque wrench to achieve 176 nm (130 lb ft) torque. Users must then check the clamp ear gap dimension before angulating the c/v joint multiple times to spread the grease and finally installing the inner seal.
Related 2005 GMC Canyon Parts
 2005 GMC Canyon Sway Bar Link
 2005 GMC Canyon 4WD Actuator
 2005 GMC Canyon Axle Shaft
 2005 GMC Canyon Ball Joint
 2005 GMC Canyon Coil Spring Insulator
 2005 GMC Canyon Control Arm
 2005 GMC Canyon Control Arm Bolt
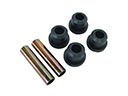 2005 GMC Canyon Leaf Spring Bushing
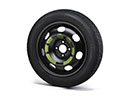 2005 GMC Canyon Spare Wheel
 2005 GMC Canyon Sway Bar Bracket
 2005 GMC Canyon Sway Bar Bushing
 2005 GMC Canyon Sway Bar Kit