ChevyParts
My Garage
My Account
Cart
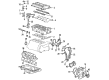
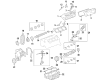
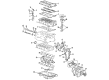
OEM 2006 Chevrolet Malibu Timing Chain
Engine Timing Chain- Select Vehicle by Model
- Select Vehicle by VIN
Select Vehicle by Model
orMake
Model
Year
Select Vehicle by VIN
For the most accurate results, select vehicle by your VIN (Vehicle Identification Number).
3 Timing Chains found

2006 Chevrolet Malibu Timing Chain, Green Line Part Number: 24461834
$90.14 MSRP: $217.34You Save: $127.20 (59%)Ships in 1-2 Business DaysProduct Specifications- Other Name: Chain, Engine Timing
- Replaces: 90537338
- Item Weight: 1.40 Pounds
- Item Dimensions: 5.8 x 2.9 x 0.7 inches
- Condition: New
- Fitment Type: Direct Replacement
- SKU: 24461834
- Warranty: This genuine part is guaranteed by GM's factory warranty.

2006 Chevrolet Malibu Timing Chain Part Number: 24506090
$69.34 MSRP: $118.06You Save: $48.72 (42%)Ships in 1-2 Business DaysProduct Specifications- Other Name: Chain, Engine Timing
- Item Weight: 1.30 Pounds
- Item Dimensions: 4.2 x 12.2 x 1.1 inches
- Condition: New
- Fitment Type: Direct Replacement
- SKU: 24506090
- Warranty: This genuine part is guaranteed by GM's factory warranty.

2006 Chevrolet Malibu Camshaft Gear, Green Line Part Number: 12604864
Product Specifications- Other Name: Chain Kit, Engine Crankshaft And Camshaft Balancer; Balance Shaft Chain; Chain; Gear; Sprocket
- Replaces: 21018823
- Item Weight: 1.60 Pounds
- Item Dimensions: 14.7 x 9.4 x 3.4 inches
- Condition: New
- Fitment Type: Direct Replacement
- SKU: 12604864
- Warranty: This genuine part is guaranteed by GM's factory warranty.
2006 Chevrolet Malibu Timing Chain
With a comprehensive array of OEM 2006 Chevrolet Malibu Timing Chain, from fuel pumps to door handles, our website is a one-stop-shop for your needs. All our genuine 2006 Chevrolet Malibu Timing Chain are backed by the manufacturer's warranty and are offered at competitive prices in the market. Rest assured, you can shop with complete confidence.
2006 Chevrolet Malibu Timing Chain Parts and Q&A
- Q: How to replace the timing chain, sprockets, and tensioner on 2006 Chevrolet Malibu?A: You need to start your work on Timing Chain replacement and sprocket repair along with tensioner replacements by first removing the Camshaft cover then lifting the vehicle. After removing the engine front cover you should lower the vehicle. Attach a 24mm open-end wrench to rotate the Camshaft clockwise until the no.1 Piston reaches around 60 degrees before top dead center and confirm position with the diamond-shaped hole on the intake Camshaft sprocket facing the 12 o'clock mark. To begin the process remove the spark plugs for easier rotation while also removing the Timing Chain Tensioner and fixed Timing Chain Guide access plug and upper Timing Chain Guide and fixed Timing Chain Guide. Holding the camshafts with a 24 mm wrench users can remove the exhaust Camshaft sprocket bolt and sprocket followed by the Timing Chain Tensioner guide then intake Camshaft sprocket bolt and sprocket and finally the Timing Chain through the top of the cylinder head. Start by removing the crankshaft sprocket, alongside oil nozzle and bolt and balance shaft drive chain tensioner followed by adjustable balance shaft chain guide, small balance shaft drive chain guide, and upper balance shaft drive chain guide. The key to successful balance shaft drive chain removal requires all slack to exist between crankshaft and water pump sprockets. Begin installation by mounting the upper balance shaft chain guide then torque its bolts to 15 nm (133 inch lbs.). Install the balance shaft drive chain placing the colored links in correct positions according to the balance shaft drive sprockets and crankshaft sprocket timing marks so the copper colored link faces the intake side balance shaft sprocket mark and the first chrome link points to the crankshaft drive sprocket and the last chrome link lines up with the exhaust side balance sha place the small balance shaft chain guide before securing its bolts to 10 nm (89 inch lbs.). Next install the adjustable balance shaft drive chain guide and secure its bolts to the same torque setting. Slip the plunger handle by 90 degrees while using a paper clip to test the tension before adding the tensioner fixture and tightening its assembly bolts to 10 nm torque (89 inch lbs.). Begin installation of the crankshaft sprocket with the timing mark positioned at the 5 o'clock mark after you install the oil nozzle and clamp it in place with 10 nm (89 inch lbs.) torque. Lower the Timing Chain through the cylinder head opening before leading the chain around both cylinder block bosses and install the intake Camshaft sprocket with the int diamond facing the 2 o'clock mark. Hand tighten a new intake Camshaft sprocket bolt before continuing. Guide the Timing Chain beneath the crankshaft sprocket next to the intake Camshaft sprocket while both timing marks should sit side by side. Fit the Timing Chain Tensioner guide securing its bolt at 10 nm (89 inch lbs.) before adding the exhaust Camshaft sprocket which requires position of the exh triangle marker at the 10 o'clock spot. Using a 24mm wrench to rotate the Camshaft minimally allows the exhaust sprocket to reach proper alignment before torquing a new exhaust Camshaft sprocket bolt. Install the fixed Timing Chain Guide while applying gm p/n 12378521 (Canadian P/N 88901148) sealant to the bolt access hole then tighten the plug with 90 nm (66 ft. Lbs.). Tighten the Timing Chain Guide bolts to 15 nm (133 inch lbs.). Secure the Timing Chain upper guide with 10 nm torque (89 inch lbs.) tension. Check the Timing Chain Tensioner for damage and replace it only if required. If necessary, replace it. A fresh Timing Chain Tensioner assembly should measure 72 mm (2.83 inch) when compressed. Start by inserting the Piston assembly into j 45027-2 placed in a vise. Then use j 45027-1 to turn the ratchet cylinder successfully. Before mounting the compressed Piston assembly into the tensioner bore apply j 45027-2 to the bottom with j 45027-1 pressed against j 45027-2 to achieve a length of 72 mm (2.83 inch). Plant the Timing Chain Tensioner into position then tighten it with a torque of 75 nm (55 ft. Lbs.). A rubber-tipped inspection tool should activate the tensioner before you use a 24 mm wrench to secure the Camshaft in place. Then use the tool to tighten the new Camshaft bolts to a torque spec of 85 nm (63 ft. Lbs.) plus 30 degrees. After the Camshaft cover installment customers should follow procedures by raising the vehicle to place the engine front cover then lowering the vehicle while connecting the negative Battery Cable.
Related 2006 Chevrolet Malibu Parts
 2006 Chevrolet Malibu Balance Shaft Bearing Set
 2006 Chevrolet Malibu Cam Gear
 2006 Chevrolet Malibu Camshaft Bearing
 2006 Chevrolet Malibu Coolant Filter
 2006 Chevrolet Malibu Crankshaft
 2006 Chevrolet Malibu Engine Mount
 2006 Chevrolet Malibu Pushrod
 2006 Chevrolet Malibu Rod Bearing
 2006 Chevrolet Malibu Timing Belt Tensioner
 2006 Chevrolet Malibu Timing Chain Guide
 2006 Chevrolet Malibu Timing Cover
 2006 Chevrolet Malibu Valve Cover Grommet