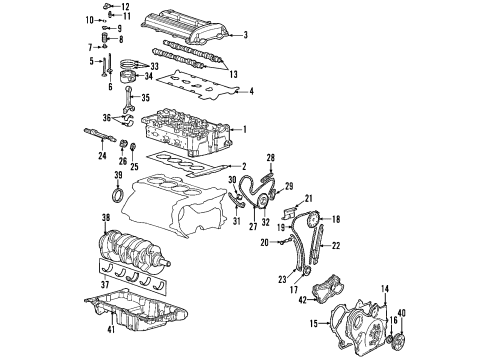
For removal of Timing Chain, sprockets, or tensioner, collect the needed tools:. Tensioner tool (J 45027). Unbolt the Camshaft cover and lift the vehicle. Then take away engine front cover and bring the vehicle down. A 24-mm open-end wrench is used to rotate the Camshaft clockwise, putting the number 1 Piston around 60 degree to top dead center (TDC). Take off the spark plugs to facilitate rotation. Go ahead and take out the Timing Chain Tensioner, fixed Timing Chain Guide access plug, fixed Timing Chain Guide, upper Timing Chain Guide, and hold the camshafts using a 24 mm wrench. The part to be removed next is the exhaust Camshaft sprocket bolt which is to be removed and discarded. Next is removal of the exhaust Camshaft sprocket, Timing Chain tensioner guide, intake Camshaft sprocket bolt and finally the intake Camshaft sprocket. Eliminate the Timing Chain from the top of the cylinder head as well as two crankshaft sprocket, oil nozzle and bolt, balance shaft drive chain tensioner, adjustable balance shaft chain guide, small balance shaft drive chain guide, upper balance shaft drive chain guide. If removal of the balance shaft drive chain proves troublesome, the air intake pipes need to have all slack taken up between the crankshaft and water pump sprockets. For installation, begin with the upper chain guide for the balance shaft much like you tighten up the bolts on it to 10 nm (89 inch lbs.). Scribble cam balance shaft drive chain, aligning the colored links with timing marks on the sprockets. Install the small balance shaft chain guide and tighten bolts to 10 nm (89 inch lbs) followed by adjustable balance shaft drive chain guide of the same torque value. Turn the tensioner plunger by 90 degrees, press it until the paper clip can be inserted, and then install Timing Chain Tensioner and tighten its bolts to 10 nm (89 inch lbs). Consequently, take off the paper clip, put the oil nozzle and bolt, tighten to 10 nm (89 inch lbs.), and install the crankshaft sprocket with the timing mark at the 5 o'clock position. Lower Timing Chain through the cylinder head taking along the opension around both sides of the cylinder block bosses. Install the intake Camshaft sprocket and set theint diamond at 2:00 position; hand-tight a new intake Camshaft sprocket bolt. Run the Timing Chain around the crankshaft and intake Camshaft sprockets so that the links with the corresponding colors are matched. After that, install the Timing Chain Tensioner guide and tighten its bolt at 10 nm (89 inch lbs); install the exhaust Camshaft sprocket with the same colored link at the triangle of exh at the 10 o'clock position. Shift the Camshaft slightly with a 24 mm wrench till the exhaust sprocket comes into line, then bolt a new exhaust Camshaft sprocket with a wrench by hand. Mount the fixed Timing Chain Guide and tighten the bolt to 10 nm (89-inch lbs), apply sealant on the Timing Chain Guide bolt access hole plug, and tighten to 90 nm (59 ft. Lbs). Mount the Timing Chain upper guide and lock up its bolts to 10 nm (89 inch lbs.). Check the tensioner Timing Chain and, if needed, replace it. Measure the tensioner assembly Timing Chain. Round up to two decimals: it should be 72mm (2.83 inch) when fully compressed. Otherwise, pull out the Piston assembly, place it in j 45027-2 in a vise, and insert a Piston assembly then apply torque to the ratchet cylinder using j 45027-1. Clean the tensioner bore and then install the compressed Piston assembly with the assembly measuring about 72mm (2.83 inch). Put on the Timing Chain Tensioner and tighten to 75 nm (55 ft. Lbs.). Use adequate tools with rubber tip to release the tensioner, while using a 24mm wrench to hold the cam shaft, the following is done; tight the replacing cam shaft together with the bolts in 85 nm (63 ft. Lbs) along with the 30°. Finally, tighten the Camshaft cover, lift the vehicle, install the engine front cover, drop the vehicle and connect the negative Battery Cable.
Posted by ChevyPartsGiant Specialist