ChevyParts
My Garage
My Account
Cart
OEM 2004 Chevrolet Malibu Timing Chain
Engine Timing Chain- Select Vehicle by Model
- Select Vehicle by VIN
Select Vehicle by Model
orMake
Model
Year
Select Vehicle by VIN
For the most accurate results, select vehicle by your VIN (Vehicle Identification Number).
3 Timing Chains found

2004 Chevrolet Malibu Timing Chain, Green Line Part Number: 24461834
$90.14 MSRP: $217.34You Save: $127.20 (59%)Ships in 1-2 Business DaysProduct Specifications- Other Name: Chain, Engine Timing
- Replaces: 90537338
- Item Weight: 1.40 Pounds
- Item Dimensions: 5.8 x 2.9 x 0.7 inches
- Condition: New
- Fitment Type: Direct Replacement
- SKU: 24461834
- Warranty: This genuine part is guaranteed by GM's factory warranty.

2004 Chevrolet Malibu Timing Chain Part Number: 24506090
$69.34 MSRP: $118.06You Save: $48.72 (42%)Ships in 1-2 Business DaysProduct Specifications- Other Name: Chain, Engine Timing
- Item Weight: 1.30 Pounds
- Item Dimensions: 4.2 x 12.2 x 1.1 inches
- Condition: New
- Fitment Type: Direct Replacement
- SKU: 24506090
- Warranty: This genuine part is guaranteed by GM's factory warranty.

2004 Chevrolet Malibu Camshaft Gear, Green Line Part Number: 12604864
Product Specifications- Other Name: Chain Kit, Engine Crankshaft And Camshaft Balancer; Balance Shaft Chain; Chain; Gear; Sprocket
- Replaces: 21018823
- Item Weight: 1.60 Pounds
- Item Dimensions: 14.7 x 9.4 x 3.4 inches
- Condition: New
- Fitment Type: Direct Replacement
- SKU: 12604864
- Warranty: This genuine part is guaranteed by GM's factory warranty.
2004 Chevrolet Malibu Timing Chain
With a comprehensive array of OEM 2004 Chevrolet Malibu Timing Chain, from fuel pumps to door handles, our website is a one-stop-shop for your needs. All our genuine 2004 Chevrolet Malibu Timing Chain are backed by the manufacturer's warranty and are offered at competitive prices in the market. Rest assured, you can shop with complete confidence.
2004 Chevrolet Malibu Timing Chain Parts and Q&A
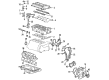
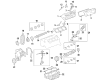
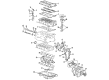
- Q: How to replace the camshaft timing chain, sprocket, and tensioner on 2004 Chevrolet Malibu?A: After removing the Camshaft cover you must raise the vehicle for this Camshaft Timing Chain and sprocket and tensioner replacement operation. Next follow these steps: extract the no. 1 cylinder's Spark Plug then crank the shaft clockwise to place the no. 1 Piston at top dead center during its compression stroke. Start by dropping the vehicle to the ground after removing the engine front cover. Oxygen supply chain tensioner removal must come first to empty tension from the chain because otherwise the Timing Chain could become twisted during removal and lead to increased difficulty. The next steps include eliminating the Timing Chain Tensioner along with the fixed Timing Chain Guide access plug then the fixed Timing Chain Guide and upper Timing Chain Guide while using a 24 mm wrench to immobilize any Camshaft rotation. The service begins with removal of the exhaust Camshaft sprocket bolt and subsequent disposal of the bolt before moving on to extract the exhaust Camshaft sprocket and Timing Chain Tensioner guide and intake Camshaft sprocket bolt (discard) and intake Camshaft sprocket. Start by pulling out the Timing Chain through the top of the cylinder head then uninstall the Crankshaft sprocket, oil nozzle and bolt, balance shaft drive chain tensioner, adjustable balance shaft chain guide, small balance shaft drive chain guide, and upper balance shaft drive chain guide. When removing the balance shaft drive chain make sure all chain slack exists between the Crankshaft and water pump sprockets first. The installation process requires correct fasteners in appropriate positions while securing upper balance shaft chain guide bolts to 15 nm (133 lb in). To install the balance shaft drive chain correctly follow these steps: use colored links to match the marks on the balance shaft drive sprockets and Crankshaft sprocket by having the copper colored link touch the intake side balance shaft sprocket timing mark then position the first chrome link at the Crankshaft drive sprocket and finally use the last chrome link to align with the exhaust side balance shaft drive sprocket. The small balance shaft chain guide requires installation first. After installing you must tighten the guiding bolts to 10 nm (89 lb in), followed by the adjustable balance shaft drive chain guide. The tensioner plunger requires a 90-degree rotation before you should compress it just enough to fit a paper clip inside. Next, install the Timing Chain Tensioner and torque its bolts to 10 nm (89 lb in). Follow these next steps: install the oil nozzle then bolt with a torque of 10 nm before setting the Crankshaft sprocket at its specific timing position. Position the Timing Chain through the cylinder head opening so it flows around both sides of the cylinder block bosses before installing the intake Camshaft sprocket with int diamond facing 2 o'clock while securing its new intake Camshaft sprocket bolt with light hand torque. Shape the Timing Chain to flow past the Crankshaft sprocket and intake Camshaft sprocket and position the color-coded links with corresponding timing marks. Place the exhaust Camshaft sprocket in position with matching exh colored links facing the 10 o'clock mark followed by manual bolt tightening of the new sprocket bolt. Install the fixed Timing Chain Guide and tighten its bolts to 15 nm before filling the Timing Chain Guide bolt access hole plug with sealant compound before applying 90 nm (66 lb ft) torque. Follow by tightening upper guide bolts to 10 nm then check tensioner for damaged parts while measuring end-to-end assembly length. Install the compressed Timing Chain Tensioner only after it reaches the 72 mm (2.83 in) length with tool j 45027-2 and secure the 75 nm (55 lb ft) torque rating. The final step involves using a suitable release tool on the tensioner followed by Camshaft retention with a 24 mm wrench and new bolt installation with torque to 85 nm (63 lb ft) along with 30 degrees of Camshaft nut angle adjustment. Afterward, install the Camshaft cover and perform vehicle lifting before engine front cover installation and vehicle lowering and negative Battery Cable reconnection.
Related 2004 Chevrolet Malibu Parts
 2004 Chevrolet Malibu Balance Shaft Bearing Set
 2004 Chevrolet Malibu Cam Gear
 2004 Chevrolet Malibu Camshaft Bearing
 2004 Chevrolet Malibu Coolant Filter
 2004 Chevrolet Malibu Crankshaft
 2004 Chevrolet Malibu Engine Mount
 2004 Chevrolet Malibu Pushrod
 2004 Chevrolet Malibu Rod Bearing
 2004 Chevrolet Malibu Timing Belt Tensioner
 2004 Chevrolet Malibu Timing Chain Guide
 2004 Chevrolet Malibu Timing Cover
 2004 Chevrolet Malibu Valve Cover Grommet