ChevyParts
My Garage
My Account
Cart
OEM 2008 Chevrolet HHR Timing Chain
Engine Timing Chain- Select Vehicle by Model
- Select Vehicle by VIN
Select Vehicle by Model
orMake
Model
Year
Select Vehicle by VIN
For the most accurate results, select vehicle by your VIN (Vehicle Identification Number).
2 Timing Chains found

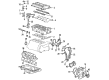
2008 Chevrolet HHR Timing Chain, Green Line Part Number: 24461834
$90.14 MSRP: $217.34You Save: $127.20 (59%)Ships in 1-2 Business DaysProduct Specifications- Other Name: Chain, Engine Timing
- Replaces: 90537338
- Item Weight: 1.40 Pounds
- Item Dimensions: 5.8 x 2.9 x 0.7 inches
- Condition: New
- Fitment Type: Direct Replacement
- SKU: 24461834
- Warranty: This genuine part is guaranteed by GM's factory warranty.
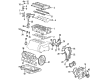
2008 Chevrolet HHR Timing Chain Part Number: 12600850
Product Specifications- Other Name: Chain Package, Timing; Camshaft Gear; Crankshaft Gear; Chain; Chain Package, Engine Timing
- Item Weight: 2.70 Pounds
- Item Dimensions: 13.6 x 7.1 x 2.8 inches
- Condition: New
- Fitment Type: Direct Replacement
- SKU: 12600850
- Warranty: This genuine part is guaranteed by GM's factory warranty.
2008 Chevrolet HHR Timing Chain
With a comprehensive array of OEM 2008 Chevrolet HHR Timing Chain, from fuel pumps to door handles, our website is a one-stop-shop for your needs. All our genuine 2008 Chevrolet HHR Timing Chain are backed by the manufacturer's warranty and are offered at competitive prices in the market. Rest assured, you can shop with complete confidence.
2008 Chevrolet HHR Timing Chain Parts Questions & Experts Answers
- Q: How to replace the camshaft timing chain, sprocket, and tensioner on 2008 Chevrolet HHR?A: To replace the Camshaft Timing Chain, sprocket, and tensioner, begin by removing the #1 cylinder Spark Plug. Rotate the Crankshaft clockwise until the #1 Piston reaches top dead center (TDC) on the compression stroke. Then take off the Camshaft cover and the engine front cover. Take off the upper Timing Chain Guide bolts and guide, and the Timing Chain Tensioner to relieve chain tension. Use a 24 mm wrench to hold the exhaust Camshaft, dispose of the exhaust Camshaft actuator bolt, and remove the actuator from the Camshaft and Timing Chain. Continue to move on and remove the Timing Chain Tensioner guide bolt & guide, fixed Timing Chain Guide access plug & fixed Timing Chain Guide bolts & guide. Take the intake Camshaft with the help of 24 mm wrench, remove the intake Camshaft actuator bolt and remove the intake Camshaft actuator and Timing Chain. Remove the Crankshaft Timing Chain sprocket. When removing the balance shaft Timing Chain and sprocket, loose the tensioner bolts and tensioner for the balance shaft drive chain, the bolt off for the adjustable balance shaft chain guide, the bolt for the small balance shaft drive chain guides, and the bolt for the upper balance shaft drive chain guides. To help in removing, make sure that all the slack is in the chain between the Crankshaft and water pump sprockets, then remove the balance shaft drive chain and sprocket. For installation, should remove the balance shaft Timing Chain, install the balance shaft drive sprocket and should properly time the balance shaft to avoid engines vibration. Place the balance shaft drive chain from the colored link to the marks on the sprockets so the copper link aligns with the timing mark on the intake side balance shaft sprocket and the first chrome link aligns with the timing mark on the balance shaft drive sprocket, and the last chrome link aligns with the timing mark on the exhaust side balance shaft drive sprocket. Install the small and adjustable upper, balance shaft drive chain guides, and torque the bolts to desired amounts. Reset the Timing Chain Tensioner by twisting the plunger on it, pressing them down and securing them with a paper clip. Install the balance shaft drive chain tensioner and ensure the intake Camshaft notch is at the 5 o'clock position and the exhaust Camshaft notch at the 7 o'clock position, with the #1 Piston at tdc. Install the Timing Chain drive sprocket, having the timing mark at 5 o'clock, the assemble intake Camshaft actuator into the Timing Chain, position the timing mark on a uniquely coloured link. Lower the Timing Chain into the Cylinder Head and fit the intake Camshaft actuator, and hand tighten the new actuator bolt. Route the Timing Chain in keeping with the Crankshaft sprocket, aligning the initial matching coloured link to the timing mark. Turn the Crankshaft clockwise to take off slack, and install the adjustable Timing Chain Guide and bolt. Mount the exhaust Camshaft actuator into the Timing Chain, with its timing mark set in line with the second matching colored link, and mount it onto the exhaust Camshaft. Surface the new actuator bolt hand tight, check all colored links and timing marks out, install the fixed Timing Chain Guide and bolts and upper Timing Chain Guide and bolts. Re-set Timing Chain Tensioner, inspect the seal for damage and cleaned thread hole within a Cylinder Head. Mount the Timing Chain Tensioner assembly and torque down to 75 n.m (55 lb ft). Disengage the locking mechanism of the Timing Chain Tensioner by compressing it using the appropriate tool. Using a 23 mm wrench and the j 45059, tighten the intake and exhaust Camshaft actuator bolts, tightening to specified torque values. Install the Timing Chain oiling nozzle and tighten its bolt then apply sealant compound gm p/n 12345382 in the Timing Chain Guide bolt access hole plug then install it , tighten at 90 n.m (66 lb ft). Finally, reinstall the engine front cover, Camshaft cover, and the #1 cylinder Spark Plug.
Related 2008 Chevrolet HHR Parts
 2008 Chevrolet HHR Oil Pan
 2008 Chevrolet HHR Crankshaft Seal
 2008 Chevrolet HHR Crankshaft Thrust Washer Set
 2008 Chevrolet HHR Dipstick Tube
 2008 Chevrolet HHR Intake Valve
 2008 Chevrolet HHR Oil Cooler
 2008 Chevrolet HHR Oil Pan Baffle
 2008 Chevrolet HHR Piston
 2008 Chevrolet HHR Rocker Arm
 2008 Chevrolet HHR Rod Bearing
 2008 Chevrolet HHR Timing Chain Guide
 2008 Chevrolet HHR Timing Cover