ChevyParts
My Garage
My Account
Cart
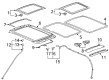
OEM 2010 Cadillac SRX Sunroof Cable
Sunroof Window Cable- Select Vehicle by Model
- Select Vehicle by VIN
Select Vehicle by Model
orMake
Model
Year
Select Vehicle by VIN
For the most accurate results, select vehicle by your VIN (Vehicle Identification Number).
2 Sunroof Cables found


2010 Cadillac SRX Cable, Driver Side Part Number: 20945787
Product Specifications- Other Name: Cable, Roof Panel
- Position: Driver Side
- Item Weight: 0.70 Pounds
- Item Dimensions: 8.5 x 8.5 x 3.4 inches
- Condition: New
- Fitment Type: Direct Replacement
- SKU: 20945787
- Warranty: This genuine part is guaranteed by GM's factory warranty.

2010 Cadillac SRX Cable, Passenger Side Part Number: 20945786
Product Specifications- Other Name: Cable, Roof Panel
- Position: Passenger Side
- Item Weight: 0.70 Pounds
- Item Dimensions: 13.6 x 13.2 x 3.5 inches
- Condition: New
- Fitment Type: Direct Replacement
- SKU: 20945786
- Warranty: This genuine part is guaranteed by GM's factory warranty.
2010 Cadillac SRX Sunroof Cable
With a comprehensive array of OEM 2010 Cadillac SRX Sunroof Cable, from fuel pumps to door handles, our website is a one-stop-shop for your needs. All our genuine 2010 Cadillac SRX Sunroof Cable are backed by the manufacturer's warranty and are offered at competitive prices in the market. Rest assured, you can shop with complete confidence.
2010 Cadillac SRX Sunroof Cable Parts Questions & Experts Answers
- Q: How to replace the Sunroof Cable Assembly on 2010 Cadillac SRX?A: The sunroof sunshade cable assembly replacement process starts with front sunroof window removal and continues with service of the rear sunroof window. Start by removing the rear luggage shade and left luggage shade bolt then the rear compartment floor stowage cover assembly. The removal process starts with taking out the rear end trim finish panel followed by floor panel rails and continues with left body side trim panel and left quarter upper trim finish panel. To access the left rear section of the headliner one should relocate the rear door opening Weather Strip. The motor of the sunroof sunshade requires its three bolts to be removed for disengagement from the frame. To access the guide extensions which mount on the sunshade cable retainers users need to disengage the sunroof inner window seal by removing it from behind the sides of the sunroof frame. To remove the sunshade front crossbar from its cable retainer on the opposite side with the broken cable drivers should lift the retaining tab and pull it forward. Use a thin flat blade screwdriver to pry out the white sunshade guide clip from its position on the drive cable retainer. Tie the sunshade crossbar into position at the rear sunshade bracket to stop it from springing loose. Move the sunshade cable ends backward until they fit inside the extended guides when they initially start in front of the frame track. Holding gloves protects your hands from sharp edges during this step. Isolate the sunshade guide extension fastener before detaching its cable from both the extension and sunroof frame. Position the new sunshade drive cable inside the guide tube at the rear of the sunroof frame, insert the sunshade cable retaining tab into the guide extension then secure the cable guide extension and fastener to the sunroof frame. Drive the drive cable retaining tab into the guide extension positions on both sides before installing the sunroof sunshade motor. You can reach the sunshade fabric pockets underneath by pulling on the crossbar. Insert the white sunshade guide clip into these pockets. The shade must recoil until the guide clip reaches a position behind the side frame rail end before sliding it into the bottom track where it should click into place. Use the front crossbar to position each side into the retaining clips at the top ends of the drive cables until the proper side frame track routing and full crossbar seating is accomplished. Before reinstalling the rear and front sunroof windows apply blue loctite to every fastening screw. The repair sequence ends with motor reinitialization then headliner repositioning alongside left rear door opening Weather Strip reinstallation followed by left quarter upper trim finish panel, left body side trim panel, rear end trim finish panel and floor panel rails and rear compartment floor stowage cover assembly and rear luggage shade and left luggage shade bolt installation if equipped.
Related 2010 Cadillac SRX Parts
 2010 Cadillac SRX Body Mount Hole Plug
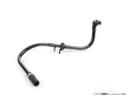 2010 Cadillac SRX Brake Booster Vacuum Hose
 2010 Cadillac SRX Car Speakers
 2010 Cadillac SRX Convertible Top Motor
 2010 Cadillac SRX Dash Panel Vent Portion Covers
 2010 Cadillac SRX Door Armrest
 2010 Cadillac SRX Door Handle
 2010 Cadillac SRX Door Lock Cylinder
 2010 Cadillac SRX Door Striker
 2010 Cadillac SRX Interior Light Bulb
 2010 Cadillac SRX Lift Support
 2010 Cadillac SRX Weather Strip