ChevyParts
My Garage
My Account
Cart
OEM Buick Enclave Rack And Pinion
Steering Rack And Pinion- Select Vehicle by Model
- Select Vehicle by VIN
Select Vehicle by Model
orMake
Model
Year
Select Vehicle by VIN
For the most accurate results, select vehicle by your VIN (Vehicle Identification Number).
3 Rack And Pinions found


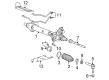
Buick Enclave Steering Gear Part Number: 23271566
$428.14 MSRP: $735.32You Save: $307.18 (42%)Ships in 1-2 Business Days


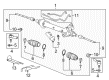
Buick Enclave Steering Gear Part Number: 23271562
$556.93 MSRP: $1080.90You Save: $523.97 (49%)Ships in 1-3 Business Days
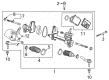
Buick Enclave Steering Gear Part Number: 87853953
$1048.26 MSRP: $1345.06You Save: $296.80 (23%)
Buick Enclave Rack And Pinion
Want to cut long-term maintenance and repair costs? Choose OEM Rack And Pinion. Those parts deliver top durability you can trust. On our site, you'll find a huge catalog of genuine Buick Enclave parts. Prices are unbeatable, so you can keep more in your pocket. Every OEM Buick Enclave Rack And Pinion includes a manufacturer's warranty. You can also get an easy return policy that keeps buying risk free. Fast delivery, get your car on the road quickly. It's simple to search, compare, and order. Stop guessing about quality or fit. Order today and save with parts that last.
The Rack And Pinion in Buick Enclave is a significant part of the steering system that converts the rotational movement to the left and right from the steering wheel into lateral movement forth and rearward of the front wheels. This mechanism is known as rack and pinion and comprised of gears which housed in a metal tube bolted to the side of the chassis with the steering column shaft being connected to the rack or pinion gear. In today's production, most of the Enclave cars are fitted with power-assisted rack and pinion steering whereby the rack movement causes the pressure fluid to move it sideways within the tube turning the front wheels. Nevertheless, problems like leakage from worn out seals or noisy and worn out gears are known to cause resistance while steering, squeaking or erratic steering while in motion. In such cases stern rack and pinion assembly may have to be replaced in order to maintain correct steering receptiveness.
Buick Enclave Rack And Pinion Parts and Q&A
- Q: How to Replace the Front Rack and Pinion Steering Gear on Buick Enclave?A:The first step to replace a Rack And Pinion starts with wheel security through an anti-rotation pin or steering column lock or strap setup to stop wheel movement thus protecting the sir system. Secure the Steering Wheel first before placing drain pans below the vehicle to perform maximum drawdown of power steering fluid from the power steering fluid reservoir. You must disconnect the following components from their related elements: Steering Knuckles from the steering linkage outer tie rods, stabilizer shaft links from the stabilizer shaft and intermediate Steering Shaft from Rack And Pinion. Begin by removing the rear propeller shaft and underbody rear side rails and continue by removing both frame brace and right side Catalytic Converter. Place adjustable jack stands beneath the vehicle at the front frame's rear side while removing the left and right front frame reinforcement mounting bolts after you install the stands beneath the left and right vehicle sides. Start the process by loosening the bolts on front frame reinforcement mounting and front frame mounting and front frame rear mounting and lower the front frame down until you have enough space to remove the Rack And Pinion. The power steering Rack And Pinion inlet and outlet hoses need separation from the Rack And Pinion after disconnecting power steering Rack And Pinion inlet and outlet pipes and removing the power steering Rack And Pinion inlet hose retaining plate bolt. Drive the Rack And Pinion out of the vehicle to the left side after unfastening left side nuts and bolts along with right side bolts. When installing the new Rack And Pinion position it on the left side of the vehicle while starting every bolt manually before completing torque specifications. The left side Rack And Pinion requires nuts and bolts installed along with 180 nm (133 lb ft) torque while right side bolts need 100 nm (74 lb ft) torque. The power steering Rack And Pinion receives its inlet and outlet hoses for connection after the inlet hose retaining plate bolt achieves 12 nm (106 lb in) torque and the inlet and outlet pipe clip bolt gets tightened to 9 nm (80 lb in). After raising the front frame until it sits 12 mm (0.5 in) above the body install both side front reinforcement bolts with 50 nm (37 lb ft) torque and the front frame rear bolts with 100 nm (74 lb ft) torque before turning the front frame bolts an additional 90 degrees. First install the front frame mounting bolts at 100 nm (74 lb ft) torque then add an additional 90 degrees rotation until achieving 50 nm (37 lb ft) for front frame reinforcement mounting bolts. Clean all remaining fluid from the components while you put the underbody rear side rails back into place. Reinstall the rear propeller shaft followed by the Rack And Pinion heat shields and right side Catalytic Converter before you install the frame brace. Connect all components including the intermediate Steering Shaft between the Rack And Pinion and the stabilizer shaft links to their attachment points at the stabilizer shaft. Also reconnect the steering linkage outer tie rods to the steering knuckles. The power steering system requires bleeding after which you measure and adjust the front toe alignment.

Related Buick Enclave Parts
 Buick Enclave Power Steering Pump
 Buick Enclave Power Steering Reservoir
 Buick Enclave Steering Wheel
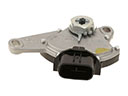 Buick Enclave Neutral Safety Switch
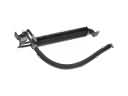 Buick Enclave Power Steering Cooler
 Buick Enclave Power Steering Hose
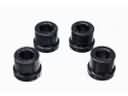 Buick Enclave Rack & Pinion Bushing
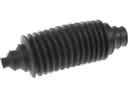 Buick Enclave Rack and Pinion Boot
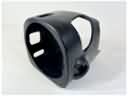 Buick Enclave Steering Column Cover
 Buick Enclave Steering Column Seal
 Buick Enclave Steering Shaft
 Buick Enclave Tie Rod End