ChevyParts
My Garage
My Account
Cart
OEM Buick Park Avenue Rod Bearing
Engine Connecting Rod Bearing- Select Vehicle by Model
- Select Vehicle by VIN
Select Vehicle by Model
orMake
Model
Year
Select Vehicle by VIN
For the most accurate results, select vehicle by your VIN (Vehicle Identification Number).
1 Rod Bearing found

Buick Park Avenue Rod Bearings Part Number: 89017700
$16.09 MSRP: $25.21You Save: $9.12 (37%)Ships in 1-2 Business Days
Buick Park Avenue Rod Bearing
Want to cut long-term maintenance and repair costs? Choose OEM Rod Bearing. Those parts deliver top durability you can trust. On our site, you'll find a huge catalog of genuine Buick Park Avenue parts. Prices are unbeatable, so you can keep more in your pocket. Every OEM Buick Park Avenue Rod Bearing includes a manufacturer's warranty. You can also get an easy return policy that keeps buying risk free. Fast delivery, get your car on the road quickly. It's simple to search, compare, and order. Stop guessing about quality or fit. Order today and save with parts that last.
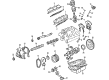
The Buick Park Avenue Rod Bearing is a highly widespread part that is often considered to be one of the most dependable and efficient parts connected with the functioning of an engine. This Rod Bearing helps the crankshaft and camshaft components to turn smoothly on the film of engine oil providing under pressure by the engine oil pump. Positive outcomes can be also observed in the Buick Park Avenue, a full-size luxury car which lineage dates back to 1935; the application of the Rod Bearing improves the car's efficiency and safety due to the advanced engineering. Available in bi-metal and tri-metal, compatible with different models of Park Avenue, the product has such features as strength, fatigue resistance, as well as high embedability. The clearance of the oil of 0.001" to 0.0035" also allows the Buick Park Avenue Rod Bearing to work well; additionally, performance modifications may also use special dry film lubricant coatings to reduce wear and increase heat endurance. It plays a very important role not only for improving driving characteristics and pleasure of car usage but also the car's durability. In the world of automobiles Buick Park Avenue Rod Bearing has carved a niche for itself because of its long lasting features and its performance capabilities and therefore is preferred by the car lovers or regular car users. As touched on in the earlier part of this write-up, Buick Park Avenue's lineage and the Brand's reputation in providing quality automobiles all over the world cannot be questioned and to make the automobile even more reliable, the Rod Bearing takes the core role in it.
Buick Park Avenue Rod Bearing Parts Questions & Experts Answers
- Q: How to replace the connecting rod bearing on Buick Park Avenue?A:To replace the connecting Rod Bearing, take out the Oil Pan and the connecting rod caps while rotating the Crankshaft as needed for access. Check the connecting rods and main bearing bores for excessive wear, gouges, foreign material trapped and mismatched side-to-side wear, and test for a bent Crankshaft or tapered bearing jounals, if necessary. Check the outer surfaces for wear, overheat, and looseness or rotation. Measure the rubbed surfaces for wear and grooving, torque the bearing cap to specifications. Check boil to ensure, there are no taper and out of round. Check the bearing cap bolts (1 and 2) and replace all stretched ones against using new bolts. To ascertain the correct size of the replacement insert using the method of measurement, check the bearing clearance by either using method a or b, with method a being preferred for reliability. Method a consists of obtaining reading of the Crankshaft journal with a micrometer, averaging those and ensuring that the bearing inserts are correctly installed and torqued to specifications. Method b requires installing all bearing inserts and the Crankshaft and placing gauging plastic across the bearing width, seating the bearing cap and getting the flattened gauging plastic. For installation, use the j36660-a torque angle meter to make sure that the bearing cap bolt holes and the mating surfaces have no spots of dirt and water. Dip the bolts on the bearing cap in clean engine oil, insert the inserts in the bearing cap as well as the engine block or connecting rod making sure that the same have protruded on both side and the insert tags engaged. Apply gm approved lubricant to the thrust surf ace on the main bearing insert, lubricate the bearing surface with clean engine oil, and install the crank shaft or conecting rod. Gently tap the bearing cap into place with a suitable tool and install the bearing cap bolts tightening them to 27 nm (20 ft. Lbs.) and then using the j36660-a, tighten the bolts an additional 50 degrees. Therefore, seat the Crankshaft thrust bearing by tapping it in both directions by using a wooden mallet, check whether there is any binding in the connecting rod, measure the end play of the Crankshaft, measure the side clearance of the connecting rod, and finally, install the Oil Pan.

Related Buick Park Avenue Parts
 Buick Park Avenue Camshaft
 Buick Park Avenue Crankshaft Seal
 Buick Park Avenue Crankshaft Thrust Washer Set
 Buick Park Avenue Exhaust Valve
 Buick Park Avenue Head Gasket
 Buick Park Avenue Oil Filler Cap
 Buick Park Avenue Oil Pan
 Buick Park Avenue Oil Pan Gasket
 Buick Park Avenue Oil Pump Rotor Set
 Buick Park Avenue Timing Cover Gasket
 Buick Park Avenue Valve Stem Oil Seal
 Buick Park Avenue Variable Timing Sprocket