ChevyParts
My Garage
My Account
Cart
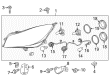
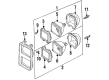
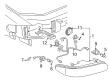
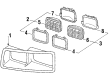
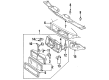
OEM Buick Regal Headlight
Headlamp- Select Vehicle by Model
- Select Vehicle by VIN
Select Vehicle by Model
orMake
Model
Year
Select Vehicle by VIN
For the most accurate results, select vehicle by your VIN (Vehicle Identification Number).
32 Headlights found


Buick Regal Headlamp Assembly, Passenger Side Part Number: 13426668
$1210.06 MSRP: $1815.70You Save: $605.64 (34%)
Buick Regal Headlamp Assembly Part Number: 16501996
$33.81 MSRP: $43.98You Save: $10.17 (24%)Buick Regal Headlamp Assembly, Driver Side Part Number: 13426667
$1210.06 MSRP: $1815.70You Save: $605.64 (34%)Buick Regal Headlamp Assembly, Passenger Side Part Number: 13432981
$882.96 MSRP: $1324.45You Save: $441.49 (34%)
Buick Regal Headlamp Assembly, Driver Side Part Number: 15194306


Buick Regal Headlamp Assembly, Passenger Side Part Number: 15194307


Buick Regal Headlamp Assembly, Passenger Side Part Number: 19244638
Buick Regal Headlamp Assembly, Passenger Side Part Number: 22934024

Buick Regal Composite Headlamp Part Number: 22795549
Buick Regal Composite Headlamp Part Number: 22795550
Buick Regal Headlamp Assembly, Driver Side Part Number: 22934025

Buick Regal Headlamp Assembly Part Number: 16502326
Buick Regal Headlamp Assembly Part Number: 16502325
Buick Regal Headlamp Assembly Part Number: 16501995
Buick Regal Headlamp Assembly, Driver Side Part Number: 19244639

Buick Regal Headlamp Assembly, Driver Side Part Number: 16521823

Buick Regal Headlamp Assembly, Passenger Side Part Number: 16521824

Buick Regal Headlamp Assembly, Driver Side Part Number: 16509389
Buick Regal Headlamp Assembly, Passenger Side Part Number: 16509390

Buick Regal Headlamp Assembly, Driver Side Part Number: 16520893
| Page 1 of 2 |Next >
1-20 of 32 Results
Buick Regal Headlight
Want to cut long-term maintenance and repair costs? Choose OEM Headlight. Those parts deliver top durability you can trust. On our site, you'll find a huge catalog of genuine Buick Regal parts. Prices are unbeatable, so you can keep more in your pocket. Every OEM Buick Regal Headlight includes a manufacturer's warranty. You can also get an easy return policy that keeps buying risk free. Fast delivery, get your car on the road quickly. It's simple to search, compare, and order. Stop guessing about quality or fit. Order today and save with parts that last.
Buick Regal Headlight is one of the vital assets that help augment the visibility on the road in the difficult and harsh weather conditions. While an ordinary headlight provides rectilinear light, an adaptive headlight will vary the beam angle depending on the direction of the car, its speed, and its height, thus, giving the driver a better view of bends and surroundings. This feature affords the utmost protection against other car owners who may be on the other side and at the same time brings out elegance in the total driving experience. Because of the state-of-the-art electric sensors and motors, the degrees of control range between 0 and 30 degrees for better fitting of the sharp curve ahead. Though there may be slightly more draw on the battery than a standard headlight, the effect is minimal due to the restricted use of the headlight in the Buick Regal. In conclusion, the Buick Regal Headlight has been developed over the years to include better features in safety and performance.
Buick Regal Headlight Parts Questions & Experts Answers
- Q: How to replace the headlight assembly or headlight bulb or cornering, sidemarker, park, turn signal bulb on Buick Regal?A:Starting the process of headlamp assembly or bulb or cornering, sidemarker, park, turn signal bulb replacement requires the hood to be opened first. You should use gentle pressure to stabilize the lens as you remove the retainers before lifting them off to extract the retainers. Remove the headlamp by detaching its mounting tabs from both the fender reinforcement as well as upper fascia support while taking out the electrical connector that feeds into the headlamp. You should begin by removing the rubber access covers which hide behind the light bulb/sockets that will be replaced while rotating the headlamp bulb/socket counterclockwise to release it while always observing the Halogen Bulb Caution. Detach the headlamp bulb/socket from the headlamp system while also disconnecting the electrical connector. To install the bulb/socket connect the electrical connector to the headlamp bulb/socket afterward insert the bulb/socket into the headlamp by rotating it clockwise until it reaches full seating position. First reconnect the electrical connector to the headlamp and then place the headlamp mounting tabs into the slots found on the upper fascia support and fender reinforcement. Finally reinstall the rubber access covers. Use light hand pressure on the headlamp lens during installation by placing retainers over mounting tabs before pressing down for full seating. Once you complete the check and aim testing of the headlamp be sure to close the hood.

Related Buick Regal Parts
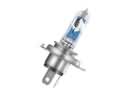 Buick Regal Headlight Bulb
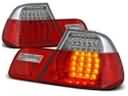 Buick Regal Tail Light
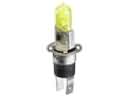 Buick Regal Fog Light Bulb
 Buick Regal Back Up Light
 Buick Regal Dome Light Connector
 Buick Regal Fog Light
 Buick Regal Forward Light Harness Connector
 Buick Regal Hid Bulb Ballast
 Buick Regal Light Socket
 Buick Regal Rear Light Harness Connector
 Buick Regal Tail Light Connector
 Buick Regal Turn Signal Light Connector