ChevyParts
My Garage
My Account
Cart
OEM Cadillac DTS Door Latch Assembly
Door Latch- Select Vehicle by Model
- Select Vehicle by VIN
Select Vehicle by Model
orMake
Model
Year
Select Vehicle by VIN
For the most accurate results, select vehicle by your VIN (Vehicle Identification Number).
7 Door Latch Assemblys found


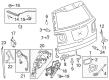
Cadillac DTS Lower Cover Part Number: 84243380
$255.52 MSRP: $372.01You Save: $116.49 (32%)


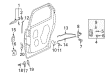
Cadillac DTS Lock Assembly, Rear Driver Side Part Number: 16639125

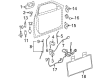
Cadillac DTS Lock, Front Passenger Side Part Number: 22778024
Cadillac DTS Lock Assembly, Rear Passenger Side Part Number: 16639124


Cadillac DTS Lock, Rear Driver Side Part Number: 16637927
Cadillac DTS Lock, Rear Passenger Side Part Number: 16637926
Cadillac DTS Lock, Front Driver Side Part Number: 22778023
$127.96 MSRP: $191.30You Save: $63.34 (34%)
Cadillac DTS Door Latch Assembly
Our website offers an extensive catalog of genuine Cadillac DTS Door Latch Assembly at unbeatable prices. Every OEM Cadillac DTS Door Latch Assembly comes with a manufacturer's warranty, an easy return policy, and rapid delivery service. Don't miss out on this great opportunity!
Cadillac DTS Door Latch Assembly Parts Questions & Experts Answers
- Q: How to replace the rear Door Latch Assembly on Cadillac DTS?A: The process of replacing the rear door latch starts by positioning the window at the top position followed by door trim panel and door module removal along with water deflector disassembly. Begin by squeezing the tabs in the middle of the bell crank pivot then pull the assembly outward. Find access to the inside handle assembly by starting with front prying then pulling out before moving it to the front. The first step is to disconnect both the outside handle rod from its rear position in the inner panel. After that, easily remove the child security lock by pulling it out. The fasteners should be removed from the door latch while pulling the door latch assembly through the inner panel access hole. The door latch requires removal of its electrical connectors along with inside handle rod and inside lock rod. The door installation sequence starts with attaching the inside lock rod and inside handle rod to the door latch then moving onto electrical connector connection. To install the door latch assembly insert it through the access hole of the inner panel before securing it with fasteners while tightening each screw to 10 N.m (89 lb in). Press the pin on the child security lock through its opening on the lock mechanism so it reaches full engagement with the inner panel. Connect the outside door handle rod to the latch through the retainer clip on the door latch assembly by inserting the rod and finally close the clip. The trim panel harness should be placed between both the handle rods and lock rods before inserting the inside handle assembly's rear end into the inner panel opening as you push the front section completely inward until total engagement. You need to place the bell crank inside the inner panel opening after connecting the lock and handle rods to the clip guides then push it forward until complete engagement with the inner panel. Test the functionality of door handles and locking mechanism first before installing the water deflector and then proceed with door module and door trim panel installation.

Related Cadillac DTS Parts
 Cadillac DTS Window Regulator
 Cadillac DTS Door Handle
 Cadillac DTS Door Lock Actuator
 Cadillac DTS Door Lock Cylinder
 Cadillac DTS Door Moldings
 Cadillac DTS Door Seal
 Cadillac DTS Door Striker
 Cadillac DTS Tailgate Latch
 Cadillac DTS Tailgate Lock
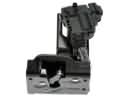 Cadillac DTS Tailgate Lock Actuator Motor
 Cadillac DTS Trunk Latch
 Cadillac DTS Weather Strip