ChevyParts
My Garage
My Account
Cart
OEM Cadillac Escalade A/C Condenser
Air Conditioning Condenser- Select Vehicle by Model
- Select Vehicle by VIN
Select Vehicle by Model
orMake
Model
Year
Select Vehicle by VIN
For the most accurate results, select vehicle by your VIN (Vehicle Identification Number).
7 A/C Condensers found


Cadillac Escalade Condenser Part Number: 20913752
$209.16 MSRP: $358.19You Save: $149.03 (42%)


Cadillac Escalade Condenser Part Number: 20913751
$121.55 MSRP: $208.18You Save: $86.63 (42%)
Cadillac Escalade Condenser Part Number: 23409063
$177.68 MSRP: $265.60You Save: $87.92 (34%)Ships in 1-3 Business Days

Cadillac Escalade Condenser Part Number: 87823302
$204.55 MSRP: $305.75You Save: $101.20 (34%)Ships in 1-2 Business Days
Cadillac Escalade Condenser Assembly Part Number: 84537373

Cadillac Escalade Condenser Part Number: 52402209
Cadillac Escalade Condenser Assembly Part Number: 84802253
$168.44 MSRP: $251.78You Save: $83.34 (34%)
Cadillac Escalade A/C Condenser
Want to cut long-term maintenance and repair costs? Choose OEM A/C Condenser. Those parts deliver top durability you can trust. On our site, you'll find a huge catalog of genuine Cadillac Escalade parts. Prices are unbeatable, so you can keep more in your pocket. Every OEM Cadillac Escalade A/C Condenser includes a manufacturer's warranty. You can also get an easy return policy that keeps buying risk free. Fast delivery, get your car on the road quickly. It's simple to search, compare, and order. Stop guessing about quality or fit. Order today and save with parts that last.
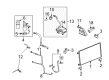
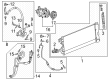
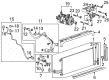
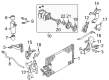
In Cadillac Escalade vehicles, the A/C Condenser plays the role of heat exchanger that is used to cool gaseous refrigerant to a liquid state before the vehicles gets to the accumulator. Usually located at the front of the car, beneath the grille that covers the condenser, and consisting of a row of thin tubes through which it cools, is the A/C Condenser. Although the general information does not include differences in the type or design of A/C Condenser depending on the model of Escalade, the principles behind A/C Condenser are maintained to work as effectively as possible with the aim of providing comfortable climate control within the car. The A/C Condenser is just as crucial in making the temperatures suitable for passengers by acting optimally.
Cadillac Escalade A/C Condenser Parts and Q&A
- Q: How to replace the A/C Condenser on Cadillac Escalade?A:A replacement procedure for air conditioning condensers begins by recovering the refrigerant from the system. First access the radiator support bolts through the rear of the upper support before removing its bracket bolts and the fascia. Start by disconnecting the compressor discharge hose assembly from the condenser after removing the bolt on the compressor discharge hose assembly. Unscrew the evaporator tube nut then separate the evaporator tube from the condenser unit. Workers should extract insulator retainer bolts along with upper insulator retainers prior to lifting out the condenser from the automobile. Put refrigerant oil into your new condenser before installation. Follow all fastener cautions when installing the condenser unit. Fasten the upper insulator retainers using a torque of 2.4 nm (21 lb in). Screw the evaporator tube to the condenser using fresh sealing washers before tightening the evaporator tube nut to 16 nm (12 lb ft). Replace the compressor discharge hose nut with new sealing washers before tightening it to 16 nm (12 lb ft). Then connect the compressor discharge hose to the condenser. First install the two lower bolts into the hood latch support bracket while using 9 nm torque settings (80 lb in), then attach the radiator support by accessing the bolts from behind the upper support bracket before securing the nut at 16 nm (12 lb ft). Secure the bolts of the radiator support bracket while also mounting the fascia. End the process by conducting a system recharging step before conducting a j 39400-a halogen leak detector analysis for the component fittings.

Related Cadillac Escalade Parts
 Cadillac Escalade Cabin Air Filter
 Cadillac Escalade Blower Motor Resistor
 Cadillac Escalade A/C Accumulator
 Cadillac Escalade A/C Compressor
 Cadillac Escalade A/C Service Cap
 Cadillac Escalade A/C Switch
 Cadillac Escalade A/C System Valve Core
 Cadillac Escalade Ambient Temperature Sensor
 Cadillac Escalade Blend Door Actuator
 Cadillac Escalade Blower Motor
 Cadillac Escalade HVAC Control Module
 Cadillac Escalade HVAC Pressure Switch