ChevyParts
My Garage
My Account
Cart
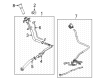
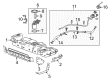
OEM Cadillac Escalade ESV Fuel Filler Hose
- Select Vehicle by Model
- Select Vehicle by VIN
Select Vehicle by Model
orMake
Model
Year
Select Vehicle by VIN
For the most accurate results, select vehicle by your VIN (Vehicle Identification Number).
25 Fuel Filler Hoses found


Cadillac Escalade ESV Upper Hose Part Number: 15124940
$50.50 MSRP: $97.15You Save: $46.65 (49%)Ships in 1-2 Business Days
Cadillac Escalade ESV Filler Neck Part Number: 15844701
$56.22 MSRP: $114.18You Save: $57.96 (51%)Ships in 1-2 Business Days

Cadillac Escalade ESV Lower Hose Part Number: 84564113
$23.58 MSRP: $36.93You Save: $13.35 (37%)Ships in 1-3 Business Days
Cadillac Escalade ESV Upper Hose Part Number: 84692824
$35.29 MSRP: $55.29You Save: $20.00 (37%)Ships in 1-3 Business Days
Cadillac Escalade ESV Filler Neck Part Number: 84696012
$202.60 MSRP: $302.83You Save: $100.23 (34%)Ships in 1-3 Business Days
Cadillac Escalade ESV Filler Neck Part Number: 85545881
$154.91 MSRP: $231.55You Save: $76.64 (34%)Ships in 1-3 Business DaysCadillac Escalade ESV Filler Neck Part Number: 84696034
$202.60 MSRP: $302.83You Save: $100.23 (34%)Ships in 1-3 Business DaysCadillac Escalade ESV Filler Neck Part Number: 22827848
$393.51 MSRP: $588.20You Save: $194.69 (34%)Ships in 1-3 Business Days
Cadillac Escalade ESV Filler Neck Part Number: 85512438
$167.44 MSRP: $250.29You Save: $82.85 (34%)
Cadillac Escalade ESV Upper Hose Part Number: 84711946
$35.29 MSRP: $52.51You Save: $17.22 (33%)Ships in 1-3 Business Days
Cadillac Escalade ESV Vent Hose Part Number: 84564116
$27.22 MSRP: $40.50You Save: $13.28 (33%)Ships in 1-3 Business Days
Cadillac Escalade ESV Lower Hose Part Number: 84818368
$46.70 MSRP: $69.50You Save: $22.80 (33%)Ships in 1-3 Business Days
Cadillac Escalade ESV Vent Hose Part Number: 23113678
$31.13 MSRP: $48.71You Save: $17.58 (37%)Ships in 1-2 Business Days
Cadillac Escalade ESV Lower Hose Part Number: 84224658
$29.12 MSRP: $43.33You Save: $14.21 (33%)Ships in 1-3 Business DaysCadillac Escalade ESV Vent Hose Part Number: 84018885
$46.85 MSRP: $69.71You Save: $22.86 (33%)Ships in 1-3 Business Days
Cadillac Escalade ESV Upper Hose Part Number: 84018883
$26.62 MSRP: $39.62You Save: $13.00 (33%)Ships in 1-3 Business Days
Cadillac Escalade ESV Vent Hose Part Number: 84711944
$23.56 MSRP: $35.07You Save: $11.51 (33%)Ships in 1-3 Business Days
Cadillac Escalade ESV Vent Hose Part Number: 84692825
$51.28 MSRP: $76.32You Save: $25.04 (33%)Ships in 1-3 Business Days

Cadillac Escalade ESV Lower Hose Part Number: 22951232

Cadillac Escalade ESV Upper Hose Part Number: 23113672
$34.35 MSRP: $51.11You Save: $16.76 (33%)
| Page 1 of 2 |Next >
1-20 of 25 Results
Cadillac Escalade ESV Fuel Filler Hose
Want to cut long-term maintenance and repair costs? Choose OEM Fuel Filler Hose. Those parts deliver top durability you can trust. On our site, you'll find a huge catalog of genuine Cadillac Escalade ESV parts. Prices are unbeatable, so you can keep more in your pocket. Every OEM Cadillac Escalade ESV Fuel Filler Hose includes a manufacturer's warranty. You can also get an easy return policy that keeps buying risk free. Fast delivery, get your car on the road quickly. It's simple to search, compare, and order. Stop guessing about quality or fit. Order today and save with parts that last.
Cadillac Escalade ESV Fuel Filler Hose Parts and Q&A
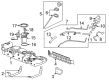
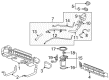
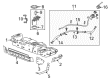
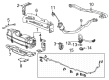
- Q: How to replace the Fuel Filler Hose on the 2500 Series on Cadillac Escalade ESV?A:Starting the replacement process for the 2500 series Fuel Tank filler pipe requires removal of the rear Fuel Tank combined with the chassis wiring harness ground bolt. Disconnect the left rear lamp ground wire from the frame and also the fill pipe ground strap that attaches to the frame. Finally cut off the rear axle vent hose clip from the neck of the fill pipe. The Fuel Tank fill hose clamp should be loosened while separating the quick connect fitting of the fuel fill hose evaporative emission (EVAP) line from the Fuel Tank line. First disconnect the fuel fill hose from the front tank while also removing the clamp attached to the crossmember. Next extract the fuel fill hose together with pipe assembly. Sealing off all exposed ends of the Fuel Tank and fuel/evap lines will protect them from contamination. Serviceable sections of the complete fill pipe assembly need disassembly that includes removing the evaporative emission canister hose, canister hose clamp, fill pipe clamp and housing bolts, housing, restrictor, vent hose, and canister hose clip. Assemble the components starting with tightening the Fuel Tank fill hose clamp to 2.5 n.m (22 lb in), then followed by the fill pipe, canister hose clip, fill hose clamp at 2.5 n.m (22 lb in), vent hose, and fill pipe clamp at 2.5 n.m (22 lb in) and restrictor and housing with housing bolts tightened to 2.3 n.m (20 lb in) and finally canister hose clamp at 2.5 n.m (22 lb in). Start fuel installation by removing protective caps from both ends of the fuel/evap lines attached to the front Fuel Tank and physically attach the fuel fill hose/pipe assembly before connecting the hose to its designated tank opening. Fasten both ends of the fuel fill hose evap line quick connect fitting to its Fuel Tank line while tightening the Fuel Tank fill hose clamp to 2.5 n.m (22 lb in). Position the integral clamp onto the crossmember at the same time install the rear axle vent hose clip onto the fill pipe neck and place the fill pipe ground strap against the left rear lamp ground wire. The last step requires installation of the rear lamp ground wire and ground strap to the frame where the lamp ground wire anti-rotation tab must be inserted into the frame hole before inserting and tightening the chassis wiring harness ground bolt to 9 n.m (80 lb in).

Related Cadillac Escalade ESV Parts
 Cadillac Escalade ESV Fuel Pressure Sensor
 Cadillac Escalade ESV Fuel Pump
 Cadillac Escalade ESV Fuel Pump Driver Module
 Cadillac Escalade ESV Fuel Pump Gasket
 Cadillac Escalade ESV Fuel Pump Seal
 Cadillac Escalade ESV Fuel Tank
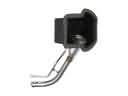 Cadillac Escalade ESV Fuel Tank Filler Neck
 Cadillac Escalade ESV Fuel Tank Sending Unit
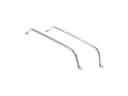 Cadillac Escalade ESV Fuel Tank Strap
 Cadillac Escalade ESV Gas Cap
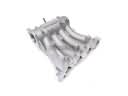 Cadillac Escalade ESV Intake Manifold
 Cadillac Escalade ESV Intake Manifold Gasket