ChevyParts
My Garage
My Account
Cart
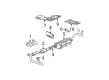
OEM Chevrolet Astro Muffler
Exhaust Muffler- Select Vehicle by Model
- Select Vehicle by VIN
Select Vehicle by Model
orMake
Model
Year
Select Vehicle by VIN
For the most accurate results, select vehicle by your VIN (Vehicle Identification Number).
8 Mufflers found


Chevrolet Astro Muffler Part Number: 15980181

Chevrolet Astro Muffler Part Number: 15756877

Chevrolet Astro Muffler W/Tpipe Part Number: 15756876
Chevrolet Astro Muffler Part Number: 15682576

Chevrolet Astro Muffler Part Number: 15650877
Chevrolet Astro Muffler Part Number: 15644642

Chevrolet Astro Muffler Part Number: 15598211
Chevrolet Astro Muffler Part Number: 15034322
Chevrolet Astro Muffler
Want to cut long-term maintenance and repair costs? Choose OEM Muffler. Those parts deliver top durability you can trust. On our site, you'll find a huge catalog of genuine Chevrolet Astro parts. Prices are unbeatable, so you can keep more in your pocket. Every OEM Chevrolet Astro Muffler includes a manufacturer's warranty. You can also get an easy return policy that keeps buying risk free. Fast delivery, get your car on the road quickly. It's simple to search, compare, and order. Stop guessing about quality or fit. Order today and save with parts that last.
The Muffler is one of the essential parts, and automotive parts of Chevrolet Astro automobiles, appreciated for its durability and efficiency. Functioning as a note on the expelling of dangerous exhaust fumes as well as cutting down on the sound of the engine, the Muffler utilizes chambers and appropriate passageway techniques to enable remarkable conformity to less sound pressure. Easy adaptability to different Chevrolet Astro vehicles means that every driver can get the advantages of modern design that includes components created out of corrosion resistant stainless steel or aluminized steel. Chevrolet offer Astro Muffler in direct fit and they also offer universal ones, the direct fit to give perfect sound and ease of installation. Custom Mufflers are commonly chosen by those people who require more successful performance from the car and do not mind if the noise level will be a little higher than in the 'standard' car. This balance is very important because the Muffler enhances performance of the vehicle as well as embraces noise control standards. Muffler is not just the part to enhance the functionality but it symbolises the core value of Chevrolet- Keeping the Quality Going. Based on the characteristics of the Muffler, it can be stated that this automotive part, with its stability of construction concept and innovative motives, remains as a unique option that strengthens Chevrolet Astro as a car that is capable of fulfilling various roles besides providing a good performance level.
Chevrolet Astro Muffler Parts Questions & Experts Answers
- Q: How to properly replace a muffler on Chevrolet Astro?A:To change the Muffler, it is essential to use protective goggles and gloves so that if you fall rust and sharp edges might cause injury, and also wait for the exhaust system to cool when servicing to avoid being burnt. Start with lifting the vehicle and supporting the Muffler assembly. Loosen the 3 nuts holding the Muffler assembly to the Catalytic Converter assembly. To make removal easier, apply lubricant (GM P/N 12345884) to the rubber hangers of the Muffler unit and remove it from the front and rear and tailpipe hangers before detaching it from the vehicle. During installation, check to be sure the exhaust system is aligned properly and leave the bolts or nuts loose until the alignment is correct, then tighten them finger tight from front to rear. Change the worn exhaust system longs, window bracket and clamps to maintain alignment. Make sure to apply replacement parts that are up to oem standards in order to replace the Muffler it's important to replace the tailpipe as well and do this by using new nuts on connecting the Exhaust Pipe to the Exhaust Manifold while cleaning the manifold stud thread with a wire brush first. Re-lubricate the rubber hangers using rubber lubricant (GM P/N 12345884) before mounting it on the vehicle and connecting the Muffler assembly to the rear hanger, tailpipe hanger, and front hanger. Finally, install the 3 nuts connecting Muffler assembly and Catalytic Converter assembly, and tighten them to 40 nm (30 ft. Lbs).

Related Chevrolet Astro Parts
 Chevrolet Astro Catalytic Converter
 Chevrolet Astro EGR Valve
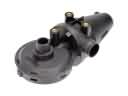 Chevrolet Astro PCV Valve
 Chevrolet Astro Air Inject Check Valve
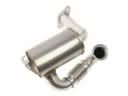 Chevrolet Astro EGR Filter
 Chevrolet Astro Exhaust Flange Gasket
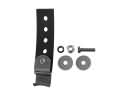 Chevrolet Astro Exhaust Hanger
 Chevrolet Astro Exhaust Heat Shield
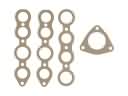 Chevrolet Astro Exhaust Manifold
 Chevrolet Astro Exhaust Manifold Gasket
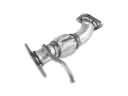 Chevrolet Astro Exhaust Pipe
 Chevrolet Astro Tail Pipe