ChevyParts
My Garage
My Account
Cart
OEM Chevrolet Avalanche 2500 Center Console
Floor Console Assembly- Select Vehicle by Model
- Select Vehicle by VIN
Select Vehicle by Model
orMake
Model
Year
Select Vehicle by VIN
For the most accurate results, select vehicle by your VIN (Vehicle Identification Number).
2 Center Consoles found

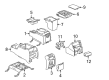
Chevrolet Avalanche 2500 Center Console, Front Part Number: 15060447
$224.63 MSRP: $353.44You Save: $128.81 (37%)Ships in 1-3 Business Days
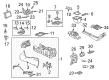
Chevrolet Avalanche 2500 Console Assembly Part Number: 88986684
Chevrolet Avalanche 2500 Center Console
Want to cut long-term maintenance and repair costs? Choose OEM Center Console. Those parts deliver top durability you can trust. On our site, you'll find a huge catalog of genuine Chevrolet Avalanche 2500 parts. Prices are unbeatable, so you can keep more in your pocket. Every OEM Chevrolet Avalanche 2500 Center Console includes a manufacturer's warranty. You can also get an easy return policy that keeps buying risk free. Fast delivery, get your car on the road quickly. It's simple to search, compare, and order. Stop guessing about quality or fit. Order today and save with parts that last.
Chevrolet Avalanche 2500 Center Console Parts Questions & Experts Answers
- Q: How to replace the Center Console without the console mounting bracket on Chevrolet Avalanche 2500?A:To remove the console without the console mounting bracket, first, if it has a bose(R) amplifier, they are required to pull the radio amp Fuse, which is found under the hood electrical center. Next, take off the floor console bezel, cup holder, and bolts that stabilize the console to the i/p. Subsequently, remove the console storage bin and the Center Console end panel, as well as the 4 screws that hold the upper console bracket to the lower console bracket, the front 2 screws of which are depicted in the graphic. Move front seats fully forward as well as reposition the inboard seat track trim to expose the rear console side panel screw, and remove the rear console side panel screws as well. Push both front seats to their fullest rearward position and take out both front console side panel screws. Pull the floor console electrical connector after disconnecting it and remove the console assembly from the vehicle. For the installation, begin by installing floor console on the floor console electrical connector. Screw on the screws that hold the upper console bracket and the lower console bracket together, tightening them to 2 n.m (18 lb in), and then drill bolts through console to i/p, tightened to 4 n.m (35 lb in). Mount both front console side panel screws and tighten them up to 2 n.m (18 lb in) , then move both front seats fully forward to mount both rear console side panel screws and tighten them up to 2 n.m (18 lb in). Move the inboard seat track trim, attach the floor console electrical connector, set up the Center Console end panel, console storage bin, cup holder, upper console bezel, and finally, radio amp Fuse.

Related Chevrolet Avalanche 2500 Parts
 Chevrolet Avalanche 2500 Car Speakers
 Chevrolet Avalanche 2500 Center Console Base
 Chevrolet Avalanche 2500 Control Arm Bumper
 Chevrolet Avalanche 2500 Cup Holder
 Chevrolet Avalanche 2500 Door Harness Connector
 Chevrolet Avalanche 2500 Door Hinge
 Chevrolet Avalanche 2500 Door Seal
 Chevrolet Avalanche 2500 Emblem
 Chevrolet Avalanche 2500 Front Cross-Member
 Chevrolet Avalanche 2500 Hood Latch
 Chevrolet Avalanche 2500 Weather Strip
 Chevrolet Avalanche 2500 Window Regulator