ChevyParts
My Garage
My Account
Cart
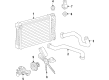
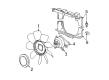
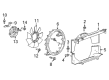
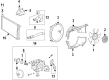
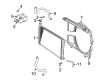
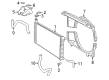
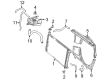
OEM Chevrolet Express 3500 Fan Shroud
Radiator Fan Shroud- Select Vehicle by Model
- Select Vehicle by VIN
Select Vehicle by Model
orMake
Model
Year
Select Vehicle by VIN
For the most accurate results, select vehicle by your VIN (Vehicle Identification Number).
25 Fan Shrouds found


Chevrolet Express 3500 Fan Shroud, Upper Part Number: 25868538
$122.68 MSRP: $183.37You Save: $60.69 (34%)Ships in 1-3 Business Days


Chevrolet Express 3500 Fan Shroud Part Number: 15751221
$116.83 MSRP: $174.63You Save: $57.80 (34%)Ships in 1-3 Business Days


Chevrolet Express 3500 Lower Shroud Part Number: 15228379
$81.60 MSRP: $155.65You Save: $74.05 (48%)Ships in 1-3 Business Days
Chevrolet Express 3500 Fan Shroud, Rear Part Number: 84243708
$240.78 MSRP: $359.92You Save: $119.14 (34%)

Chevrolet Express 3500 Fan Shroud, Lower Part Number: 84362766
$61.33 MSRP: $91.27You Save: $29.94 (33%)Ships in 1-3 Business Days
Chevrolet Express 3500 Fan Shroud, Rear Part Number: 84145362
$77.63 MSRP: $115.52You Save: $37.89 (33%)Ships in 1-3 Business Days
Chevrolet Express 3500 Fan Shroud Part Number: 84930910
$57.64 MSRP: $85.78You Save: $28.14 (33%)
Chevrolet Express 3500 Upper Shroud Part Number: 20901842
$105.10 MSRP: $156.39You Save: $51.29 (33%)Ships in 1-3 Business Days
Chevrolet Express 3500 Fan Shroud Part Number: 84445416
$60.73 MSRP: $90.37You Save: $29.64 (33%)Ships in 1-3 Business Days
Chevrolet Express 3500 Fan Shroud, Lower Part Number: 84930911
$44.42 MSRP: $66.11You Save: $21.69 (33%)Ships in 1-3 Business Days
Chevrolet Express 3500 Fan Shroud Part Number: 84372589
$75.57 MSRP: $112.44You Save: $36.87 (33%)Ships in 1-3 Business Days
Chevrolet Express 3500 Fan Shroud, Lower Part Number: 84324391
$51.15 MSRP: $76.12You Save: $24.97 (33%)Ships in 1-3 Business Days
Chevrolet Express 3500 Upper Shroud Part Number: 25908166

Chevrolet Express 3500 Upper Shroud Part Number: 15020329
$13.41 MSRP: $21.00You Save: $7.59 (37%)
Chevrolet Express 3500 Lower Shroud Part Number: 15958161

Chevrolet Express 3500 Lower Shroud Part Number: 15978381
Chevrolet Express 3500 Upper Shroud Part Number: 15008532

Chevrolet Express 3500 Lower Shroud Part Number: 15155188
Chevrolet Express 3500 Upper Shroud Part Number: 15959942
Chevrolet Express 3500 Lower Shroud Part Number: 15008531
| Page 1 of 2 |Next >
1-20 of 25 Results
Chevrolet Express 3500 Fan Shroud
Want to cut long-term maintenance and repair costs? Choose OEM Fan Shroud. Those parts deliver top durability you can trust. On our site, you'll find a huge catalog of genuine Chevrolet Express 3500 parts. Prices are unbeatable, so you can keep more in your pocket. Every OEM Chevrolet Express 3500 Fan Shroud includes a manufacturer's warranty. You can also get an easy return policy that keeps buying risk free. Fast delivery, get your car on the road quickly. It's simple to search, compare, and order. Stop guessing about quality or fit. Order today and save with parts that last.
Chevrolet Express 3500 Fan Shroud Parts Questions & Experts Answers
- Q: How to service and repair the fan shroud on Chevrolet Express 3500?A:Users should start the Fan Shroud service and repair procedure by detaching the air cleaner assembly before removing the air intake duct from the Throttle Body. Start by removing the Coolant Reservoir followed by detaching the bolt connecting the engine oil fill tube and the generator bracket bolts which attach the engine and transmission oil dipsticks. Start by placing the dipsticks with the oil fill tube beyond the Fan Shroud before unscrewing all upper Radiator retaining bolts and bolts that fasten the upper to lower shrouds from their location. First remove the fan and clutch from the engine before moving to remove lower Fan Shroud retaining bolts and finally the lower Fan Shroud itself. To install the lower Fan Shroud first install it with retaining bolts which should be tightened to 8 nm (71 inch lbs.). You should start with installing the fan along with the clutch onto the engine before placing the upper Fan Shroud onto the lower Fan Shroud and tightening the upper to lower Fan Shroud retaining bolts at 8 nm (71 inch lbs.). Apply gm p/n 12346004 sealer equivalent along with similar products to the upper end of the oil level indicator tube at the joint before installing the top section into the lower part. Fix the engine and transmission oil Dipstick bolt followed by tightening the engine oil fill tube bolt at the generator bracket. The last step involves securing upper Fan Shroud retaining bolts to the top of the Radiator since 8 nm (71 inch lbs.) torque is required before moving onto the Coolant Reservoir and surge tank as well as the air intake duct from the Throttle Body and air cleaner assembly.

Related Chevrolet Express 3500 Parts
 Chevrolet Express 3500 Coolant Pipe
 Chevrolet Express 3500 Coolant Reservoir
 Chevrolet Express 3500 Coolant Reservoir Cap
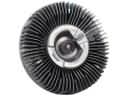 Chevrolet Express 3500 Cooling Fan Clutch
 Chevrolet Express 3500 Fan Blade
 Chevrolet Express 3500 Fan Clutch
 Chevrolet Express 3500 Radiator
 Chevrolet Express 3500 Radiator Cap
 Chevrolet Express 3500 Radiator fan
 Chevrolet Express 3500 Thermostat
 Chevrolet Express 3500 Thermostat Gasket
 Chevrolet Express 3500 Water Pump Gasket