ChevyParts
My Garage
My Account
Cart
OEM Chevrolet K3500 A/C Switch
Air Conditioning Switch- Select Vehicle by Model
- Select Vehicle by VIN
Select Vehicle by Model
orMake
Model
Year
Select Vehicle by VIN
For the most accurate results, select vehicle by your VIN (Vehicle Identification Number).
28 A/C Switches found


Chevrolet K3500 Control Unit Part Number: 16148660


Chevrolet K3500 Control Unit Part Number: 16181175


Chevrolet K3500 Heater Control Part Number: 16233213


Chevrolet K3500 Heater Control Part Number: 9378815

Chevrolet K3500 Heater Control Part Number: 16233143


Chevrolet K3500 Heater Control Part Number: 9378805


Chevrolet K3500 Dash Control Unit Part Number: 16233142

Chevrolet K3500 Control Unit Part Number: 15645349

Chevrolet K3500 Temperature Control Part Number: 16209335

Chevrolet K3500 Blower Motor Switch Part Number: 16148673

Chevrolet K3500 Blower Motor Switch Part Number: 16147657

Chevrolet K3500 Heater Control Part Number: 16086055
Chevrolet K3500 Blower Motor Switch Part Number: 16182145
Chevrolet K3500 Blower Motor Switch Part Number: 16209345

Chevrolet K3500 Temperature Control Part Number: 16182125
Chevrolet K3500 Heater Control Part Number: 16168925
Chevrolet K3500 Heater Control Part Number: 16167575
Chevrolet K3500 Dash Control Unit, Rear Part Number: 16233144
Chevrolet K3500 Temperature Control Part Number: 16195485
Chevrolet K3500 Control Unit Part Number: 16195495
| Page 1 of 2 |Next >
1-20 of 28 Results
Chevrolet K3500 A/C Switch
Want to cut long-term maintenance and repair costs? Choose OEM A/C Switch. Those parts deliver top durability you can trust. On our site, you'll find a huge catalog of genuine Chevrolet K3500 parts. Prices are unbeatable, so you can keep more in your pocket. Every OEM Chevrolet K3500 A/C Switch includes a manufacturer's warranty. You can also get an easy return policy that keeps buying risk free. Fast delivery, get your car on the road quickly. It's simple to search, compare, and order. Stop guessing about quality or fit. Order today and save with parts that last.
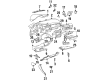
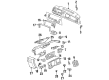
As a core element of the K3500 series Chevrolet vehicles the Chevrolet K3500 A/C Switch stands as an example of dependable performance in Chevrolet lineup. The vehicle's climate control system depends on the robust A/C Switch which supervises climate management to maintain comfortable interior conditions across all environmental settings. Drivers across all K3500 versions from 1988 to 2002 can experience better safety and efficiency due to this A/C Switch that brings direct control of temperature settings. The interface has simple buttons and dials which allow quick controls thus creating a safer operation while driving. The Chevrolet K3500 A/C Switch has become popular in the market due to its exceptional durability while providing smooth function with the Climate Control Module to optimize A/C system efficiency. Joint operation between the components improves airflow and enhances fuel economy by enabling the optimal engine performance. The A/C Switch delivers durability alongside functional excellence because it functions reliably under daily usage for Chevrolet K3500 operators in their professional and recreational activities. The the automaker model A/C Switch stands as an important automotive component because it unites functionality and reliability to provide an excellent driving experience to users.
Chevrolet K3500 A/C Switch Parts Questions & Experts Answers
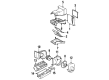
- Q: How to replace the front auxiliary A/C switch assembly on Chevrolet K3500?A:Removing the Front Auxiliary A/C control assembly requires starting with overhead console removal. Start by disconnecting the electrical harness which goes to the control assembly before taking the control assembly free from the overhead console. Start the installation process by returning the control assembly to its position in the overhead console then proceed with connecting its electrical harness. After installation check the overhead console circuit operation through tests to verify it works correctly.

Related Chevrolet K3500 Parts
 Chevrolet K3500 A/C Accumulator
 Chevrolet K3500 A/C Clutch
 Chevrolet K3500 A/C Hose
 Chevrolet K3500 A/C Idler Pulley
 Chevrolet K3500 Blower Control Switches
 Chevrolet K3500 Blower Motor
 Chevrolet K3500 Blower Motor Resistor
 Chevrolet K3500 Cabin Air Filter
 Chevrolet K3500 Evaporator
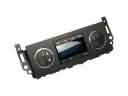 Chevrolet K3500 HVAC Control Module
 Chevrolet K3500 HVAC Pressure Switch
 Chevrolet K3500 Heater Core