ChevyParts
My Garage
My Account
Cart
OEM Chevrolet Lumina CV Boot
Axle Boot- Select Vehicle by Model
- Select Vehicle by VIN
Select Vehicle by Model
orMake
Model
Year
Select Vehicle by VIN
For the most accurate results, select vehicle by your VIN (Vehicle Identification Number).
6 CV Boots found

Chevrolet Lumina Seal Kit, Front Part Number: 26018333
$4.27 MSRP: $42.86You Save: $38.59 (91%)Ships in 1-2 Business Days
Chevrolet Lumina Seal Kit, Front Part Number: 26059842

Chevrolet Lumina Seal Kit, Front Part Number: 26005376

Chevrolet Lumina Seal Kit Part Number: 26044380

Chevrolet Lumina Seal Kit, Front Part Number: 26044381
Chevrolet Lumina Seal Kit, Front Part Number: 26001938
Chevrolet Lumina CV Boot
Want to cut long-term maintenance and repair costs? Choose OEM CV Boot. Those parts deliver top durability you can trust. On our site, you'll find a huge catalog of genuine Chevrolet Lumina parts. Prices are unbeatable, so you can keep more in your pocket. Every OEM Chevrolet Lumina CV Boot includes a manufacturer's warranty. You can also get an easy return policy that keeps buying risk free. Fast delivery, get your car on the road quickly. It's simple to search, compare, and order. Stop guessing about quality or fit. Order today and save with parts that last.
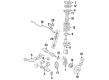
Specification boot for Chevrolet Lumina CV defines the car series that was manufactured between 1989 and 2013 and prioritized the dependability of the automobile. This flexible rubber or plastic boot is very crucial in protecting the Constant Velocity (CV) joints which is very important in transmitting power from the transaxle to the wheels. As for the function of the Chevrolet Lumina CV Boot, it will hold the requisite lubricant and keep out dirt and other contaminants and thus help to keep the CV joints in their premier working condition as long as possible. The fact which proved that it can be used in all types of Lumina models with fixed and plunging CV joints speaks about its flexibility. It is necessary to also inspect the CV Boot regularly because damage to it can cause the CV joint to fail, reducing efficacy and safety further. Substantial changes in the design of the Chevrolet Lumina like enhancements in the suspension, among others, are necessary so that even the front-wheel-drive is sturdy; thus, the need for focusing on the CV Boot maintenance. More specifically, in total reference, and supported by the Turbo-Hydramatic 125 transmission, the Lumina's componentry adds functionality to the CV Boot- all in the area of facilitating smooth transmission of power. It seems that Chevrolet Lumina CV Boot occupies a special place in automotive market, as well as the boots themselves thanks to their reliability and, in particular, the protection that they provide for the car and becoming one of the backbones of its performance. In a nutshell, more proof is the Chevrolet Lumina CV Boot in terms of quality and innovation symbolizing Chevrolet as a dependable midsize vehicle aside from the classy and stunning Lumina.
Chevrolet Lumina CV Boot Parts Questions & Experts Answers
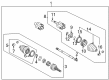
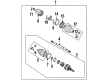
- Q: How to replace the inner CV Boot and CV Joint of the axle shaft assembly on Chevrolet Lumina?A:The following tools are necessary for inner joint and boot replacement of the Axle Shaft assembly: snap ring pliers (J8059) and earless clamp tool (J35910) and small swage tool (J41048). The necessary tools for the replacement project are snap ring pliers (J8059), earless clamp tool (J35910), and small swage tool (J41048). Check the transmission sealing surface of the halfshaft for corrosion before cleaning it with 320 grit cloth depending on need. The hand grinder should slice through the swage ring but avoid causing any damage to the tripot housing while you remove and dispose of the large boot retaining clamp. Slowly extract the inboard boot from the trilobal tripot bushing by moving it off the joint. Start by taking off the housing that contains the tripot joint spider and halfshaft bar and then detach the trilobal tripot bushing . Use snap ring pliers (J8059) to open up spacer rings and then take out the spider assembly with its attached parts which include the spacer ring , spider assembly , second spacer ring , and inboard boot . Use a wire brush to clean the halfshaft bar before checking the spider assembly for signs of wear or damage. Assemble the system only after you replace all failed components. Fit the new swage ring onto the joint boot's small end before sliding the unit on to the halfshaft bar. Install the joint boot in the halfshaft bar groove then fix in position its outboard end in the small swage tool (J41048). Check that the boot neck placement is correct before tightening the bolts with appropriate torque. Use a ratchet wrench to torque the bolts of the small swage tool (J41048) by rotating them 180 degrees at a time starting from the inboard boot and swage ring position. Use snap ring pliers (J8059) to position the spacer ring and spider assembly onto the halfshaft bar before setting the next spacer ring to achieve complete seating. Stuff the inboard boot with half of the service kit grease before you repack the housing with remaining grease. Insert the trilobal tripot bushing onto the housing before attaching its larger new boot retaining clamp onto the boot. The housing needs to slide over the spider assembly while inspecting the formed shape of the boot. Place the joint assembly to its correct vehicle size while keeping the boot and tripot housing and large boot retaining clamp properly aligned. Discipline the boot retaining clamp using an earless clamp tool (J35910) to compress it to 176 nm (130 ft. Lbs.). Either use a breaker bar coupled with a torque wrench or repeat this process until the clamp ear gap measurement is tight.

Related Chevrolet Lumina Parts
 Chevrolet Lumina Axle Shaft
 Chevrolet Lumina Axle Shaft Retainer
 Chevrolet Lumina CV Joint
 Chevrolet Lumina Control Arm Bracket
 Chevrolet Lumina Crossmember Bushing
 Chevrolet Lumina Drive Shaft
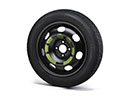 Chevrolet Lumina Spare Wheel
 Chevrolet Lumina Spindle Nut
 Chevrolet Lumina Sway Bar Link
 Chevrolet Lumina Trailing Arm
 Chevrolet Lumina Wheel Hub Bolt
 Chevrolet Lumina Wheel Seal