ChevyParts
My Garage
My Account
Cart
OEM Chevrolet Metro Starter
Starter Ignition- Select Vehicle by Model
- Select Vehicle by VIN
Select Vehicle by Model
orMake
Model
Year
Select Vehicle by VIN
For the most accurate results, select vehicle by your VIN (Vehicle Identification Number).
3 Starters found

Chevrolet Metro Starter Part Number: 30005925
Chevrolet Metro Starter Part Number: 30005563

Chevrolet Metro Starter Part Number: 30005226
Chevrolet Metro Starter
Want to cut long-term maintenance and repair costs? Choose OEM Starter. Those parts deliver top durability you can trust. On our site, you'll find a huge catalog of genuine Chevrolet Metro parts. Prices are unbeatable, so you can keep more in your pocket. Every OEM Chevrolet Metro Starter includes a manufacturer's warranty. You can also get an easy return policy that keeps buying risk free. Fast delivery, get your car on the road quickly. It's simple to search, compare, and order. Stop guessing about quality or fit. Order today and save with parts that last.
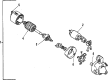
The Chevrolet Metro Starter is an important part of the vehicle which helps in converting the electrical energy available in the battery to mechanical energy to start the engine. This is done by an externally mounted solenoid which is connected to the battery, the solenoid engages the starter motor. In the starter there is an armature which rotates due to electromagnetic effect and thus engages the starter drive with the flywheel or the flexplate ring gear of the engine. Chevrolet Metro cars have basically been fitted with electric starters and these are the most popular ones in the market. The solenoid in these starters clutches a drive pinion to the engine flywheel, and such improvements as gear reduction have made the systems more efficient and smaller in size. Whereas standard engines can use original equipment (OE) starters, it is often necessary to install performance starters in high-compression engines that are used in performance cars to prevent problems such as kickback or starter failure.
Chevrolet Metro Starter Parts and Q&A
- Q: How to replace the starter motor on Chevrolet Metro?A:The first step to change the Starter motor is to disconnect the negative (-) word from the battery. Next, you should take the retaining nut and the positive Battery Cable and take them away from the Starter Solenoid and then proceed to disconnected the solenoid electrical connector. Trade the two mounting bolts off and pull out the Starter motor assembly from the automobile. Par for installation, fasten the Starter motor assembly back to the vehicle using two mounting bolts and tighten them to 23 n.m (17 lb ft). Connect the solenoid electrical connector and introduce the battery positive terminal cable into the solenoid with a retaining nut at 10 n.m (89 lb in). Lastly, attach the negative (-) battery cable and tighten the negative (-) battery cable-to-negative (-) battery terminal retainer to a torque of 15 n.m (11 lb ft).
- Q: What tools are required to service and repair the starter motor on Chevrolet Metro?A:The required tools for fixing Starter motors consist of tension scale (J 544-01), dial indicator (J 8001), magnetic base (J 26900-13), vernier caliper (J 26900-5), and digital multimeter (J 39200). First clean all Starter motor components while sanding away burn marks and clearing dirt from the commutator end of the Armature by using #300 or #400 grit sandpaper followed by wiping with a clean cloth. Set the Armature on v-blocks then use the dial indicator (J 8001) along with the magnetic base (J 26900-13) to determine commutator run-out; discard the Armature if it exceeds 0.40 mm (0.016 in). Use the vernier caliper (J 26900-5) to check the commutator outside diameter then replace the Armature if the measurement falls below the specified minimum diameter for automatic or manual transaxle requirements. The Armature needs replacement when commutator insulation depth falls below 0.2 mm (0.008 in). The digital multimeter (J 39200) should be used to check the core to commutator resistance which must be below 5.0 ohms for the Armature to remain in service. Test the commutator segment-to-segment resistance levels until reaching 5.0 ohms and replace the Armature when this value is exceeded. The test for manual transaxle field coils requires measuring resistance between lead wires and the yoke component; replace the yoke if resistance is at 5 ohms or below. The brush requires replacement through vernier caliper (J 26900-5) measurements when its length falls below specification. The digital multimeter (J 39200) should be used to measure resistance between positive and negative brush holders. Replace the brush holder whenever the measured resistance falls below 5.0 ohms. The brush spring tension needs to be checked with j 544-01 tension scale to replace the spring when maintained tension goes below the minimum level. Use the digital multimeter (J 39200) to check the pull-in and hold-in coils resistance of the Starter Solenoid. Replace the solenoid when either resistance passes 5.0 ohms. Check and replace all components of pinion drive lever, overrunning clutch, Armature bushing and bearings when signs of wear or damage emerge. The maintenance process concludes with an evaluation of the internal gear assembly, idle gears, brush springs, brush holder and positive plate insulation before changing all affected components displaying signs of wear or damage.

Related Chevrolet Metro Parts
 Chevrolet Metro Alternator
 Chevrolet Metro Alternator Bearing
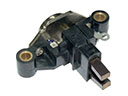 Chevrolet Metro Alternator Brush
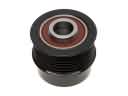 Chevrolet Metro Alternator Pulley
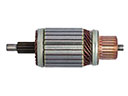 Chevrolet Metro Armature
 Chevrolet Metro Battery Cable
 Chevrolet Metro Fuse Box
 Chevrolet Metro Starter Brush
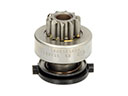 Chevrolet Metro Starter Drive
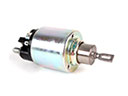 Chevrolet Metro Starter Solenoid
 Chevrolet Metro Voltage Regulator