ChevyParts
My Garage
My Account
Cart
OEM Chevrolet Silverado 1500 Classic Oil Pan
Oil Drain Pan- Select Vehicle by Model
- Select Vehicle by VIN
Select Vehicle by Model
orMake
Model
Year
Select Vehicle by VIN
For the most accurate results, select vehicle by your VIN (Vehicle Identification Number).
3 Oil Pans found


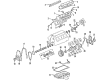
Chevrolet Silverado 1500 Classic Oil Pan Part Number: 12599806
$139.05 MSRP: $335.25You Save: $196.20 (59%)Ships in 1-3 Business Days
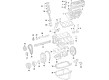
Chevrolet Silverado 1500 Classic Oil Pan Part Number: 12597153
$346.25 MSRP: $544.81You Save: $198.56 (37%)Ships in 1-3 Business Days
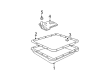
Chevrolet Silverado 1500 Classic Oil Pan
Want to cut long-term maintenance and repair costs? Choose OEM Oil Pan. Those parts deliver top durability you can trust. On our site, you'll find a huge catalog of genuine Chevrolet Silverado 1500 Classic parts. Prices are unbeatable, so you can keep more in your pocket. Every OEM Chevrolet Silverado 1500 Classic Oil Pan includes a manufacturer's warranty. You can also get an easy return policy that keeps buying risk free. Fast delivery, get your car on the road quickly. It's simple to search, compare, and order. Stop guessing about quality or fit. Order today and save with parts that last.
Chevrolet Silverado 1500 Classic Oil Pan Parts Questions & Experts Answers
- Q: How to replace the oil pan on Chevrolet Silverado 1500 Classic?A:Begin the Oil Pan replacement process by securely raising your vehicle then supporting it. Start by draining the oil through Drain Plug and Oil Filter removal after disconnecting the skid plate bolts and plate (if equipment includes these components). The 2wd requires removal of the crossmember bolts along with the bar component. In addition to front differential carrier removal 4wd owners should complete the same process. Begin by taking out the battery cable bracket bolts then proceed to remove Starter and transmission cover while seizing positive battery cable clip bolts next to evenly disconnect oil level sensor electrical connector. The procedure requires transmission bolt removal for both manual and automatic designs. Afterward, discard the oil level sensor which cannot be reused. Take out the Oil Pan bolts and nuts before removing the Oil Pan and throwing away the Oil Pan Gasket. It's essential to examine and clean the Oil Pan when needed. During installation apply a 0.197 inch (5 mm) wide adhesive strip across both sides of front cover to engine block junction while extending the adhesive strip to cover the entire rear oil seal housing to engine block junction. Install the Oil Pan Gasket immediately after gasket placement while adhesive remains wet. Install a brand new gasket. Before mounting the Oil Pan it must rest flat or sit no further than 0.3 mm (0.011 inch) in front of the engine block's rear surface. Set the Oil Pan straight with a straight edge after you have pressed the gasket into its grooves. After tightening the Oil Pan bolts and nuts until they become snug use a feeler gauge to check the transmission housing clearance. If this measurement is over 0.3 mm (0.011 inch) repeat the alignment process. The alignment process must be repeated when the feeler gauge measurement goes beyond 0.3 mm (0.011 inch). After tightening the Oil Pan bolts to 25 nm torque with specified sequence apply a feeler gauge measurement for clearance check. Slide the new Drain Plug o-ring along the Drain Plug before tightening it to 25 nm (18 ft. Lbs.). After tightening the new oil level sensor to 13 nm (115 inch lbs.), put the transmission cover back in place and secure all bolts to 12 nm (106 inch lbs.). Tighten both manual and automatic transmission bolts with 50 nm (37 ft. Lbs.) of torque. Finally, bolt and tighten the positive battery cable clip to 9 nm (80 inch lbs.). Reinstall the Starter and attach the oil level sensor electrical connector. Reinstall the battery cable bracket bolts while maintaining a torque of 12 nm (106 inch lbs.). The 2wd crossmember requires bolt installation at 100 nm (74 ft. Lbs.) torque. When reinstalling the front differential carrier and crossmember for 4wd models keep the bolts at 100 nm (74 ft. Lbs.). Follow this step by reinstalling the skid plate of the Oil Pan with 20 nm (15 ft. Lbs.) torque settings. Apply clean engine oil to the Oil Filter gasket before installing it then torque the filter to 30 nm (22 ft. Lbs.). To finish the procedure lower the vehicle down and add the correct amount and grade of engine oil as recommended.

Related Chevrolet Silverado 1500 Classic Parts
 Chevrolet Silverado 1500 Classic Camshaft Bearing
 Chevrolet Silverado 1500 Classic Crankshaft Seal
 Chevrolet Silverado 1500 Classic Crankshaft Thrust Washer Set
 Chevrolet Silverado 1500 Classic Engine Mount Bracket
 Chevrolet Silverado 1500 Classic Exhaust Valve
 Chevrolet Silverado 1500 Classic Harmonic Balancer
 Chevrolet Silverado 1500 Classic Intake Valve
 Chevrolet Silverado 1500 Classic Oil Pump
 Chevrolet Silverado 1500 Classic Piston
 Chevrolet Silverado 1500 Classic Rocker Shaft Spring Kit
 Chevrolet Silverado 1500 Classic Rod Bearing
 Chevrolet Silverado 1500 Classic Timing Chain