ChevyParts
My Garage
My Account
Cart
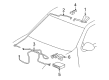
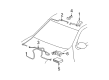
OEM Chevrolet Suburban 2500 Body Control Module
BCM- Select Vehicle by Model
- Select Vehicle by VIN
Select Vehicle by Model
orMake
Model
Year
Select Vehicle by VIN
For the most accurate results, select vehicle by your VIN (Vehicle Identification Number).
28 Body Control Modules found


Chevrolet Suburban 2500 Control Module Part Number: 15881861
$212.97 MSRP: $437.64You Save: $224.67 (52%)Ships in 1-2 Business Days


Chevrolet Suburban 2500 Body Control Module Part Number: 22846365
$245.89 MSRP: $459.98You Save: $214.09 (47%)Ships in 1-2 Business Days


Chevrolet Suburban 2500 Control Module, Rear Part Number: 25889603
$531.07 MSRP: $773.19You Save: $242.12 (32%)Ships in 1-2 Business Days


Chevrolet Suburban 2500 Body Control Module Part Number: 25835966
$267.12 MSRP: $499.70You Save: $232.58 (47%)Ships in 1-2 Business Days


Chevrolet Suburban 2500 Control Module Part Number: 20821156
$152.69 MSRP: $419.70You Save: $267.01 (64%)Ships in 1-2 Business Days


Chevrolet Suburban 2500 Antitheft Module Part Number: 22738087
$149.91 MSRP: $293.49You Save: $143.58 (49%)Ships in 1 Business Day
Chevrolet Suburban 2500 Control Module Part Number: 25824256
$263.39 MSRP: $528.67You Save: $265.28 (51%)Ships in 1-2 Business Days


Chevrolet Suburban 2500 Radio Control Part Number: 15886277
$204.30 MSRP: $419.83You Save: $215.53 (52%)Ships in 1-2 Business Days

Chevrolet Suburban 2500 Control Module Part Number: 23190708
$490.85 MSRP: $720.93You Save: $230.08 (32%)Ships in 1-2 Business Days

Chevrolet Suburban 2500 Radio Control Part Number: 22981560
$335.52 MSRP: $607.28You Save: $271.76 (45%)Ships in 1-2 Business Days


Chevrolet Suburban 2500 Module Part Number: 22744241
$78.38 MSRP: $133.44You Save: $55.06 (42%)Ships in 1-2 Business Days


Chevrolet Suburban 2500 Object Sensor Part Number: 20823460
$393.75 MSRP: $573.26You Save: $179.51 (32%)Ships in 1-2 Business Days


Chevrolet Suburban 2500 Module Part Number: 25973805
$122.80 MSRP: $209.08You Save: $86.28 (42%)Chevrolet Suburban 2500 Object Sensor Part Number: 22896038
$342.37 MSRP: $511.87You Save: $169.50 (34%)Ships in 1-3 Business Days

Chevrolet Suburban 2500 Control Module Part Number: 25883862
$153.09 MSRP: $228.88You Save: $75.79 (34%)

Chevrolet Suburban 2500 Module, Rear Part Number: 15877571


Chevrolet Suburban 2500 Control Module Part Number: 25819594


Chevrolet Suburban 2500 Module Part Number: 15187264


Chevrolet Suburban 2500 Control Module Part Number: 25911919
$230.43 MSRP: $344.43You Save: $114.00 (34%)

Chevrolet Suburban 2500 Control Module Part Number: 22831419
| Page 1 of 2 |Next >
1-20 of 28 Results
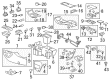
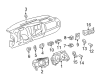
Chevrolet Suburban 2500 Body Control Module
Our website offers an extensive catalog of genuine Chevrolet Suburban 2500 Body Control Module at unbeatable prices. Every OEM Chevrolet Suburban 2500 Body Control Module comes with a manufacturer's warranty, an easy return policy, and rapid delivery service. Don't miss out on this great opportunity!
Chevrolet Suburban 2500 Body Control Module Parts Questions & Experts Answers
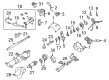
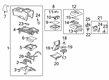
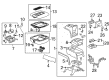
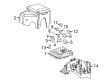
- Q: How to remove and replace the Body Control Module (BCM) on Chevrolet Suburban 2500?A: Disconnection of the negative Battery Cables must come first followed by the knee bolster's removal. Unplug all connectors including the brown one before taking out the bcm from its position on the sliding bracket. Place the bcm on the bracket then join all its connectors except the brown one which goes in last. Put in the knee bolster and complete the bcm repair steps with negative cable connections.

Related Chevrolet Suburban 2500 Parts
 Chevrolet Suburban 2500 Automatic Transmission Shift Position Sensor Switch
 Chevrolet Suburban 2500 Battery Fuse
 Chevrolet Suburban 2500 Brake Light Switch
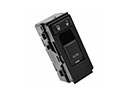 Chevrolet Suburban 2500 Door Lock Switch
 Chevrolet Suburban 2500 Fuel Pump Relay
 Chevrolet Suburban 2500 Headlight Relay
 Chevrolet Suburban 2500 Headlight Switch
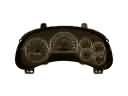 Chevrolet Suburban 2500 Instrument Cluster
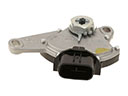 Chevrolet Suburban 2500 Neutral Safety Switch
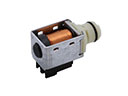 Chevrolet Suburban 2500 Shift Solenoid
 Chevrolet Suburban 2500 Speedometer
 Chevrolet Suburban 2500 Turn Signal Switch