ChevyParts
My Garage
My Account
Cart
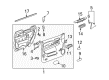
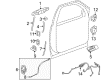
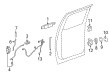
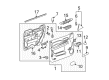
OEM Chevrolet Suburban 2500 Door Handle
Inside Door Handle- Select Vehicle by Model
- Select Vehicle by VIN
Select Vehicle by Model
orMake
Model
Year
Select Vehicle by VIN
For the most accurate results, select vehicle by your VIN (Vehicle Identification Number).
111 Door Handles found


Chevrolet Suburban 2500 Handle, Inside, Front Driver Side Part Number: 22855617
$77.78 MSRP: $115.77You Save: $37.99 (33%)Ships in 1-2 Business Days


Chevrolet Suburban 2500 Handle, Outside, Black, Passenger Side Part Number: 84053440
$77.29 MSRP: $112.52You Save: $35.23 (32%)Ships in 1-3 Business Days

Chevrolet Suburban 2500 Handle, Outside, Driver Side Part Number: 15930535
$6.05 MSRP: $9.00You Save: $2.95 (33%)Ships in 1-2 Business Days


Chevrolet Suburban 2500 Handle, Outside, Black, Driver Side Part Number: 84053452
$68.50 MSRP: $101.95You Save: $33.45 (33%)Ships in 1-3 Business Days

Chevrolet Suburban 2500 Handle, Inside, Front Passenger Side Part Number: 22855610
$79.51 MSRP: $118.34You Save: $38.83 (33%)Ships in 1-2 Business Days


Chevrolet Suburban 2500 Handle, Inside, Front Driver Side Part Number: 22855624
$71.56 MSRP: $104.19You Save: $32.63 (32%)Ships in 1-2 Business Days

Chevrolet Suburban 2500 Handle Part Number: 15273470
$71.01 MSRP: $105.69You Save: $34.68 (33%)Ships in 1-2 Business Days

Chevrolet Suburban 2500 Handle, Inside, Titanium, Front Driver Side Part Number: 22855625
$71.56 MSRP: $104.19You Save: $32.63 (32%)Ships in 1-2 Business Days


Chevrolet Suburban 2500 Handle, Outside, Passenger Side Part Number: 84053458
$79.36 MSRP: $118.12You Save: $38.76 (33%)Ships in 1-2 Business Days

Chevrolet Suburban 2500 Handle, Outside, Rear Passenger Side Part Number: 15029900
$25.02 MSRP: $37.87You Save: $12.85 (34%)Ships in 1-3 Business Days
Chevrolet Suburban 2500 Handle, Outside Part Number: 25838218
$148.39 MSRP: $216.04You Save: $67.65 (32%)Ships in 1-2 Business DaysChevrolet Suburban 2500 Handle, Outside, Rear Driver Side Part Number: 15029899
$28.95 MSRP: $43.81You Save: $14.86 (34%)Ships in 1-3 Business Days
Chevrolet Suburban 2500 Handle, Outside, Blue, Front Passenger Side Part Number: 15205689
$42.53 MSRP: $63.30You Save: $20.77 (33%)Ships in 1-2 Business Days
Chevrolet Suburban 2500 Grip Handle, Opel Gray, Passenger Side Part Number: 20986867
$23.74 MSRP: $35.34You Save: $11.60 (33%)Ships in 1-3 Business DaysChevrolet Suburban 2500 Handle, Outside, Black, Front Driver Side Part Number: 84053444
$79.36 MSRP: $118.12You Save: $38.76 (33%)Ships in 1-3 Business Days


Chevrolet Suburban 2500 Grip Handle Part Number: 15044366
$18.20 MSRP: $27.09You Save: $8.89 (33%)


Chevrolet Suburban 2500 Handle, Outside, Driver Side Part Number: 84053448
$79.21 MSRP: $117.89You Save: $38.68 (33%)
Chevrolet Suburban 2500 Handle, Outside, Front Passenger Side Part Number: 84053436
$99.39 MSRP: $147.93You Save: $48.54 (33%)


Chevrolet Suburban 2500 Handle, Outside, Black, Driver Side Part Number: 84053438
$107.52 MSRP: $160.03You Save: $52.51 (33%)Chevrolet Suburban 2500 Handle, Inside, Titanium, Front Passenger Side Part Number: 22855622
$74.26 MSRP: $110.52You Save: $36.26 (33%)
| Page 1 of 6 |Next >
1-20 of 111 Results
Chevrolet Suburban 2500 Door Handle
Want to cut long-term maintenance and repair costs? Choose OEM Door Handle. Those parts deliver top durability you can trust. On our site, you'll find a huge catalog of genuine Chevrolet Suburban 2500 parts. Prices are unbeatable, so you can keep more in your pocket. Every OEM Chevrolet Suburban 2500 Door Handle includes a manufacturer's warranty. You can also get an easy return policy that keeps buying risk free. Fast delivery, get your car on the road quickly. It's simple to search, compare, and order. Stop guessing about quality or fit. Order today and save with parts that last.
Chevrolet Suburban 2500 Door Handle Parts and Q&A
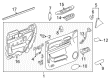
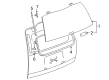
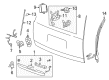
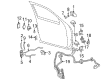
- Q: How to replace the rear door handle on Chevrolet Suburban 2500?A:The exterior handle replacement for the rear door begins with trimming away the panel followed by pulling out the water deflector when needed. Start by disconnecting the rod clip from the lock cylinder rod and follow it with outside handle nut removal to finally take out the outside handle. First unload the electrical connector if present and then detach the actuator cable together with the Door Lock Cylinder. The correct procedures must be followed if a lock cylinder repair becomes binding while separate coding methods exist for installing new lock cylinders. The installation of new lock cylinders requires application of gm p/n 12345120 or canadian p/n 726548 lubricant inside the lock case and the keyway. Place the Door Lock Cylinder followed by the actuator cable onto the assembly while connecting the electrical plug when needed before installing the handle system. Screw on the outside handle mounting nuts until they reach 9 n.m (80 lb in), then attach the lock cylinder rod to its clip. The last step involves reinstallation of the water deflector and trim panel if required.
- Q: How to replace the front door exterior door handle on Chevrolet Suburban 2500?A:One should start the front door exterior handle replacement journey by removing the trim panel and water deflector. First detach the outside handle rod from the rod clip followed by removing the lock cylinder rod from its clip. You should first free the outboard nut by removing the outside handle mounting nuts and the rubber cover. Separate the door-lock cylinder from the outside handle housing before resolving any restrictive lock cylinder function. Set and install the new handle onto the vehicle after handle removal. The inside of lock case together with the cylinder keyway requires lubricant gm p/n 12345120, canadian p/n 726548 or equivalent before reinstalling the lock cylinder. The outside handle housing receives the door-lock cylinder followed by the clipping of the lock cylinder clip onto the rod. Grab the handle rod and join it with the handle assembly clip before tightening the outside handle mounting nuts to 9 n.m (80 lb in). After completion, you must reinstall the rubber cover together with the water deflector along with the trim panel.


Related Chevrolet Suburban 2500 Parts
 Chevrolet Suburban 2500 Cup Holder
 Chevrolet Suburban 2500 Door Lock Cylinder
 Chevrolet Suburban 2500 Door Seal
 Chevrolet Suburban 2500 Door Striker
 Chevrolet Suburban 2500 Liftgate Hinge
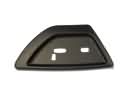 Chevrolet Suburban 2500 Seat Switch Panel
 Chevrolet Suburban 2500 Tailgate Latch
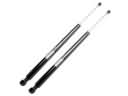 Chevrolet Suburban 2500 Tailgate Lift Support
 Chevrolet Suburban 2500 Tailgate Lock
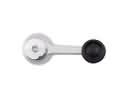 Chevrolet Suburban 2500 Window Crank Handles
 Chevrolet Suburban 2500 Window Motor
 Chevrolet Suburban 2500 Window Regulator