ChevyParts
My Garage
My Account
Cart
OEM GMC C2500 Universal Joint
U-Joint- Select Vehicle by Model
- Select Vehicle by VIN
Select Vehicle by Model
orMake
Model
Year
Select Vehicle by VIN
For the most accurate results, select vehicle by your VIN (Vehicle Identification Number).
2 Universal Joints found


GMC C2500 Universal Joints Part Number: 23104840
$36.45 MSRP: $88.98You Save: $52.53 (60%)


GMC C2500 Universal Joints Part Number: 88964413
$196.62 MSRP: $328.19You Save: $131.57 (41%)Ships in 1-2 Business Days
GMC C2500 Universal Joint
Want to cut long-term maintenance and repair costs? Choose OEM Universal Joint. Those parts deliver top durability you can trust. On our site, you'll find a huge catalog of genuine GMC C2500 parts. Prices are unbeatable, so you can keep more in your pocket. Every OEM GMC C2500 Universal Joint includes a manufacturer's warranty. You can also get an easy return policy that keeps buying risk free. Fast delivery, get your car on the road quickly. It's simple to search, compare, and order. Stop guessing about quality or fit. Order today and save with parts that last.
The GMC C2500 Universal Joint is one of the crucial assemble parts that provide mechanical reliability and performance in the GMC C2500 series which has been mediating the heavy load carrying vehicle especially the pickup truck market since 1960's. This GMC C2500 Universal Joint is employed to axially rotate the driveshaft and assumes the role of adjusting to any angles that may exist between components, thus maintaining efficiency of the vehicle's function. Though it is available in the different GMC C2500 models, this Universal Joint is an important component that helps support the integrity of the drive train. The cross variety has needle bearings enclosed by steel cups which makes it very durable and long lasting, something that is very important in the intense duties that the GMC C2500 is normally used in. Through the pre-lubricated style of the Universal Joint, its maintenance requirement is very limited and the shock absorption and vibration reduction property that the device provides enhance the safety and comfort of the ride. In particular, the GMC C2500 Universal Joint attracts the attention of consumers due to the ability to function under great load which makes the car ideal for work and off-road using. This GMC C2500 universal joint has stood the test and has added value and reliability to GMC C2500 vehicles making sure that the drivers of these trucks will not be let down for many years to come.
GMC C2500 Universal Joint Parts Questions & Experts Answers
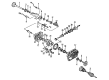
- Q: How to replace the universal joint with a nylon injected ring using the J 9522-3 and J 9522-5 tools on GMC C2500?A:The replacement of a universal joint with a nylon injected ring requires the use of tools J 9522-3 Universal Joint Bearing Separator and J 9522-5 Universal Joint Bearing Spacer Remover. Set the propeller shaft horizontally on a press table while maintaining it away from vise clamps to prevent damage to the tubing. Put marks on the propeller shaft ends to maintain their correct positions. Set the universal joint into a 30 mm (1 1/8 inch) socket with its lower yoke ear facing up. Apply pressure from the J 9522-3 to shear the plastic ring of the bearing cup before removing the lower cup from the yoke ear. Use the J 9522-5 between the seal and bearing cup to drive out any remaining portions of the bearing cup which won't come out properly. After pressing the bearing cup from the opposite side rotate the propeller shaft to push it out. Proceed by removing the cross section and all remaining universal joint hardware. Check both the retaining ring grooves and bearing cup bores for damage before cleaning out any plastic shearing that would prevent new parts from seating correctly. To assemble the yoke start by inserting a bearing cup on one side followed by cross placement into the yoke while verifying trunnion freedom of movement. Press each bearing cup against the yoke ear so it becomes flush while maintaining the correct trunnion alignment for both sides. Verify proper connection before checking if needle bearings are lined up properly. Seating the bearing retainer requires additional force until the retainer groove releases from the yoke before applying the retainers for both sides using either hand pressure or a dead blow hammer to secure installation. You should apply chassis grease to the snap ring when putting it into the bearing cup groove to ensure proper placement.


