ChevyParts
My Garage
My Account
Cart
OEM GMC Sierra 1500 Classic Pushrod
Valve Push Rod- Select Vehicle by Model
- Select Vehicle by VIN
Select Vehicle by Model
orMake
Model
Year
Select Vehicle by VIN
For the most accurate results, select vehicle by your VIN (Vehicle Identification Number).
1 Pushrod found


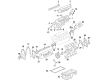
GMC Sierra 1500 Classic Push Rods Part Number: 10238852
$18.77 MSRP: $30.90You Save: $12.13 (40%)Ships in 1-2 Business Days
GMC Sierra 1500 Classic Pushrod
Want to cut long-term maintenance and repair costs? Choose OEM Pushrod. Those parts deliver top durability you can trust. On our site, you'll find a huge catalog of genuine GMC Sierra 1500 Classic parts. Prices are unbeatable, so you can keep more in your pocket. Every OEM GMC Sierra 1500 Classic Pushrod includes a manufacturer's warranty. You can also get an easy return policy that keeps buying risk free. Fast delivery, get your car on the road quickly. It's simple to search, compare, and order. Stop guessing about quality or fit. Order today and save with parts that last.
GMC Sierra 1500 Classic Pushrod Parts Questions & Experts Answers
- Q: How to replace the pushrod and valve rocker arm on GMC Sierra 1500 Classic?A:Mark all components first as part of the process to replace the valve Rocker Arm and push rod and then organize them for assembly. The first step requires removing the Rocker Arm cover before taking out all the rocker arms together with their supports and pushrods. The rocker arms plus pushrods require inspection for cleanliness while inspection can proceed as needed. Installation requires maintaining part order which leads to proper reinstallation at original positions. Mount the pushrods onto the vehicle yet keep the arrow point on each Rocker Arm support in its raised position until setting the Rocker Arm supports. Use the specified item number from sealers, adhesives, and lubricants to apply lubricant on the Pushrod socket and roller pivot and valve stem tip. Begin by using fingers to start bolts at locations , , and before proceeding with the remainder of the Rocker Arm bolts. Set the crankshaft balancer to align its mark at 57-63 degrees either clockwise or counterclockwise away from the engine front cover tab. The rocker arms require no further adjustment of valve lash because they need proper torque during installation. Systematically tighten all Rocker Arm bolts to 30 nm (22 ft. Lbs.) after you install the Rocker Arm cover.

Related GMC Sierra 1500 Classic Parts
 GMC Sierra 1500 Classic Balance Shaft Bearing Set
 GMC Sierra 1500 Classic Balance Shaft Gear
 GMC Sierra 1500 Classic Camshaft
 GMC Sierra 1500 Classic Coolant Filter
 GMC Sierra 1500 Classic Crankshaft Gear
 GMC Sierra 1500 Classic Crankshaft Pulley
 GMC Sierra 1500 Classic Head Gasket
 GMC Sierra 1500 Classic Oil Filler Cap
 GMC Sierra 1500 Classic Oil Pump
 GMC Sierra 1500 Classic Rocker Shaft Spring Kit
 GMC Sierra 1500 Classic Valve Cover Gasket
 GMC Sierra 1500 Classic Valve Stem Oil Seal