ChevyParts
My Garage
My Account
Cart
OEM GMC Sierra 3500 Classic Crankshaft Seal
- Select Vehicle by Model
- Select Vehicle by VIN
Select Vehicle by Model
orMake
Model
Year
Select Vehicle by VIN
For the most accurate results, select vehicle by your VIN (Vehicle Identification Number).
5 Crankshaft Seals found


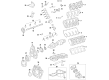
GMC Sierra 3500 Classic Rear Main Seal Part Number: 97209342
$47.90 MSRP: $81.54You Save: $33.64 (42%)Ships in 1-2 Business Days


GMC Sierra 3500 Classic Rear Main Seal Part Number: 89060436
$24.24 MSRP: $39.93You Save: $15.69 (40%)Ships in 1-3 Business Days


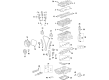
GMC Sierra 3500 Classic Timing Cover Oil Seal, Front Part Number: 12580743
$16.05 MSRP: $26.45You Save: $10.40 (40%)Ships in 1-3 Business Days

GMC Sierra 3500 Classic Front Crank Seal Part Number: 97209341
$40.81 MSRP: $69.48You Save: $28.67 (42%)Ships in 1-2 Business Days
GMC Sierra 3500 Classic Rear Main Seal Part Number: 12587621
$37.56 MSRP: $63.95You Save: $26.39 (42%)Ships in 1-3 Business Days
GMC Sierra 3500 Classic Crankshaft Seal
Our website offers an extensive catalog of genuine GMC Sierra 3500 Classic Crankshaft Seal at unbeatable prices. Every OEM GMC Sierra 3500 Classic Crankshaft Seal comes with a manufacturer's warranty, an easy return policy, and rapid delivery service. Don't miss out on this great opportunity!
GMC Sierra 3500 Classic Crankshaft Seal Parts Questions & Experts Answers
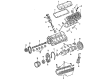
- Q: How to Replace the Front Crankshaft Seal for Engines LH6, LY6, L76, and L92 on GMC Sierra 3500 Classic?A: The replacement process for crankshaft front oil seal 140 on engines LH6, LY6, L76, and L92 requires initial crankshaft balancer removal followed by removal of the front cover seal 140. Failure to lubricate the oil seal sealing surface together with avoiding reuse of the crankshaft front oil seal constitutes essential requirements for this procedure. Clean engine oil should be used to lubricate both the new oil seal (140) outer edge and the front cover oil seal bore before installation starts. The procedure starts with installing the crankshaft front oil seal (140) onto the guide of Crankshaft Front Oil Seal Installer (J 41478). Use the threaded rod of J 41478 along with its nut and washer and guide and oil seal to insert into the crankshaft end for proper oil seal installation into the cover bore. Utilize a wrench to secure the installer bolt hex while another wrench turns the installer nut clockwise to deliver the seal completely inside the cover bore. Check the front cover bore for correct and even installation of the oil seal after using the J 41478 tool to install the component. Finally, reinstall the crankshaft balancer.

Related GMC Sierra 3500 Classic Parts
 GMC Sierra 3500 Classic Camshaft Bearing
 GMC Sierra 3500 Classic Coolant Filter
 GMC Sierra 3500 Classic Engine Mount Bracket
 GMC Sierra 3500 Classic Intake Valve
 GMC Sierra 3500 Classic Oil Pan
 GMC Sierra 3500 Classic Oil Pan Gasket
 GMC Sierra 3500 Classic Oil Pump
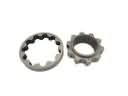 GMC Sierra 3500 Classic Oil Pump Rotor Set
 GMC Sierra 3500 Classic Rod Bearing
 GMC Sierra 3500 Classic Timing Chain
 GMC Sierra 3500 Classic Timing Cover Gasket
 GMC Sierra 3500 Classic Valve Cover Grommet