ChevyParts
My Garage
My Account
Cart
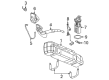
OEM GMC Yukon XL 1500 Fuel Pump
Gas Pump- Select Vehicle by Model
- Select Vehicle by VIN
Select Vehicle by Model
orMake
Model
Year
Select Vehicle by VIN
For the most accurate results, select vehicle by your VIN (Vehicle Identification Number).
17 Fuel Pumps found


GMC Yukon XL 1500 Fuel Pump Part Number: 84445142
$405.93 MSRP: $834.17You Save: $428.24 (52%)Ships in 1-2 Business Days


GMC Yukon XL 1500 Fuel Pump Part Number: 19332070
$334.81 MSRP: $688.02You Save: $353.21 (52%)Ships in 1-2 Business Days

GMC Yukon XL 1500 Fuel Pump Part Number: 19299715
$359.47 MSRP: $738.69You Save: $379.22 (52%)Ships in 1-2 Business Days


GMC Yukon XL 1500 Fuel Pump Part Number: 19208963
$277.94 MSRP: $571.16You Save: $293.22 (52%)Ships in 1-2 Business Days


GMC Yukon XL 1500 Fuel Pump Part Number: 19168707
$309.62 MSRP: $636.26You Save: $326.64 (52%)Ships in 1 Business DayGMC Yukon XL 1500 Fuel Pump Part Number: 84445145
$257.45 MSRP: $529.06You Save: $271.61 (52%)Ships in 1-2 Business Days
GMC Yukon XL 1500 Fuel Pump Part Number: 19370396
$333.16 MSRP: $616.40You Save: $283.24 (46%)

GMC Yukon XL 1500 Fuel Pump Part Number: 19369905
$211.45 MSRP: $434.51You Save: $223.06 (52%)Ships in 1-2 Business DaysGMC Yukon XL 1500 Fuel Pump Part Number: 19368772
$307.01 MSRP: $630.91You Save: $323.90 (52%)Ships in 1-2 Business Days
GMC Yukon XL 1500 Fuel Pump Part Number: 19331311
$387.49 MSRP: $701.34You Save: $313.85 (45%)Ships in 1-2 Business DaysGMC Yukon XL 1500 Fuel Pump Part Number: 19168775
$232.64 MSRP: $417.30You Save: $184.66 (45%)Ships in 1-3 Business DaysGMC Yukon XL 1500 Fuel Pump Part Number: 19167498
$232.50 MSRP: $477.78You Save: $245.28 (52%)Ships in 1-2 Business Days
GMC Yukon XL 1500 Module Part Number: 15759666
$341.89 MSRP: $613.26You Save: $271.37 (45%)GMC Yukon XL 1500 Module Part Number: 88966963
GMC Yukon XL 1500 Fuel Pump Part Number: 25361361
GMC Yukon XL 1500 Fuel Pump Part Number: 19179477

GMC Yukon XL 1500 Fuel Pump Part Number: 15205629
GMC Yukon XL 1500 Fuel Pump
Want to cut long-term maintenance and repair costs? Choose OEM Fuel Pump. Those parts deliver top durability you can trust. On our site, you'll find a huge catalog of genuine GMC Yukon XL 1500 parts. Prices are unbeatable, so you can keep more in your pocket. Every OEM GMC Yukon XL 1500 Fuel Pump includes a manufacturer's warranty. You can also get an easy return policy that keeps buying risk free. Fast delivery, get your car on the road quickly. It's simple to search, compare, and order. Stop guessing about quality or fit. Order today and save with parts that last.
GMC Yukon XL 1500 Fuel Pump Parts and Q&A
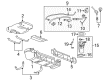
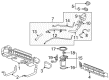
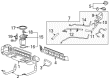
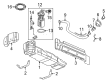
- Q: How to replace the fuel pump module on GMC Yukon XL 1500?A:The necessary tools for Fuel Tank pump module replacement include a fuel pressure gauge (J 34730 1A) together with a fuel sender lock nut wrench (J 39765). To begin the task you need to remove the negative Battery Cable while also emptying fuel system pressure. The Fuel Tank drainage should happen before extracting it and removing the fuel sender assembly. The process starts with noting the fuel strainer position on the fuel sender followed by supporting the fuel sender assembly with one hand while pulling the strainer off for discardable inspection. Before reusing the strainer inspect its condition and obtain a new one if necessary. The Fuel Tank needs cleaning when needed. Disconnect the Fuel Pump electrical connector before removing the Fuel Level Sensor electrical connector retaining clip and finally disconnecting this connector from beneath the fuel sender cover. Push the retaining clip of the Fuel Level Sensor and then grip its locking tangs until you release the sensor unit. Next disconnect the Fuel Pressure Sensor. You can start the installation process by putting in the Fuel Pressure Sensor then the Fuel Level Sensor before setting the retaining clip for the Fuel Level Sensor. Finish by attaching the Fuel Level Sensor electrical connector while putting back its retaining clip followed by linking the Fuel Pump electrical connector . Position the new fuel strainer at its original position like before disassembly while ensuring complete bottom immersion. Put back the fuel sending unit assembly and the Fuel Tank after refilling the tank with fuel and adding the fuel cap. End the procedure by reinstalling the negative Battery Cable then examine for leakage under the following sequence: on switch for two seconds followed by off for ten seconds and another on check for fuel leaks.

Related GMC Yukon XL 1500 Parts
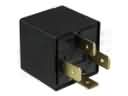 GMC Yukon XL 1500 Daytime Running Light Relay
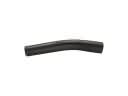 GMC Yukon XL 1500 Fuel Filler Hose
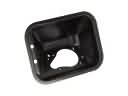 GMC Yukon XL 1500 Fuel Filler Housing
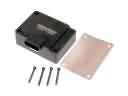 GMC Yukon XL 1500 Fuel Pump Driver Module
 GMC Yukon XL 1500 Fuel Tank
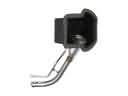 GMC Yukon XL 1500 Fuel Tank Filler Neck
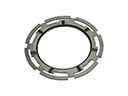 GMC Yukon XL 1500 Fuel Tank Lock Ring
 GMC Yukon XL 1500 Fuel Tank Sending Unit
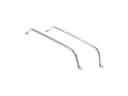 GMC Yukon XL 1500 Fuel Tank Strap
 GMC Yukon XL 1500 Gas Cap
 GMC Yukon XL 1500 Throttle Cable
 GMC Yukon XL 1500 Vapor Pressure Sensor