ChevyParts
My Garage
My Account
Cart
OEM Hummer H3 MAP Sensor
Manifold Air Pressure Sensor- Select Vehicle by Model
- Select Vehicle by VIN
Select Vehicle by Model
orMake
Model
Year
Select Vehicle by VIN
For the most accurate results, select vehicle by your VIN (Vehicle Identification Number).
3 MAP Sensors found


Hummer H3 Throttle Position Sensor Part Number: 12711681
$46.60 MSRP: $94.64You Save: $48.04 (51%)Ships in 1-2 Business Days
Hummer H3 M.A.P. Sensor Part Number: 19418808
$73.36 MSRP: $125.98You Save: $52.62 (42%)Ships in 1 Business Day
Hummer H3 M.A.P. Sensor Part Number: 19418807
$76.01 MSRP: $129.40You Save: $53.39 (42%)Ships in 1-3 Business Days
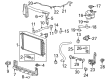
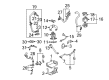
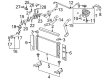
Hummer H3 MAP Sensor
Want to cut long-term maintenance and repair costs? Choose OEM MAP Sensor. Those parts deliver top durability you can trust. On our site, you'll find a huge catalog of genuine Hummer H3 parts. Prices are unbeatable, so you can keep more in your pocket. Every OEM Hummer H3 MAP Sensor includes a manufacturer's warranty. You can also get an easy return policy that keeps buying risk free. Fast delivery, get your car on the road quickly. It's simple to search, compare, and order. Stop guessing about quality or fit. Order today and save with parts that last.
Hummer H3 MAP Sensor is located in the core of engine control system, yet before considering that MAP Sensor it is worth remembering the reasons why the Hummer became popular midsize SUV. The badge delivers rugged style, and the H3 does it with its heavyweight ladder frame construction, full time four wheel drive, locking differentials, huge ground clearance of 16 inches, and the capability to creep over rocks or drive in the city comfortably due to heated leather seats and an easy-to-use navigation screen. Though it has a smaller footprint the H3 still maintains the Hummer ruggedness, provides inline five and optional V8 power, and combines the engines with either smooth automatic or a manual gearbox that provides flexibility to H3 drivers in their everyday driving or backcountry exploration. The H3 is a good compromise of muscle and a decent cabin tech and excellent construction that can withstand mean trails. The MAP Sensor in a Hummer now measures manifold pressure in order to allow the computer to add fuel and spark on the correct ratio to protect horsepower, throttle response, and emissions. The MAP Sensor detecting changing vacuum immediately transmits the signal to the ECU to make the Hummer run efficiently when in high altitude or under heavy load, and its reliability adds to the brand image of longevity. Installation of a new MAP Sensor requires disconnection of the battery, removal of the old sensor by unplugging it off the intake manifold, cleaning of the port, insertion of the replacement sensor firmly, even tightening of the screws, replenishment of the connector, reconnection of power, and start of the engine to verify a steady idle.
Related Hummer H3 Parts
 Hummer H3 Catalytic Converter
 Hummer H3 Exhaust Manifold
 Hummer H3 Exhaust Manifold Gasket
 Hummer H3 Muffler
 Hummer H3 Canister Purge Valves
 Hummer H3 Exhaust Flange Gasket
 Hummer H3 Exhaust Hanger
 Hummer H3 Exhaust Heat Shield
 Hummer H3 Exhaust Pipe
 Hummer H3 Secondary Air Injection Pump
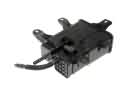 Hummer H3 Vapor Canister