ChevyParts
My Garage
My Account
Cart
OEM Saturn Timing Chain Guide
Engine Timing Chain Guide- Select Vehicle by Model
- Select Vehicle by VIN
Select Vehicle by Model
orMake
Model
Year
Select Vehicle by VIN
For the most accurate results, select vehicle by your VIN (Vehicle Identification Number).
17 Timing Chain Guides found


Saturn Chain Guide, Green Line Part Number: 90537337
$27.22 MSRP: $44.85You Save: $17.63 (40%)Ships in 1-2 Business DaysProduct Specifications- Other Name: Guide Assembly, Timing Chain; Engine Timing Chain Guide; Upper Guide
- Replaced by: 12588387


Saturn Chain Guide, Green Line, Passenger Side Part Number: 24449448
$46.11 MSRP: $75.96You Save: $29.85 (40%)Ships in 1-2 Business DaysProduct Specifications- Other Name: Guide, Engine Timing; Engine Timing Chain Tensioner Guide; Timing Chain Guide; Tensioner Guide; Guide
- Position: Passenger Side


Saturn Chain Guide, Green Line, Driver Side Part Number: 13104978
$16.34 MSRP: $26.92You Save: $10.58 (40%)Ships in 1-2 Business DaysProduct Specifications- Other Name: Guide, Engine Timing; Engine Timing Chain Guide; Timing Chain Guide; Lower Guide; Guide
- Position: Driver Side


Saturn Chain Guide Part Number: 12623514
$18.97 MSRP: $31.24You Save: $12.27 (40%)Ships in 1-2 Business DaysProduct Specifications- Other Name: Guide, Timing Chain; Timing Chain Guide; Guide; Guide, Engine Timing
- Replaces: 12586961


Saturn Chain Guide Part Number: 12623513
$21.57 MSRP: $35.53You Save: $13.96 (40%)Ships in 1-3 Business DaysProduct Specifications- Other Name: Guide, Timing Chain; Timing Chain Guide; Guide; Guide, Engine Timing
- Replaces: 12586960


Saturn Chain Guide Part Number: 12600462
$19.35 MSRP: $31.87You Save: $12.52 (40%)Ships in 1-2 Business DaysProduct Specifications- Other Name: Guide Assembly-Timing Chain; Timing Chain Guide; Guide; Guide, Engine Timing

Saturn Chain Guide Part Number: 12600461
$19.35 MSRP: $31.88You Save: $12.53 (40%)Product Specifications- Other Name: Guide Assembly-Timing Chain; Timing Chain Guide; Guide; Guide, Engine Timing


Saturn Chain Guide Part Number: 12597417
$21.96 MSRP: $36.16You Save: $14.20 (40%)Ships in 1-3 Business DaysProduct Specifications- Other Name: Guide, Timing Chain; Timing Chain Guide; Guide; Damper; Guide, Engine Timing


Saturn Tensioner Guide Part Number: 21008208
$1.32 MSRP: $17.47You Save: $16.15 (93%)Ships in 1-2 Business DaysProduct Specifications- Other Name: Guide, Engine Timing; Timing Chain Guide
Saturn Tensioner Guide Part Number: 21000099
$13.11 MSRP: $20.81You Save: $7.70 (37%)Product Specifications- Other Name: Guide, Engine Timing; Timing Chain Guide

Saturn Chain Guide, Driver Side Part Number: 12609260
Product Specifications- Other Name: Tensioner, Engine Timing; Timing Chain Tensioner; Timing Chain Guide; Tensioner
- Position: Driver Side

Saturn Chain Guide, Passenger Side Part Number: 12609258
Product Specifications- Other Name: Tensioner, Engine Timing; Timing Chain Tensioner; Timing Chain Guide; Tensioner
- Position: Passenger Side

Saturn Tensioner Guide Part Number: 21008212
Product Specifications- Other Name: Guide, Engine Timing; Timing Chain Guide

Saturn Tensioner Guide Part Number: 21008211
Product Specifications- Other Name: Guide, Engine Timing; Timing Chain Guide
Saturn Tensioner Guide Part Number: 21008209
Product Specifications- Other Name: Guide, Engine Timing; Timing Chain Guide
Saturn Tensioner Guide Part Number: 21006489
Product Specifications- Other Name: Guide, Engine Timing; Timing Chain Guide

Saturn Tensioner Guide Part Number: 21006035
Product Specifications- Other Name: Guide, Timing Chain; Timing Chain Guide; Guide, Engine Timing
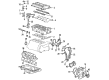
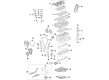
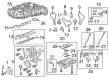
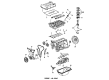
Saturn Timing Chain Guide
Choose OEM Timing Chain Guide, you're making the optimal decision for superior quality and perfect performance. You can feel confident because each component goes through stringent quality checks. Every part is carefully built to comply with Saturn's factory specifications. You'll enjoy a smooth, worry-free installation that fits just right. At ChevyPartsGiant.com, you'll find it easy to get top-quality OEM Saturn Timing Chain Guide. You can shop at highly competitive prices and protect your budget. All our genuine Saturn parts include a dependable manufacturer's warranty. You'll also appreciate our straightforward return policy and swift delivery services for extra convenience.
Saturn Timing Chain Guide makes the timing of the engine fine as well as all the Saturn can retain the enthusiastic throttle reaction and the silenced ride fan boast. Saturn, born in 1985, rattled the industry with dent resistant material body panels that shake off the dents in the parking lot, lost foam cast aluminum components that reduce the weight, and a multistage paint process that does not fade off after several years. Divers enjoyed the spacious cabins, light steering, and the economical four cylinder power plants and do-it-yourself owners were complementing the well defined under-hood designs that make weekend servicing less anxiety ridden. Couple in extravagant corrosion guarantees and a hospitable approach to sales and it is understandable why Saturn has created a community who will drive up the miles without rust or rattles and will place their trust in the brand as something that will provide them a value after the value. A Timing Chain Guide is a hardened rail which supports and guides the chain, and dampens vibration, and synchronizes the valve timing with the crank. In order to fit a new Timing Chain Guide, first remove the battery, position crank to top dead center, remove the front cover, lock tensioner, and pull the chain out of the previous guide. Wipe surfaces, look over the new guide, apply threadlocker where indicated, and tighten the bolts. Hold the chain meshed with the sprocker on the crank with a tie, to prevent skipping of teeth, re-fit the tensioner, turn the crank two times and check off marks. Finally, close cover, replace fluids, re-attach battery, allow engine to warm up, and then listen to make sure everything has been properly seated, Timing Chain Guide and all.


