Make sure this part fits

GM 93176626
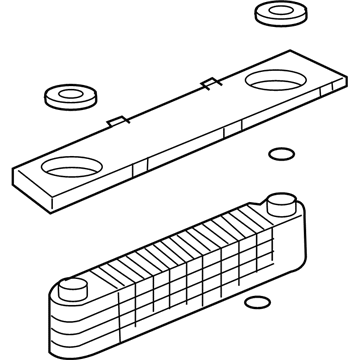
Oil Cooler

1997-2004 GM

Customer Questions & Expert Answers (5)
GM 93176626 Oil Cooler
  • Part Description
    Cooler, Engine Oil Cooler
  • Replaces
    90412391
  • Manufacturer
    General Motors
Make sure this part fits
$352.93 MSRP: $527.55
You Save: $174.62 (34%)
Currently Unavailable

Due to manufacturer supply shortage, this item isn't currently available for ordering.

  • Related Parts
  • Product Specifications
  • Vehicle Fitment
  • Customer Questions & Expert Answers
  • Product Specifications

    BrandGenuine GM
    Manufacturer Part Number93176626
    Part DescriptionCooler, Engine Oil Cooler
    Item Dimensions15.4 x 5.5 x 5.4 inches
    Item Weight2.70 Pounds
    ConditionNew
    Fitment TypeDirect Replacement
    Replaces90412391
    ManufacturerGeneral Motors
    SKU93176626
    WarrantyThis genuine GM part is guaranteed by GM's factory warranty.
    Shipping & ReturnShipping Policy Return Policy
    Warning: California's Proposition 65
  • Vehicle Fitment

    Year Make Model Trim Engine
    2003-2004 Cadillac CTSBase, Luxury, Luxury Sport6 Cyl 3.2 L GAS
    1997-2001 Cadillac CateraBase, Sport6 Cyl 3.0 L GAS
  • Customer Questions & Expert Answers

    Q:
    Hey, is 93176626 a good match for my vehicle? Posted by ChevyPartsGiant Specialist
    A:
    Please Select Your Vehicle model to see if part number 93176626 is suitable before ordering.
    Posted by ChevyPartsGiant Specialist
    Q:
    How to replace the oil cooler on Cadillac Catera? Posted by Customer
    A:
    Vehicle suspension along with engine oil draining and oil filter housing removal serves as the initial steps for replacing the Oil Cooler. Lower the vehicle only after you have loosened all connections between the engine block and the Oil Cooler lines. Start by eliminating the intake plenum followed by the Intake Manifold then disconnect both the engine coolant temperature sender and engine Coolant Temperature Sensor from the water crossover. Remove all water crossover bolts from the Oil Cooler system in addition to upper and lower seals. Begin by loosening bolts on the Exhaust Manifold upper heat shield at its left side before removing Engine Oil Cooler outlet and inlet lines from the cooler while making note of the 4 seals' positions. A mechanic wire should be used to position the oil feed return lines safely before the Engine Oil Cooler inlet nuts and outlet nuts and cover bolts are removed to detach the Engine Oil Cooler and its cover. The installer must cleanse all sealing areas before fitting the Engine Oil Cooler. Install 2 mm (0.08 inch) of gm p/n 12346240 rtv silicone sealant in the cover groove around the Engine Oil Cooler. Apply 30 nm (22 ft. Lbs.) torque to cover bolts before installing inlet and outlet Engine Oil Cooler nuts. These nuts require a torque of 20 nm (15 ft. Lbs.). The oil feed line and return need to be repositioned before installing the Engine Oil Cooler outlet and inlet lines with 4 new seals that should be torqued to 30 nm (22 ft. Lbs.). Place the water crossover while you install the upper and lower seals before tightening the water crossover bolts to 30 nm (22 ft. Lbs.) torque settings. Reconnect the engine Coolant Temperature Sensor electrical connectors and engine coolant temperature sender electrical connectors before installing both the Intake Manifold and intake plenum. First install and tighten the Oil Cooler outlet line down to 30 nm (22 ft. Lbs.) before moving on to the Oil Cooler inlet line which needs the same 30 nm (22 ft. Lbs.) torque setting. After tightening the oil filter housing to 45 nm (33 ft. Lbs.) you must lower the vehicle to complete filling the engine oil in the crankcase.
    Posted by ChevyPartsGiant Specialist
    Q:
    How to replace the oil cooler on Cadillac CTS? Posted by Customer
    A:
    To replace the Oil Cooler first loosen off the Intake Manifold and the water crossover. After that, unbolt the Oil Cooler inlet fitting and the outlet fitting off the Engine Oil Cooler while recording the placement of the 4 seals. Secure the Oil Cooler lines away using mechanics wire and remove the Engine Oil Cooler inlet & outlet nuts with Engine Oil Cooler cover bolts & remove the cover. Then take the Engine Oil Cooler out of the engine and clean the mating surfaces of the cylinder block and the Oil Cooler itself. For installation, begin by installing the Engine Oil Cooler inlet/outlet o-ring seals and applying a 2mm (0.08 inch) bead of gm p/n 12378521 (Canadian P/N 88901148) into the groove surrounding the Engine Oil Cooler cover. Mount the Engine Oil Cooler to the engine and apply thread adhesive gm p/n 12345382 (Canadian P/N 109534382) on to the Engine Oil Cooler cover bolts. Install the engine oil-cooler cover bolts, and tighten them in sequence to 30 nm (22 ft. Lbs.). Next, you should install the Engine Oil Cooler inlet and outlet nuts, and tighten them to 20 nm (15 ft. Lbs.). Position the Oil Cooler line fittings to the Oil Cooler, install the Oil Cooler inlet and outlet fittings using 4 new seals and tighten the inlet fitting to 30 nm (22 ft. Lbs) as well as the outlet fitting to 30 nm (22 ft. Lbs). At last, you should install the water crossover and the Intake Manifold.
    Posted by ChevyPartsGiant Specialist
    Q:
    How to service and repair the oil cooler on Cadillac Catera? Posted by Customer
    A:
    Service and repair of the Oil Cooler require first removing the intake plenum and Intake Manifold from the vehicle. First disconnect the engine coolant temperature sender along with the engine Coolant Temperature Sensor from the water crossover and afterward break all water crossover bolts and remove upper seals then separate the water crossover from lower seals. Before removing the oil feed line and return line from the Engine Oil Cooler you must loosen the upper heat shield bolts on the lh side of the Exhaust Manifold and record the original placement of the four seals. Lift the vehicle before you remove the left-side Catalytic Converter and oil filter cartridge housing from engine block position. Begin installation by removing the bolt securing the crank position sensor (CKP) along with the ckp sensor and next disconnect the oil feed line and oil return line from the engine block prior to lowering the vehicle. Secure the oil feed and return lines in place using mechanic wire because these lines should stay out of the way. You should remove the Engine Oil Cooler inlet and outlet nuts using socket wrench tools and expose the Engine Oil Cooler cover bolts for removal. With all these parts separated you can remove the Engine Oil Cooler cover and its mounting members. Wipe down all essential sealing surfaces with a clean rag. To install the Engine Oil Cooler use a 2 mm (0.08 inch) bead of rtv silicone sealant gm p/n 12346240 in the cover's grooved area before installing the cover. Fasten the Engine Oil Cooler cover bolts to 30 nm (22 ft.lbs.) torque. After that, install the Engine Oil Cooler inlet and outlet nuts and adjust their torque to 20 nm (15 ft.lbs.). Reposition the oil feed and return lines then raise and support the vehicle again before installing the feed line to the engine block with 30 nm (22 ft.lbs.) torque and the return line at the same torque setting. Mount the ckp sensor using an 8 nm (71 inch lbs.) torque before adding the engine block-mounted oil filter cartridge housing that must be secured at 15 nm (11 ft.lbs.). Return the installation of the left side Catalytic Converter and subsequently drop the vehicle down before connecting the Engine Oil Cooler's oil feed and return lines with four fresh seals that must reach tightening torque specifications of 30 nm (22 ft.lbs.). High temperature nickel anti-seize lubricant gm p/n 12371386 or its equivalent should be applied to Exhaust Manifold heat shield bolts before installing and tightening upper bolts facing left side of Exhaust Manifold to 8 nm (71 inch lbs.). Finish the installation by placing the crossover in position and then fitting upper seals onto bolts before inserting bolts into the crossover and fastening the lower seals under it and finally tightening bolt nuts to 30 nm (22 ft.lbs.). After installing the engine Coolant Temperature Sensor electrical connector and the engine coolant temperature sender electrical connector, install the Intake Manifold and intake plenum while also checking and filling the engine oil.
    Posted by ChevyPartsGiant Specialist
    Q:
    What is the next step after detaching the oil cooler fittings for the 2004 Cadillac CTS? Posted by Customer
    A:
    Remove the oil cooler lines from the engine, followed by the engine oil cooler inlet and outlet nuts and the engine oil cooler cover bolts.
    Posted by ChevyPartsGiant Specialist
    See expert answers on similar Oil Cooler
    If you have any questions about this product, please don't hesitate to ask us. We will be happy to help you!

OEM GM 93176626, Excellent Performance and Perfect Fitment

To ensure reliability, purchase GM part # 93176626 Oil Cooler. It is sometimes referred to as GM Engine Oil Cooler, GM Oil Cooler. Choosing OEM parts is the optimal decision for guaranteeing superior quality and perfect performance. These components undergo stringent quality checks and are carefully constructed to comply with GM's factory specifications, ensuring a smooth installation process.

ChevyPartsGiant.com is a leading supplier of genuine GM parts such as GM 93176626 Oil Cooler. Our website boasts an extensive inventory of OEM GM parts, available at highly competitive prices in the market. Should you require any new genuine GM parts, rest assured we will deliver them swiftly and efficiently to your doorstep. Furthermore, all our parts come with the assurance of a manufacturer's warranty. For detailed Cadillac parts information, click here.
Choose ChevyPartsGiant for discounted prices, exceptional service and fast delivery