ChevyParts
My Garage
My Account
Cart
OEM 2000 Cadillac DeVille Axle Shaft
Car Axle Shaft- Select Vehicle by Model
- Select Vehicle by VIN
Select Vehicle by Model
orMake
Model
Year
Select Vehicle by VIN
For the most accurate results, select vehicle by your VIN (Vehicle Identification Number).
1 Axle Shaft found

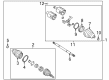
2000 Cadillac DeVille Axle Assembly, Front Part Number: 26075603
Product Specifications- Other Name: Shaft Kit, Front Wheel Drive; CV Axle Assembly; Axle Shaft; CV Axle; Axle
- Position: Front
- Replaced by: 20984613
- Item Weight: 15.90 Pounds
- Item Dimensions: 30.2 x 5.8 x 5.7 inches
- Condition: New
- SKU: 26075603
- Warranty: This genuine part is guaranteed by GM's factory warranty.
2000 Cadillac DeVille Axle Shaft
With a comprehensive array of OEM 2000 Cadillac DeVille Axle Shaft, from fuel pumps to door handles, our website is a one-stop-shop for your needs. All our genuine 2000 Cadillac DeVille Axle Shaft are backed by the manufacturer's warranty and are offered at competitive prices in the market. Rest assured, you can shop with complete confidence.
2000 Cadillac DeVille Axle Shaft Parts Questions & Experts Answers
- Q: What tools are required to service and repair the axle shaft assembly for RPO FE1 and FE3 front wheel drive shafts on 2000 Cadillac DeVille?A: Repairing rpo fe1 and fe3 front wheel drive shaft's Axle Shaft assembly requires these essential tools: service and repair operations on rpo fe1 and fe3 front wheel drive shafts require slide hammer (J2619-01), front hub spindle remover (J28733-B), Axle Shaft remover (J33008), and Ball Joint separator (J43828). Slide hammer (J2619-01), front hub spindle remover (J28733-B), Axle Shaft remover (J33008), and Ball Joint separator (J43828). First raise the vehicle before securing it on a safe position while removing both the wheel and tire. Begin by loosening the stabilizer shaft link assembly bolt (optionally removing it) then proceed with removing the Ball Joint cotter pin and nut. Free the ball stud using a Ball Joint separator instead of a pickle fork or wedge type tool to protect seals and bushings from damage. Let the Ball Joint separator (J43828) eliminate joint resistance rather than employing traditional tools. When removing the right axle rotate the wheel to the left. When removing the left axle the wheel should be turned to the right direction. A pry bar should separate the joint area where the suspension support meets the lower control arm. Insert a drift or screwdriver through the caliper and rotor to stop them from rotating before removing the hub nut. Use the front hub spindle remover (J28733-B) to disconnect the axle from the hub while keeping the hub partially installed for thread protection. Then move the strut and knuckle toward the rear. Proper wheel drive shaft extension requires caution to prevent both internal component separation and joint failure. Remove the drive axle from the transaxle by utilizing the Axle Shaft remover (J33008) and slide hammer (J2619-01). Clean transmission fluid must be applied to a sand-smoothed 320 grit emery cloth-treated tripot housing transmission seal surface which has been inspected for corrosion. Check axle seating position by holding the inner joint housing when you push the axle inside the transaxle housing. Slots the drive axle within the hub while bearing assembly and fasten it using a fresh hub nut and stops rotor flutter with a drift or screwdriver. First tighten the hub nut to 160 nm (118 ft. Lbs.) before installing the Ball Joint to the knuckle and torquing the Ball Joint nut to 10 nm (88 inch lbs.) while adding an additional 150 degrees of rotation to a final torque of 55 nm (41 ft. Lbs.). If needed then tighten the nut until proper fitment. Install the cotter pin by positioning the slot in the nut. After installation of the stabilizer shaft link assembly secure the nut to 17 nm (13 ft. Lbs.) before reinstalling the wheel and tire while lowering the vehicle.


