ChevyParts
My Garage
My Account
Cart
OEM 2000 Chevrolet Astro Axle Shaft
Car Axle Shaft- Select Vehicle by Model
- Select Vehicle by VIN
Select Vehicle by Model
orMake
Model
Year
Select Vehicle by VIN
For the most accurate results, select vehicle by your VIN (Vehicle Identification Number).
5 Axle Shafts found

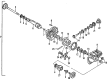
2000 Chevrolet Astro Drive Axle, Front Part Number: 26055051
Product Specifications- Other Name: Shaft Kit, Front Wheel Drive; CV Axle Assembly; Axle Shaft; CV Axle; Axle Assembly; Shaft Kit, Front Axle
- Position: Front
- Replaces: 26055050
- Item Weight: 21.30 Pounds
- Item Dimensions: 29.6 x 5.8 x 5.6 inches
- Condition: New
- Fitment Type: Direct Replacement
- Require Quantity: 2
- SKU: 26055051
- Warranty: This genuine part is guaranteed by GM's factory warranty.

 Product Specifications
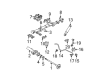
- Other Name: Shaft, Rear Axle Drive; Axle Shafts
- Position: Rear Driver Side
- Replaces: 26011054
- Item Weight: 19.80 Pounds
- Item Dimensions: 37.6 x 7.1 x 6.9 inches
- Condition: New
- Fitment Type: Direct Replacement
- SKU: 26047182
- Warranty: This genuine part is guaranteed by GM's factory warranty.
- Product Specifications
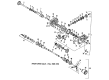
- Other Name: Shaft, Rear Axle Drive; Axle Shafts
- Position: Rear Passenger Side
- Replaces: 26011055
- Item Weight: 15.30 Pounds
- Item Dimensions: 33.0 x 6.9 x 1.5 inches
- Condition: New
- Fitment Type: Direct Replacement
- SKU: 26015580
- Warranty: This genuine part is guaranteed by GM's factory warranty.

 Product Specifications
- Other Name: Shaft, Front Axle; Axle Shafts
- Position: Front Passenger Side
- Item Weight: 4.70 Pounds
- Item Dimensions: 23.2 x 4.8 x 4.7 inches
- Condition: New
- Fitment Type: Direct Replacement
- SKU: 26053319
- Warranty: This genuine part is guaranteed by GM's factory warranty.

2000 Chevrolet Astro Axle Shafts, Front Part Number: 26053320
Product Specifications- Other Name: Shaft, Front Axle; Stub Shaft
- Position: Front
- Item Weight: 1.30 Pounds
- Item Dimensions: 9.0 x 3.7 x 3.5 inches
- Condition: New
- Fitment Type: Direct Replacement
- SKU: 26053320
- Warranty: This genuine part is guaranteed by GM's factory warranty.
2000 Chevrolet Astro Axle Shaft
With a comprehensive array of OEM 2000 Chevrolet Astro Axle Shaft, from fuel pumps to door handles, our website is a one-stop-shop for your needs. All our genuine 2000 Chevrolet Astro Axle Shaft are backed by the manufacturer's warranty and are offered at competitive prices in the market. Rest assured, you can shop with complete confidence.
2000 Chevrolet Astro Axle Shaft Parts and Q&A
- Q: How to replace the inner axle shaft or housing on 2000 Chevrolet Astro?A: Marking the driveline components relative to the propeller shaft before disassembly must occur accurately to allow proper reassembly. Ensure all components including propeller shafts, drive axles, pinion flange, and inner axle shafts are placed back in the exact relationship. Start the procedure by lifting the vehicle and placing a drain under the housing of the inner Axle Shaft. Carefully pull out the right wheel Drive Shaft but avoid damaging the seal surface that surrounds it. The right inner Axle Shaft comes out of the housing while using a shop towel to protect two areas: the end of the inner Axle Shaft housing and the internal seal. A special screwdriver removes the shaft from the side gear by inserting it into the slot that holds the retaining ring which pushes against the towel. Begin by unscrewing the inner axle housing support bracket bolts, nuts, washers from the inner Axle Shaft housing then take out the inner Axle Shaft housing itself. First use a chlorinated solvent to establish a cleaned condition on both the carrier and inner Axle Shaft housing sealing surfaces. Assembly installation starts with applying gm p/n 12345739 sealer (equivalent product) to the carrier sealing surface before inserting the inner Axle Shaft and housing assembly. Install the inner Axle Shaft housing to the differential carrier assembly bolts to a torque of 48 nm (36 ft. Lbs.) then install the Axle Shaft housing to support bracket bolts with corresponding nuts and washers and torque the nuts to 73 nm (54 ft. Lbs.). Replace the right wheel Drive Shaft before checking and refilling the proper fluid if necessary in the axle. Finally, lower the vehicle.
Related 2000 Chevrolet Astro Parts
 2000 Chevrolet Astro Ball Joint
 2000 Chevrolet Astro Torsion Bar
 2000 Chevrolet Astro CV Joint
 2000 Chevrolet Astro Control Arm Bumper
 2000 Chevrolet Astro Drive Shaft
 2000 Chevrolet Astro Front Cross-Member
 2000 Chevrolet Astro Leaf Spring Plate
 2000 Chevrolet Astro Spindle
 2000 Chevrolet Astro Steering Knuckle
 2000 Chevrolet Astro Sway Bar Bracket
 2000 Chevrolet Astro Sway Bar Bushing
 2000 Chevrolet Astro Sway Bar Kit