ChevyParts
My Garage
My Account
Cart
OEM 2000 Chevrolet Camaro Engine Mount Bracket
Engine Mount- Select Vehicle by Model
- Select Vehicle by VIN
Select Vehicle by Model
orMake
Model
Year
Select Vehicle by VIN
For the most accurate results, select vehicle by your VIN (Vehicle Identification Number).
5 Engine Mount Brackets found

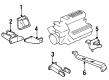
2000 Chevrolet Camaro Mount Bracket, Driver Side Part Number: 10274964
Product Specifications- Other Name: Bracket, Engine Mounting; Engine Mount Bracket; Motor Mount; Motor Mount Bracket
- Position: Driver Side
- Item Weight: 1.90 Pounds
- Item Dimensions: 8.5 x 6.4 x 5.1 inches
- Condition: New
- Fitment Type: Direct Replacement
- SKU: 10274964
- Warranty: This genuine part is guaranteed by GM's factory warranty.

 Product Specifications
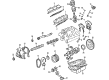
- Other Name: Mount Assembly-Engine; Engine Mount Bracket; Mount; Mount, Engine Mount Dampening
- Position: Passenger Side
- Item Weight: 2.60 Pounds
- Item Dimensions: 5.4 x 4.6 x 2.7 inches
- Condition: New
- Fitment Type: Direct Replacement
- SKU: 22173129
- Warranty: This genuine part is guaranteed by GM's factory warranty.

 Product Specifications
- Other Name: Bracket, Engine Mounting; Engine Mount Bracket; Motor Mount
- Position: Passenger Side
- Item Weight: 5.00 Pounds
- Item Dimensions: 6.4 x 6.5 x 5.7 inches
- Condition: New
- Fitment Type: Direct Replacement
- SKU: 10269731
- Warranty: This genuine part is guaranteed by GM's factory warranty.

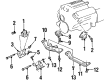
2000 Chevrolet Camaro Mount Bracket, Driver Side Part Number: 10269733
Product Specifications- Other Name: Bracket, Engine Mounting; Engine Mount Bracket; Motor Mount
- Position: Driver Side
- Item Weight: 1.90 Pounds
- Item Dimensions: 7.3 x 7.3 x 5.8 inches
- Condition: New
- Fitment Type: Direct Replacement
- SKU: 10269733
- Warranty: This genuine part is guaranteed by GM's factory warranty.
 Product Specifications
- Other Name: Bracket, Engine Mounting; Engine Mount Bracket; Motor Mount; Motor Mount Bracket
- Position: Passenger Side
- Item Weight: 6.30 Pounds
- Item Dimensions: 9.1 x 7.3 x 3.7 inches
- Condition: New
- Fitment Type: Direct Replacement
- SKU: 10265186
- Warranty: This genuine part is guaranteed by GM's factory warranty.
2000 Chevrolet Camaro Engine Mount Bracket
With a comprehensive array of OEM 2000 Chevrolet Camaro Engine Mount Bracket, from fuel pumps to door handles, our website is a one-stop-shop for your needs. All our genuine 2000 Chevrolet Camaro Engine Mount Bracket are backed by the manufacturer's warranty and are offered at competitive prices in the market. Rest assured, you can shop with complete confidence.
2000 Chevrolet Camaro Engine Mount Bracket Parts Questions & Experts Answers
- Q: How to replace the Engine Mount Bracket on 2000 Chevrolet Camaro?A: The first step to replace an Engine Mount bracket involves engine support using j 28467-a (Universal Support Fixture) and j 41044 (Engine Support Adapters) while keeping a distance from the Oil Pan and crankshaft balancer. The work starts by disconnecting the generator alongside the Ignition Control Module followed by vehicle elevation. The maintenance process starts by uninstalling the 3-way Catalytic Converter and continuing with the removal of right and left side Engine Mount through bolt nuts. The support fixture for the engine needs installation followed by a small lift that eases the strain on through bolts. Start by unwelding the transmission oil cooler pipe bracket bolt along with its bracket while moving the air conditioning compressor toward the front to reach the Engine Mount through bolt without recovering refrigerant. The process starts with tension relief before the through bolts are taken off both right and left engines. The engine must then be lifted for the complete removal of the mount and bracket units. The positive cable detachment from the Engine Mount requires unfastening its connection points which include the battery positive cable nut, harness clamp, and rf ground strap. First remove the bolts securing the left Engine Mount bracket before extracting both the bracket stud and its installation bracket. Check for any damage on the rubber elements of the Engine Mount. You should attach the left Engine Mount bracket and stud to the engine block before tightening bracket bolts to 100 nm (74 ft. Lbs.) and stud to 87 nm (64 ft. Lbs.). Reattach and torque the battery positive cable nut to 25 nm (18 ft. Lbs.) while also securing its harness clamp and positive cable then fastening the rf ground strap to the vehicle. Fasten the right Engine Mount bracket along with its bolts by the specified torque values. The left and right engine mounts need to be installed on the crossmember while tightening both sets of bolts to 58 nm (43 ft. Lbs.). Lower the engine until the mount brackets and through holes match their positions and then uninstall both bolt connectors of the engine support fixture before installing through bolts from engine mounts on each side. After placing the A/C Compressor in its rear position users must secure all rear bolts to 30 nm (22 ft. Lbs.) before proceeding to tighten the compressor bolts to 50 nm (37 ft. Lbs.). Before continuing install the transmission oil cooler pipe bracket and bolt with a torque of 17 nm (13 ft. Lbs.) while installing left and right side Engine Mount through bolt nuts to 80 nm (59 ft. Lbs.). The 3-way Catalytic Converter needs to be remounted after lowering the vehicle and reconnecting the Ignition Control Module with the generator.
Related 2000 Chevrolet Camaro Parts
 2000 Chevrolet Camaro Oil Filter
 2000 Chevrolet Camaro Cam Gear
 2000 Chevrolet Camaro Crankshaft
 2000 Chevrolet Camaro Crankshaft Gear
 2000 Chevrolet Camaro Dipstick Tube
 2000 Chevrolet Camaro Harmonic Balancer
 2000 Chevrolet Camaro Lash Adjuster
 2000 Chevrolet Camaro Oil Pan Gasket
 2000 Chevrolet Camaro Piston
 2000 Chevrolet Camaro Rocker Arm
 2000 Chevrolet Camaro Timing Cover Gasket
 2000 Chevrolet Camaro Valve Cover Gasket