
Popular OEM Chevrolet Camaro Parts
- Body & Hardware Parts View More >
- Steering Parts View More >
- Electrical Parts View More >
- Air & Fuel Delivery Parts View More >
- Charging & Starting Parts View More >
- Engine Parts View More >
- Belts & Cooling Parts View More >
- Suspension Parts View More >
- Driveline & Axles Parts View More >
- Emission Control & Exhaust Parts View More >
- Transmission Parts View More >
- Brakes Parts View More >


Why Buy Genuine Chevrolet Camaro Parts From ChevyPartsGiant.com
Looking for real Chevrolet Camaro parts? ChevyPartsGiant.com may be a better choice to find genuine parts at wallet-friendly prices. We sell only OEM Chevrolet Camaro parts, ensuring perfect fit, reliability, and long-term performance. With our website, you can easily get access to the same parts found at local Chevrolet stores. All components are produced by Chevrolet and are exclusively fitted on Chevrolet Camaro automobiles. By shopping at our store, you can enjoy the quality of the Chevrolet factory without the high prices of brick-and-mortar facilities. We achieve this because we are an online store operating at lower costs, which we pass on to you. We also have a user-friendly platform where you can find and order genuine Chevrolet Camaro parts swiftly. We are here to make your process of restoring a Chevrolet Camaro or dealing with simple repairs quick and inexpensive. We also make it easy to obtain Chevrolet Camaro parts at competitive shipping prices and a team of knowledgeable staff ready to take your order. Choose ChevyPartsGiant.com to save time and money, as well as keep your Chevrolet Camaro in the good condition.
The Chevrolet Camaro entered the market on September 29, 1966 as a 1967 model year vehicle that competitors with the Ford Mustang pony car category. The Chevrolet Camaro has adopted three distinct platforms for its manufacturing history starting with F-body from 1967 to 2002 before using Zeta from 2009 to 2015 and concluding with Alpha from 2016 to the present 2024. The sixth generation Camaro production will end in 2024 before its final discontinuation. The Chevrolet Camaro includes three major engine choices combining V6 and V8 power with 275 hp output from the 2.0 L turbocharged inline-four engine and 335 hp from the 3.6 L V6 and 455 hp from the strong 6.2 L LT1 V8 engine. The Chevrolet Camaro features both six-speed manual and automatic transmission among its available options according to specific model specifications. The eight-speed automatic transmission was used before 2019 but the ten-speed automatic took its place in V8 models during that year. The V8 models deliver their exceptionally powerful driving performance while manual transmissions respond sharply in different driving scenarios. Development of the Chevrolet Camaro highlights genuine parts as essential elements because these components satisfy tough guidelines for factory specifications which deliver both performance and endurance. Modern interior design elements paired with an intuitive layout deliver better performance to Chevrolet Camaro drivers. The Chevrolet Camaro stands out for sporty drive characteristics since it combines the features necessary for everyday life use.
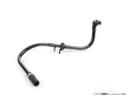
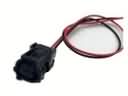
Chevrolet Camaro issues cluster into body electrical, evaporative emissions, and fuel delivery systems for efficient diagnosis. In the body electrical, a broken roller on the window guide lets the glass slip off track. Inspect the window regulator, check guide rollers, and verify glass alignment. Replace the window regulator if travel hesitates, binds, or the pane drops suddenly. For emissions, a loose or worn gas cap can trigger a check engine light on the Chevrolet Camaro. Inspect the cap seal, tighten to click, then replace the gas cap and clear codes. Fuel delivery concerns on the Chevrolet Camaro include stalling, long cranking, or a no start. Keep the filter on a 30,000-mile service schedule to safeguard the pump. Read rail pressure, validate relay command, and measure pump circuit voltage drop. When pressure falls short, replace the fuel pump and recheck pressure after priming. Functionally, these systems align with power delivery, emissions integrity, and cabin usability on the Camaro. When the lamp is on, bear in mind to fix EVAP faults and then windows, fueling before they are damaged. Check out by road testing and by checking readiness to ensure that repairs to the Chevrolet Camaro are valid. The Camaro is then expected to provide consistent starts, clean emissions, and smooth travels on the windows.
Chevrolet Camaro Parts and Q&A
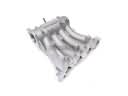
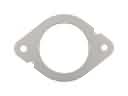
- Q: How to replace the intake manifold on Chevrolet Camaro?A:To fit the intake manifold, take away the fuels pipe protective and air out hose. Disassemble different hoses and throttle body electrical connector. Unscrew the intake manifold bolts and disassemble the manifold and the gasket. A new manifold and gasket will need to be installed and all the elements need to be reconnected back to the duct and shield.
- Q: How to replace the power steering pump on Chevrolet Camaro?A:In order to change the power steering pump, lift the front intake manifold cover and seal the air conditioning compressor. Disengage hoses in order to prevent contamination. Take away the power steering pump and bracket. Installation of a new pump, tightening of bolts, reconnecting hoses, filling the reservoir. Wipe out surplus and place pieces back.
- Q: How to replace the camshaft on Chevrolet Camaro?A:For replacement of camshaft, take out the valve lifters, timing chain, sprockets and balance shaft gear. Removing the thrust plate bolts and thrust plate, remove the camshaft key. Caution is required when handling the camshaft so that it does not suffer any damage. Look at the bearings, oil and refit parts of the camshaft system.


