ChevyParts
My Garage
My Account
Cart
OEM Chevrolet Camaro CV Boot
Axle Boot- Select Vehicle by Model
- Select Vehicle by VIN
Select Vehicle by Model
orMake
Model
Year
Select Vehicle by VIN
For the most accurate results, select vehicle by your VIN (Vehicle Identification Number).
7 CV Boots found

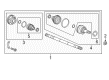
Chevrolet Camaro Outer Boot, Rear Passenger Side Part Number: 84138229
$32.73 MSRP: $53.90You Save: $21.17 (40%)Ships in 1-2 Business Days
Chevrolet Camaro Inner Boot, Rear Driver Side Part Number: 84138227
$43.70 MSRP: $71.52You Save: $27.82 (39%)Chevrolet Camaro Inner Boot, Rear Passenger Side Part Number: 84138226
$30.20 MSRP: $49.75You Save: $19.55 (40%)Ships in 1-2 Business Days
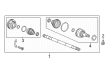
Chevrolet Camaro Inner Joint Assembly, Rear Driver Side Part Number: 84138225
$48.74 MSRP: $76.35You Save: $27.61 (37%)Ships in 1-3 Business Days

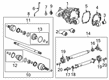
Chevrolet Camaro Outer Boot Part Number: 92228290

Chevrolet Camaro Outer Boot, Rear Driver Side Part Number: 84138228

Chevrolet Camaro Inner Boot Part Number: 92228294
Chevrolet Camaro CV Boot
Want to cut long-term maintenance and repair costs? Choose OEM CV Boot. Those parts deliver top durability you can trust. On our site, you'll find a huge catalog of genuine Chevrolet Camaro parts. Prices are unbeatable, so you can keep more in your pocket. Every OEM Chevrolet Camaro CV Boot includes a manufacturer's warranty. You can also get an easy return policy that keeps buying risk free. Fast delivery, get your car on the road quickly. It's simple to search, compare, and order. Stop guessing about quality or fit. Order today and save with parts that last.
The CV Boot of Chevrolet Camaro vehicles is actually an integral part which safeguards the Constant Velocity or CV Joint that helps in the transmitting power from the transaxle to the wheels. Fixed joints are present in the outboard end while plunging joints are put in the inboard end of the Camaro vehicles and there are many types of them. Despite the fact that it is a small part, the CV Boot cannot be overlooked because it helps in the lubrication of the joints and protects them from any outside influence that might lead to the Complete teardown of the CV Joint. Frequent check-up is highly recommended for the Chevrolet Camaro CV Boot as this is crucial in the performance of the CV Joint that is affected by damages such as cracks or even tears.
Chevrolet Camaro CV Boot Parts Questions & Experts Answers
- Q: How to replace the rear CV Boot and CV Joint on the inner drive shaft on Chevrolet Camaro?A:When replacing the rear wheel drive shaft inner joint and boot, perform the following: unset the wheel drive shaft and CV joint and boot outer. Do not sever the inboard or outboard boot because this ragged tearing will damage the sealing surface and shorten the life of the constant velocity joint. Using the necessary tools, remove the outer boot clamp and the inner boot clamp from the CV joint . The inner CV, no one services when the boot is damaged or if foreign object is evident in the CV joint; the wheel drive shaft must be replaced as a complete unit. Next, take off the CV boot from the CV joint and the WD drive shaft . Clean lubricant from the CV joint and wheel drive shaft. For assembly, attach the CV joint boot and clamp to the wheel drive shaft and CV joint housing ; make sure boot is well placed in groove of wheel drive shaft . With the help of the J 35910 - pliers, breaker bar, torque wrench, and ratchet, close the clamp so that the gap is 1.8 mm (0.07 in). Put half of the lubricant inside CV joint boot ,and the other half inside CV joint . Mount the CV joint boot and clamp on the CV joint housing . For vehicles with the ear type boot clamp, the following tooling will be used: J 35910-pliers, breaker bar and a torque or ratchet wrench in closing the clamp by ensuring that the gap is set until 1.9 mm (0.07 in) and ensure that the boot clamp is securely closed. For earless type clamps, pass directly on to closing the boot clamp with the CH 48894 - pliers. Rotate the CV joint in a circular pattern to ensure the lubrication is dispersed within the CV joint and remove any of the lubricant from the CV join on its outer structure. Lastly, you can install the outer CV joint and boot then follow it up with the wheel drive shaft.

Related Chevrolet Camaro Parts
 Chevrolet Camaro Axle Beam Mount
 Chevrolet Camaro Axle Shaft
 Chevrolet Camaro Ball Joint
 Chevrolet Camaro CV Joint
 Chevrolet Camaro Control Arm Bolt
 Chevrolet Camaro Control Arm Bushing
 Chevrolet Camaro Differential Cover
 Chevrolet Camaro Drive Shaft
 Chevrolet Camaro Shock Absorber
 Chevrolet Camaro Spindle Nut
 Chevrolet Camaro Steering Knuckle
 Chevrolet Camaro Trailing Arm Bushing