ChevyParts
My Garage
My Account
Cart
OEM 2000 Chevrolet Cavalier Window Channel
Window Run- Select Vehicle by Model
- Select Vehicle by VIN
Select Vehicle by Model
orMake
Model
Year
Select Vehicle by VIN
For the most accurate results, select vehicle by your VIN (Vehicle Identification Number).
10 Window Channels found

2000 Chevrolet Cavalier Run Channel, Front Passenger Side Part Number: 12362884
$101.35 MSRP: $373.84You Save: $272.49 (73%)Ships in 1-2 Business DaysProduct Specifications- Other Name: Channel, Front Door Window; Window Channel; Channel
- Position: Front Passenger Side
- Item Weight: 4.00 Pounds
- Item Dimensions: 31.7 x 9.9 x 4.7 inches
- Condition: New
- Fitment Type: Direct Replacement
- SKU: 12362884
- Warranty: This genuine part is guaranteed by GM's factory warranty.
- Product Specifications
- Other Name: Channel, Front Door Window; Window Channel; Channel
- Position: Front Driver Side
- Item Weight: 3.90 Pounds
- Item Dimensions: 31.1 x 10.0 x 4.9 inches
- Condition: New
- Fitment Type: Direct Replacement
- SKU: 12362885
- Warranty: This genuine part is guaranteed by GM's factory warranty.

 Product Specifications
- Other Name: Channel Assembly-Front Side Door Window; Window Channel; Channel, Front Door Window
- Position: Front Driver Side
- Replaces: 22607511, 22651813, 22651491, 22615705, 22680676, 22649571
- Item Weight: 6.60 Pounds
- Item Dimensions: 65.1 x 35.0 x 3.0 inches
- Condition: New
- Fitment Type: Direct Replacement
- SKU: 22729846
- Warranty: This genuine part is guaranteed by GM's factory warranty.

 Product Specifications
- Other Name: Channel Assembly-Front Side Door Window; Window Channel; Channel, Front Door Window
- Position: Front Driver Side
- Replaces: 22651815, 22723167, 22615707, 22649573, 22607513, 22651553, 22680678
- Item Weight: 2.20 Pounds
- Item Dimensions: 28.8 x 27.7 x 4.5 inches
- Condition: New
- Fitment Type: Direct Replacement
- SKU: 22729847
- Warranty: This genuine part is guaranteed by GM's factory warranty.
- Product Specifications
- Other Name: Channel Assembly-Front Side Door Window; Window Channel; Channel, Front Door Window
- Position: Front Passenger Side
- Replaces: 22615704, 22607510, 22680675, 22651812
- Item Weight: 3.80 Pounds
- Item Dimensions: 29.9 x 26.9 x 4.5 inches
- Condition: New
- Fitment Type: Direct Replacement
- SKU: 22729848
- Warranty: This genuine part is guaranteed by GM's factory warranty.
- Product Specifications
- Other Name: Channel Assembly-Front Side Door Window; Window Channel; Channel, Front Door Window
- Position: Front Passenger Side
- Replaces: 22680677, 22615706, 22651814, 22607512
- Item Weight: 3.70 Pounds
- Item Dimensions: 28.8 x 27.4 x 4.3 inches
- Condition: New
- Fitment Type: Direct Replacement
- SKU: 22729849
- Warranty: This genuine part is guaranteed by GM's factory warranty.

 Product Specifications
- Other Name: Channel Assembly-Rear Side Door Window *Black; Window Channel; Channel, Rear Door Window Glass Running
- Position: Rear Passenger Side
- Replaces: 22649564
- Item Weight: 3.10 Pounds
- Item Dimensions: 38.9 x 16.1 x 4.5 inches
- Condition: New
- Fitment Type: Direct Replacement
- SKU: 22615708
- Warranty: This genuine part is guaranteed by GM's factory warranty.
- Product Specifications
- Other Name: Channel Assembly-Rear Side Door Window *Black; Window Channel; Channel, Rear Door Window Glass Running
- Position: Rear Driver Side
- Replaces: 22649565
- Item Weight: 3.40 Pounds
- Item Dimensions: 38.9 x 16.1 x 4.6 inches
- Condition: New
- Fitment Type: Direct Replacement
- SKU: 22615709
- Warranty: This genuine part is guaranteed by GM's factory warranty.
 Product Specifications
- Other Name: Channel, Front Door Window; Window Channel; Channel
- Position: Front Driver Side
- Item Weight: 1.30 Pounds
- Item Dimensions: 21.6 x 2.9 x 1.6 inches
- Condition: New
- Fitment Type: Direct Replacement
- SKU: 12362891
- Warranty: This genuine part is guaranteed by GM's factory warranty.
- Product Specifications
- Other Name: Channel, Front Door Window; Window Channel; Channel
- Position: Front Passenger Side
- Item Weight: 2.00 Pounds
- Item Dimensions: 21.0 x 2.6 x 2.1 inches
- Condition: New
- Fitment Type: Direct Replacement
- SKU: 12362890
- Warranty: This genuine part is guaranteed by GM's factory warranty.
2000 Chevrolet Cavalier Window Channel
With a comprehensive array of OEM 2000 Chevrolet Cavalier Window Channel, from fuel pumps to door handles, our website is a one-stop-shop for your needs. All our genuine 2000 Chevrolet Cavalier Window Channel are backed by the manufacturer's warranty and are offered at competitive prices in the market. Rest assured, you can shop with complete confidence.
2000 Chevrolet Cavalier Window Channel Parts and Q&A
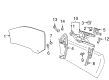
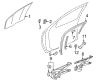
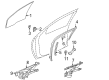
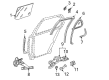
- Q: How to replace the door window channel on a convertible on 2000 Chevrolet Cavalier?A: The process to replace a convertible door Window Channel requires removal of the trim panel followed by the door trim panel and then the door rear view mirror. Extract the deflector from the door inner panel by peeling it if necessary. The Power Window Switch needs disconnection for safety reasons because of the express down feature. Begin by taking out the door belt outer molding followed by the nuts from the door bracket studs and nutwasher. Start the procedure by extracting the front channel assembly with glass and seal from the door while using access through the inner panel to take away the adjustment stud. Pull the front channel up through the door top opening. To install the glass front channel and seal assembly you must push it through the top of the door before pressing down to pass the adjustment stud through the access hole to establish front channel engagement with the door window glass. Securely mount the channel upper bracket over the door surface studs while leaving the nutwasher in place untightened before tightening the nuts at 6 n.m (53 lb in) torque. Install the door belt outer molding while adjusting the window glass properly before tightening the nutwasher to 10 n.m (89 lb in). Reinstall the water deflector together with the door rear view mirror and the trim panel at the end. To replace the rear door Window Channel begin by taking out door trim panel and trim panel then remove the deflector as needed before setting the door glass at 51 mm (2 in) below the full-up position. Remove the window rear channel from the door by tipping it outward and rearward to disengage its bottom section before pulling it out. First remove the nut together with its nutwasher before proceeding. Complete the disassembly by taking out the adjustment stud then screws followed by channel upstop bracket and screw and rear upstop bracket. Finally remove the nut and rear upper extension bracket. Start by installing the rear upper extension bracket and the nut without fastening, continue with the installation of the rear upstop bracket and screw and then add the channel upstop and screws before finishing with the adjustment stud. To install this part arrange the window rear channel through the access hole and elevate it upward into position before aligning it with the rear window guide then insert the rear extension bracket and adjustment stud through the door inner panel holes. Install the nuts (8,9) while tightening to 6 n.m (53 lb in) before adjusting window glass and tightening the nutwasher to 10 n.m (89 lb in). After replacing the water deflector and trim panel and door trim panel the process should be finished.
Related 2000 Chevrolet Cavalier Parts
 2000 Chevrolet Cavalier Window Motor
 2000 Chevrolet Cavalier Window Regulator
 2000 Chevrolet Cavalier Automatic Transmission Shift Indicator
 2000 Chevrolet Cavalier Center Console Base
 2000 Chevrolet Cavalier Cup Holder
 2000 Chevrolet Cavalier Door Handle
 2000 Chevrolet Cavalier Door Hinge
 2000 Chevrolet Cavalier Emblem
 2000 Chevrolet Cavalier Tailgate Lock
 2000 Chevrolet Cavalier Weather Strip
 2000 Chevrolet Cavalier Window Crank Handles
 2000 Chevrolet Cavalier Windshield Wiper