
Popular OEM Chevrolet Cavalier Parts
- Body & Hardware Parts View More >
- Steering Parts View More >
- Electrical Parts View More >
- Air & Fuel Delivery Parts View More >
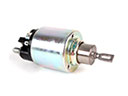
- Charging & Starting Parts View More >
- Engine Parts View More >
- Belts & Cooling Parts View More >
- Suspension Parts View More >
- Emission Control & Exhaust Parts View More >
- Transmission Parts View More >
- Brakes Parts View More >
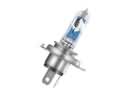
- Headlights & Lighting Parts View More >


Why Buy Genuine Chevrolet Cavalier Parts From ChevyPartsGiant.com
Looking for real Chevrolet Cavalier parts? ChevyPartsGiant.com may be a better choice to find genuine parts at wallet-friendly prices. We sell only OEM Chevrolet Cavalier parts, ensuring perfect fit, reliability, and long-term performance. With our website, you can easily get access to the same parts found at local Chevrolet stores. All components are produced by Chevrolet and are exclusively fitted on Chevrolet Cavalier automobiles. By shopping at our store, you can enjoy the quality of the Chevrolet factory without the high prices of brick-and-mortar facilities. We achieve this because we are an online store operating at lower costs, which we pass on to you. We also have a user-friendly platform where you can find and order genuine Chevrolet Cavalier parts swiftly. We are here to make your process of restoring a Chevrolet Cavalier or dealing with simple repairs quick and inexpensive. We also make it easy to obtain Chevrolet Cavalier parts at competitive shipping prices and a team of knowledgeable staff ready to take your order. Choose ChevyPartsGiant.com to save time and money, as well as keep your Chevrolet Cavalier in the good condition.
General Motors produced the Chevrolet Cavalier compact model for both Chinese and Mexican markets beginning with 1981 since its North American production start. The 1981 Chevrolet Cavalier introduced to the market used a 1.8-liter carbureted L46 inline-4 engine until GM replaced it in 1983 with a 2.0-liter fuel-injected L44 inline-4 engine. The 1985 release of the LB6 V6 2.8-liter engine with Z24 package elevated the performance capabilities of the Chevrolet Cavalier model. During its second generation Chevrolet Cavalier introduced three engine choices which included a 2.2-liter LN2 OHV inline-4 unit. The Chinese marketplace received a 1.5-liter S-TEC III inline-4 motor variant of the Cavalier. Each generation of Chevrolet Cavalier provided different transmission choices since the first generation came with manual 4-speed and automatic 3-speed transmissions though the third generation featured manual 5-speed Getrag F23 and automatic 6-speed options on the Chinese model. Multiple body styles of the Chevrolet Cavalier used the same wheelbase which expanded from 101.2 inches to 104.1 inches across different production models. Substantial demand exists for authentic Chevrolet Cavalier components especially those that are OEM parts that include durability and reliability features and can be obtained from authorized sellers.
Chevrolet Cavalier clusters issues into fuel delivery, braking, and ignition to allow diagnosis and reliable service. Fuel delivery errors on the Cavalier are a result of a failing fuel pump that leads to stalls or failure to start. Check rail pressure, relay command, voltage, and grounds at the Chevrolet Cavalier to replace the fuel pump and filter. Braking issues are related to the wear to the front brake rotors, causing pulsation and a bigger stopping distance. Measures the thickness and runout of the Chevrolet Cavalier brake rotor, and installs new rotors and pads into the car when out of specifications. The reason why ignition misfire on your Cavalier is likely due to a failed ignition coil or the ignition module and harness decaying. Clear codes, inspect connectors, verify spark strength, and replace the ignition coil to restore proper combustion. These groups are allied in the functionality of power delivery, braking safety, and idle stability on the Chevrolet Cavalier. Put fuel first, then braking, then ignition on the Chevrolet Cavalier in order to ensure smooth day-by-day performance. Replace a 30,000-mile fuel filter to increase the life of the pump and maintain pressure consistency. Listen to the noise of bearings in front hubs, and fade on works stops in pedals, during verification. Post repair, verify clearance of freeze frame/trims to normal conditions and smooth idle during a hot soak.
Chevrolet Cavalier Parts and Q&A
- Q: How to replace a water pump on Chevrolet Cavalier?A:Replacement of the water pump requires emptying the cooling system, loosening the pulley bolts of the coolant pump, and taking off the accessory drive belt. Take off coolant pump and gasket, clean surfaces to which gasket is applied and put in new gasket. Install the accessory drive belt, the pulley, and the coolant pump, fill in the cooling system and check the leaks.
- Q: How to replace the intake camshaft and lash adjuster on Chevrolet Cavalier?A:To change intake camshaft and the lifters, take out the camshaft cover and upper timing guide chain. Removal of the camshaft sprocket bolts is done with the help of the Camshaft Sprocket Holding Tool. Take the bearings caps off, camshaft and followers. Oil and put back parts, tightening bolts step by step. Lastly, attach top timing chain guide and camshaft cover.
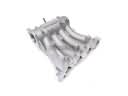
- Q: How to replace the intake manifold on Chevrolet Cavalier?A:In order to change an intake manifold, relieve the pressure in the fuel system, then take away air cleaner inlet duct, resonator, and fuel rail cover. Disassemble a variety of sensors and switches, and take out the intake manifold. Wipe mating surfaces and check that they are not damaged. Install the manifold back and connect all the parts.


