ChevyParts
My Garage
My Account
Cart
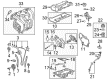
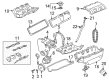
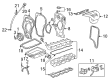
OEM Chevrolet Cavalier Intake Manifold
Engine Intake Manifold- Select Vehicle by Model
- Select Vehicle by VIN
Select Vehicle by Model
orMake
Model
Year
Select Vehicle by VIN
For the most accurate results, select vehicle by your VIN (Vehicle Identification Number).
15 Intake Manifolds found


Chevrolet Cavalier Intake Manifold Part Number: 12608305
$94.44 MSRP: $147.94You Save: $53.50 (37%)

Chevrolet Cavalier Throttle Body, Upper Part Number: 17096169

Chevrolet Cavalier Intake Manifold Part Number: 24576993

Chevrolet Cavalier Intake Manifold Part Number: 24576172
Chevrolet Cavalier Intake Manifold Part Number: 24575462
Chevrolet Cavalier Intake Manifold Part Number: 24575273

Chevrolet Cavalier Intake Manifold Part Number: 24575245

Chevrolet Cavalier Throttle Body Part Number: 17112902
Chevrolet Cavalier Throttle Body Part Number: 17112896

Chevrolet Cavalier Throttle Body, Upper Part Number: 17096170

Chevrolet Cavalier Throttle Body Part Number: 17095105
Chevrolet Cavalier Throttle Body, Upper Part Number: 17095104

Chevrolet Cavalier Intake Manifold Part Number: 17087537
Chevrolet Cavalier Intake Manifold Part Number: 12568321

Chevrolet Cavalier Intake Manifold Part Number: 12567678
Chevrolet Cavalier Intake Manifold
Want to cut long-term maintenance and repair costs? Choose OEM Intake Manifold. Those parts deliver top durability you can trust. On our site, you'll find a huge catalog of genuine Chevrolet Cavalier parts. Prices are unbeatable, so you can keep more in your pocket. Every OEM Chevrolet Cavalier Intake Manifold includes a manufacturer's warranty. You can also get an easy return policy that keeps buying risk free. Fast delivery, get your car on the road quickly. It's simple to search, compare, and order. Stop guessing about quality or fit. Order today and save with parts that last.
The Intake Manifold is one of the most important systems that substantially affects the performance and durability of Chevrolet's compact car series. Extremely important in the process of delivering the air or the air/fuel mixture to each of the intake ports of the cylinder heads, the Intake Manifold also regulates the power output throughout the Chevrolet Cavalier models. The Intake Manifold from the modern car industry is a good example of how such modifications have been made; this novel is made of composite plastic that is light in weight, and therefore, would improve fuel efficiency and works well in cooling. In the case of the Intake Manifold again there are types compatible with carbureted engines, TBI engines, and multiport fuel injected engines because Chevrolet Cavalier has been in production from 1982 up to present and even after 2005 in some countries. Indeed, some Intake Manifolds feature special variable-length designs (abbreviated as VLIM), which provide for a modified performance depending on the current loads of the car's engine, thus increasing efficiency and safety. The functions of the Intake Manifold involve smooth sealing and operational efficiency in controlling air and fuel mixture with impacts on the efficiency of the Chevrolet Cavalier. This reliability and performance is in line with Chevrolet's focus to produce cars to suit a global market, thereby making Intake Manifold an important component to the Chevrolet Cavalier series.
Chevrolet Cavalier Intake Manifold Parts and Q&A
- Q: How to service and repair the intake manifold on Chevrolet Cavalier?A:Relieve the pressure of the fuel system at first to service and repair the Intake Manifold. Remove the air cleaner inlet duct, the resonator, and resonator bracket. Pull out the accelerator and cruise control cables, then pull out the vacuum hoses at the Throttle Body. Take the map, tp, and iac sensors, along with the 2 bolts on the accelerator bracket. Next, unfasten the Throttle Body, fuel feed, and fuel inlet pipe retainers and get the Intake Manifold attaching nuts and bolts out and remove the Intake Manifold from the engine. Clean the mating surfaces on the Cylinder Head and the Intake Manifold and check the manifold for cracks, broken flanges, gasket surface damages. For installation, install Intake Manifold assembly and secure with Intake Manifold to Cylinder Head bolts and nuts using the fastener notice in service precautions. Installed the fuel inlet pipe retainers, tighten the bolts to 24 nm (18 inch lbs) and install the Throttle Body, connect the fuel feed and return quick- connection fittings and attach the two bolts for the accelerator cable bracket. Reconnect the MAP Sensor, tp sensor and iac sensor and after doing so, then install the resonator bracket, resonator, and air cleaner inlet duct.
- Q: How to replace the intake manifold on Chevrolet Cavalier?A:The Intake Manifold replacement process necessitates initial pressure relief of the fuel system and subsequent removal of the air cleaner inlet duct , resonator assembly with bracket and Fuel Rail cover. Begin by detaching the Throttle Body vacuum lines followed by Throttle Body removal. After that you should disconnect the MAP Sensor, remove the Fuel Rail then do the process in reverse. Use a hoist to elevate the vehicle then remove these components: evap purge solenoid, camshaft sensor, crankshaft sensor, vss, Knock Sensor, back up lamp switch, Oxygen Sensor and Oil Pressure Switch. Follow these steps to remove the Intake Manifold from the engine: first lower the vehicle then unroute the wiring harness and finally remove the bolts and nuts securing the Intake Manifold. Before installing the Intake Manifold check the mating surfaces of the Cylinder Head and Intake Manifold for damage while also inspecting the manifold for surface damage and loose or broken flanges or cracks. For installation, place the Intake Manifold assembly onto the Cylinder Head, ensuring to tighten the nuts and bolts to 24 nm (17 ft. Lbs.) tighten the bolts to 12 nm while keeping the studs at 24 nm (107 inch lbs.). Sequnce the wiring harness before elevating the vehicle to reconnect the evap purge solenoid and its accompanying components including the camshaft sensor, crankshaft sensor, vss, knock sensor, back up lamp switch, oxygen sensor, and Oil Pressure Switch. The following steps must be taken: install the Fuel Rail, connect the MAP Sensor, install the Throttle Body, install the resonator bracket/fuel rail cover before placing the resonator and finishing with the air cleaner inlet duct.


Related Chevrolet Cavalier Parts
 Chevrolet Cavalier Fuel Pump
 Chevrolet Cavalier Throttle Body
 Chevrolet Cavalier Air Filter Box
 Chevrolet Cavalier Air Intake Coupling
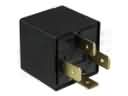 Chevrolet Cavalier Daytime Running Light Relay
 Chevrolet Cavalier Fuel Injector
 Chevrolet Cavalier Fuel Pressure Sensor
 Chevrolet Cavalier Fuel Pump Wiring Harness
 Chevrolet Cavalier Fuel Tank Lock Ring
 Chevrolet Cavalier Intake Manifold Gasket
 Chevrolet Cavalier Throttle Body Gasket
 Chevrolet Cavalier Vapor Pressure Sensor