ChevyParts
My Garage
My Account
Cart
OEM 2001 Cadillac Catera Exhaust Manifold
Engine Exhaust Manifold- Select Vehicle by Model
- Select Vehicle by VIN
Select Vehicle by Model
orMake
Model
Year
Select Vehicle by VIN
For the most accurate results, select vehicle by your VIN (Vehicle Identification Number).
2 Exhaust Manifolds found

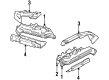
2001 Cadillac Catera Exhaust Manifold Part Number: 90530537
Product Specifications- Other Name: Manifold, Engine Exhaust Manifold; Manifold
- Item Weight: 11.00 Pounds
- Item Dimensions: 19.5 x 8.0 x 5.8 inches
- Condition: New
- Fitment Type: Direct Replacement
- SKU: 90530537
- Warranty: This genuine part is guaranteed by GM's factory warranty.

2001 Cadillac Catera Exhaust Manifold Part Number: 90528459
Product Specifications- Other Name: Manifold, Engine Exhaust Manifold; Manifold
- Item Weight: 11.00 Pounds
- Item Dimensions: 15.5 x 3.9 x 4.1 inches
- Condition: New
- Fitment Type: Direct Replacement
- SKU: 90528459
- Warranty: This genuine part is guaranteed by GM's factory warranty.
2001 Cadillac Catera Exhaust Manifold
With a comprehensive array of OEM 2001 Cadillac Catera Exhaust Manifold, from fuel pumps to door handles, our website is a one-stop-shop for your needs. All our genuine 2001 Cadillac Catera Exhaust Manifold are backed by the manufacturer's warranty and are offered at competitive prices in the market. Rest assured, you can shop with complete confidence.
2001 Cadillac Catera Exhaust Manifold Parts and Q&A
- Q: How to replace the right exhaust manifold on 2001 Cadillac Catera?A: The procedure to replace the right Exhaust Manifold begins with coolant intake pipe removal then progresses to 3 lower heat shield bolts and finally to the removal of the lower heat shield. The next step involves removing three lower nuts situated at the Exhaust Manifold rear portion and the upper rear heat shield bolt. After raising and supporting the vehicle you should remove catalytic converter nuts from the Exhaust Manifold before returning the vehicle to its resting position. First remove the accessory drive belt tensioner then remove the two front-facing nuts at the Exhaust Manifold. To reach the air pipe user must first remove the upper heat shield bolts before removing both the air pipe bolts and the air pipe from the Exhaust Manifold. To remove the Exhaust Manifold with its gasket, first raise the vehicle and then uninstall the 2 upper nuts on the Exhaust Manifold. The 2 upper nuts on the Exhaust Manifold should get cleaning before the installation of the new Exhaust Manifold gasket and Exhaust Manifold itself. Drive the upper nuts at the Exhaust Manifold to a torque of 20 nm (15 ft. Lbs.) after securing them to their position. Lower the vehicle to complete the operation. Place the air pipe onto the Exhaust Manifold while applying high temperature anti-seize compound gm p/n 12371386 or equivalent to the air pipe bolts before tightening them to 20 nm (15 ft. Lbs.). The upper heat shield bolts need application of anti-seize compound before installation with torque set at 8 nm (71 inch lbs.). Reinstall the accessory drive belt tensioner while installing the two lower nuts at the front position of the Exhaust Manifold to 20 nm (15 ft. Lbs.). Once again raise the vehicle to install catalytic converter nuts that should be tightened at 20 nm (15 ft. Lbs.) before lowering the vehicle. Apply high temperature anti-seize compound to the upper rear heat shield bolt before installation followed by tightening the 3 lower nuts at the Exhaust Manifold's rear section to 20 nm (15 ft. Lbs.). The final step includes reinstalling the lower heat shield followed by applying high temperature anti-seize compound to its bolts. Those bolts should be tightened to 8 nm (71 inch lbs.) before reinstalling the coolant intake pipe.
Related 2001 Cadillac Catera Parts
 2001 Cadillac Catera Catalytic Converter
 2001 Cadillac Catera Diverter Valve
 2001 Cadillac Catera EGR Valve
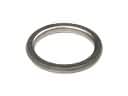 2001 Cadillac Catera Exhaust Flange Gasket
 2001 Cadillac Catera Exhaust Hanger
 2001 Cadillac Catera Exhaust Heat Shield
 2001 Cadillac Catera Exhaust Manifold Gasket
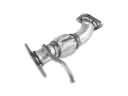 2001 Cadillac Catera Exhaust Pipe
 2001 Cadillac Catera Muffler
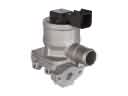 2001 Cadillac Catera Secondary Air Injection Check Valve
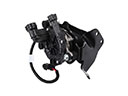 2001 Cadillac Catera Secondary Air Injection Pump
 2001 Cadillac Catera Vapor Canister