ChevyParts
My Garage
My Account
Cart
OEM Cadillac Catera Exhaust Manifold
Engine Exhaust Manifold- Select Vehicle by Model
- Select Vehicle by VIN
Select Vehicle by Model
orMake
Model
Year
Select Vehicle by VIN
For the most accurate results, select vehicle by your VIN (Vehicle Identification Number).
2 Exhaust Manifolds found

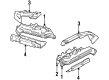
Cadillac Catera Exhaust Manifold Part Number: 90530537

Cadillac Catera Exhaust Manifold Part Number: 90528459
Cadillac Catera Exhaust Manifold
Want to cut long-term maintenance and repair costs? Choose OEM Exhaust Manifold. Those parts deliver top durability you can trust. On our site, you'll find a huge catalog of genuine Cadillac Catera parts. Prices are unbeatable, so you can keep more in your pocket. Every OEM Cadillac Catera Exhaust Manifold includes a manufacturer's warranty. You can also get an easy return policy that keeps buying risk free. Fast delivery, get your car on the road quickly. It's simple to search, compare, and order. Stop guessing about quality or fit. Order today and save with parts that last.
Another part of the Cadillac that plays a crucial role of a Catera exhaust manifold is crucial for effective and efficient operation of the luxury Cadillac Catera that was manufactured between 1996 and 2001. This exhaust manifold is particularly important in the channeling of hot exhaust gases from the engine to the exhaust system for efficiency in the operation of the engine while at the same time reducing on the emission of noxious gases to the environment. Made from cast iron or stainless steel, the Cadillac Catera Exhaust Manifold is made up of several tubes in relation to the cylinder of the engine to enhance the flow of the exhaust gases thus enhancing the performance of the car. This exhaust manifold works well with Catera models; the important role of matching a specific model's needs is significant in achieving the necessary air to fuel ratio that creates balance, and therefore safety and efficiency. The Cadillac Catera that has features such as rear-wheel drive, as well as luxurious interior parts, will have a lot to gain from a good functioning exhaust manifold to avoid conditions such as exhaust leaks, which if experienced may be damaging to health. Also, the Cadillac Catera Exhaust Manifold distinguishes itself in the automobile market by its sturdiness and noble engineering concerning the Cadillac brand. In today's automobiles, the exhaust manifold is part of the engine system of the Cadillac Catera, and with this, the Cadillac Catera narrows down the gap of competetitive rivalry in luxurious sedans and boost Cadillac's reliability on improvements in its technologies.
Cadillac Catera Exhaust Manifold Parts and Q&A
- Q: How to replace the right exhaust manifold on Cadillac Catera?A:The right Exhaust Manifold replacement process requires developers to start by taking out the transmission and coolant intake pipe before removing lower heat shield bolts one by three and finally removing the lower heat shield itself. The Exhaust Manifold replacement sequence starts with taking off three nuts on its rear section and the rear upper heat shield bolt and catalytic converter fasteners. Lower the vehicle while you remove the accessory drive belt tensioner followed by the two nuts near the front of the Exhaust Manifold. You need to remove the upper heat shield bolts to reach the air pipe before detaching the air pipe bolts as well as the air pipe from the Exhaust Manifold. To remove the Exhaust Manifold begin by first taking off the two upper nuts and subsequently raising the vehicle to extract it beneath. Begin by cleaning both Cylinder Head and Exhaust Manifold mating areas if you plan to reuse them before putting on the Exhaust Manifold and applying torque to its most accessible nuts. Lower the vehicle before installing the two upper nuts on the Exhaust Manifold while applying a torque of 20 nm (15 ft lbs) to them. Before installing and tightening the air pipe bolts at the Exhaust Manifold, coat them with high temperature anti-seize compound, gm p/n 12371386 or equivalent. Apply the compound to the bolts before securing them to 20 nm (15 ft. Lbs.). The anti-seize compound should be applied to the upper heat shield bolts before installation and subsequent tightening to 8 nm (71 inch lbs.). Attach the accessory drive belt tensioner next before installing the two lower nuts at the front of the Exhaust Manifold to a torque of 20 nm (15 ft. Lbs.). Raise the vehicle while you install the catalytic converter nuts and apply torque evenly to 20 nm (15 ft. Lbs.). The three lower nuts at the Exhaust Manifold rear need an identical torque fitting of 20 nm (15 ft. Lbs.). Place the lower heat shield before applying high temperature anti-seize compound to its bolts and torque them to 8 nm (71 inch lbs.). Complete the task by lowering the vehicle then replace the coolant intake pipe followed by the Transmission Assembly.
- Q: How to replace the left exhaust manifold on Cadillac Catera?A:Changing the left Exhaust Manifold begins with removing the engine assembly and proceeding to separate the Exhaust Manifold lower heat shield bolts then the lower heat shield. Secondly remove the upper heat shield bolts and later the upper heat shield. Detach the Exhaust Manifold air pipe components by removing both air pipe bolts while disconnecting the coolant pipe and engine lift bracket bolt attached to the cylinder head along with the oil level indicator tube. The next procedure requires Exhaust Manifold nut removal followed by Exhaust Manifold extraction and accompanying Exhaust Manifold Gasket removal while you clean the mating surfaces. The first step during installation includes setting the new Exhaust Manifold Gasket and then mounting the Exhaust Manifold. Secure the Exhaust Manifold nuts until they reach 20 nm (15 ft. Lbs.) torque after installing the oil level indicator tube followed by connecting the coolant pipe to the engine lift bracket bolt that goes through other components before the final torque to 20 nm (15 ft. Lbs.). The procedure requires installation of the air injection pipe onto the Exhaust Manifold after applying high temperature anti-seize compound gm p/n 12371386 or equivalent to the air injection pipe bolts. Then tighten these bolts to 20 nm (15 ft. Lbs.). Install the upper heat shield to the Exhaust Manifold while applying high temperature anti-seize compound to bolts then fix them securely at 8 nm (71 inch lbs). You should apply high temperature anti-seize compound to lower heat shield bolts before installing them while also tightening them to 8 nm (71 inch lbs.). Finally, reinstall the engine assembly.


Related Cadillac Catera Parts
 Cadillac Catera Catalytic Converter
 Cadillac Catera Diverter Valve
 Cadillac Catera EGR Valve
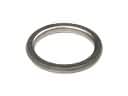 Cadillac Catera Exhaust Flange Gasket
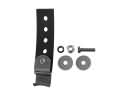 Cadillac Catera Exhaust Hanger
 Cadillac Catera Exhaust Heat Shield
 Cadillac Catera Exhaust Manifold Gasket
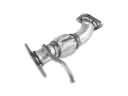 Cadillac Catera Exhaust Pipe
 Cadillac Catera Muffler
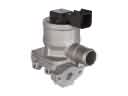 Cadillac Catera Secondary Air Injection Check Valve
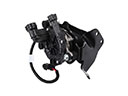 Cadillac Catera Secondary Air Injection Pump
 Cadillac Catera Vapor Canister