ChevyParts
My Garage
My Account
Cart
OEM 2001 Cadillac Catera Rack And Pinion
Steering Rack And Pinion- Select Vehicle by Model
- Select Vehicle by VIN
Select Vehicle by Model
orMake
Model
Year
Select Vehicle by VIN
For the most accurate results, select vehicle by your VIN (Vehicle Identification Number).
1 Rack And Pinion found

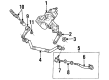
2001 Cadillac Catera Gear Assembly Part Number: 9227771
Product Specifications- Other Name: Gear, Steering; Steering Gear Assembly
- Item Weight: 30.70 Pounds
- Item Dimensions: 20.8 x 12.2 x 12.2 inches
- Condition: New
- Fitment Type: Direct Replacement
- SKU: 9227771
- Warranty: This genuine part is guaranteed by GM's factory warranty.
2001 Cadillac Catera Rack And Pinion
With a comprehensive array of OEM 2001 Cadillac Catera Rack And Pinion, from fuel pumps to door handles, our website is a one-stop-shop for your needs. All our genuine 2001 Cadillac Catera Rack And Pinion are backed by the manufacturer's warranty and are offered at competitive prices in the market. Rest assured, you can shop with complete confidence.
2001 Cadillac Catera Rack And Pinion Parts Questions & Experts Answers
- Q: How to Replace the Front Rack and Pinion Steering Gear on 2001 Cadillac Catera?A: Start power steering Rack And Pinion replacement by taking off the Windshield Wiper assembly then disconnecting the three body harness electrical connectors and ecm from the electrical box. The first step is draining the cooling system while removing the upper Radiator Hose. The a/c system needs refrigerant evacuation before removal of the a/c evaporative line extension bolt. Start by draining power steering fluid from the reservoir before you detach the power steering fluid reservoir bracket bolt and remove the reservoir. Draw out brake fluid from the reservoir before unfastening the Brake Booster vacuum from the intake plenum and separating master cylinder brake pipes. Unplug the electrical connection at the master cylinder reservoir cap before taking out the sound insulator tabs and removing the sound insulation component. Steering coupler match-marking for splines on the steering Rack And Pinion is important when steering wheel reinstall for sir coil protection against damage. After bolt removal of the steering coupler lock down the steering wheel with a locking device then remove the key. The Steering Column can be removed from the steering Rack And Pinion after aligning the steering wheel directly ahead then locking it securely while using care to spread the clamp for moving the shaft. Remove the Brake Pedal from the brake power booster link rod using a clip removal tool then carefully drive the small pin out of its place. The driver knee bolster energy absorber and both relay panel and Fuse screws must be removed to reveal the upper Brake Booster nuts once the i/p panel is moved into position. Detach the vacuum booster containing the master cylinder by first unbolting all vacuum booster nuts located on the cowl's inner side. Remove the quick connect of the a/c evaporator line extension and the power steering hoses from the steering Rack And Pinion before removing the electronic brake control module (EBCM) assembly. After removing the heat shield upper fastening bolt lift the vehicle then support it while removing the Pitman Arm nut and washer. Orient the components to check steering Rack And Pinion alignment when planning gear reuse. The universal Pitman Arm puller extracts the Pitman Arm after technicians remove the lower heat shield nuts and the steering Rack And Pinion lower bolts with washers. After vehicle lowering they can remove the heat shield. Start by disconnecting electrical power from the power steering fluid flow control valve actuator. Remove the upper steering Rack And Pinion bolt along with any shim(s) and keep notes of the positions for later reassembly. Finish by removing the steering Rack And Pinion. Install the stub shaft through stops using an 8 mm (5/16 inch) open-end wrench while counting rotations until returning half the total rotations while matching the stub shaft mark to the v mark on the steering Rack And Pinion case. Follow the fastener instructions upon installation of the steering Rack And Pinion and shim(s) before you start with the upper steering Rack And Pinion bolt but finish the installation with final bolt torques after installing the remaining hardware. The power steering fluid flow control valve actuator electrical connection should be restored before securing the heat shield with an upper heat shield bolt at 8 nm (71 inch lbs.). After raising and supporting the vehicle once again, fasten the lower steering Rack And Pinion bolts, nuts, and washers by applying a torque of 40 nm (30 ft. Lbs.) followed by tightening the lower heat shield nuts to 15 nm (11 ft. Lbs.). The Pitman Arm installation requires placement of the rubber steering Rack And Pinion shaft protector before aligning with steering Rack And Pinion marks and adding the Pitman Arm washer and tightening the nut to 160 nm (118 ft. Lbs.). When the vehicle is at its lowest point install the ebcm assembly before tightening the power steering Rack And Pinion inlet and outlet hoses to 28 nm (21 ft. Lbs.). New o-rings lubricated with mineral oil 525 viscosity should be used on the a/c evaporator line extension quick connect during installation before tightening the extension bolt to 20 nm (15 ft. Lbs.). Put back the upper Radiator Hose and reattach both the ecm mounting at the electrical box and the three body harness electrical connectors before restoring the Windshield Wiper assembly. Complete the engine cooling system with fluid before you bleed the power steering system and perform a complete a/c system check for leaks.
Related 2001 Cadillac Catera Parts
 2001 Cadillac Catera Center Link
 2001 Cadillac Catera Drag Link
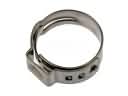 2001 Cadillac Catera Fuel Line Clamps
 2001 Cadillac Catera Idler Arm
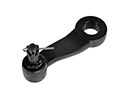 2001 Cadillac Catera Pitman Arm
 2001 Cadillac Catera Power Steering Hose
 2001 Cadillac Catera Power Steering Pump
 2001 Cadillac Catera Power Steering Reservoir
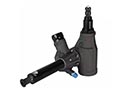 2001 Cadillac Catera Steering Gearbox
 2001 Cadillac Catera Tie Rod
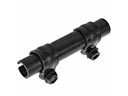 2001 Cadillac Catera Tie Rod Adjusting Sleeve
 2001 Cadillac Catera Tie Rod End