ChevyParts
My Garage
My Account
Cart
OEM Cadillac Catera Rack And Pinion
Steering Rack And Pinion- Select Vehicle by Model
- Select Vehicle by VIN
Select Vehicle by Model
orMake
Model
Year
Select Vehicle by VIN
For the most accurate results, select vehicle by your VIN (Vehicle Identification Number).
1 Rack And Pinion found

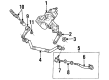
Cadillac Catera Gear Assembly Part Number: 9227771
Cadillac Catera Rack And Pinion
Want to cut long-term maintenance and repair costs? Choose OEM Rack And Pinion. Those parts deliver top durability you can trust. On our site, you'll find a huge catalog of genuine Cadillac Catera parts. Prices are unbeatable, so you can keep more in your pocket. Every OEM Cadillac Catera Rack And Pinion includes a manufacturer's warranty. You can also get an easy return policy that keeps buying risk free. Fast delivery, get your car on the road quickly. It's simple to search, compare, and order. Stop guessing about quality or fit. Order today and save with parts that last.
The Rack And Pinion is a very essential part which plays an important role in raising the functionality of Cadillac Catera vehicle models, known for its reliability and durability. This steering mechanism turns the rotation of the steering wheel into the relative movement of the front wheels so as to achieve an effective response. The Cadillac Catera mainly has a power assisted rack and pinion steering, which means that including in this system, there are hydraulic means that make the task very easy and this makes it to be a major consideration in the market. Rack And Pinion fits different Catera designs used between 1996 and 2001 to enable customers to have better control and safety on their car. Its design also has other elements like helical gears, though these provide a silent operation, they call for constant check so as to be able to notice the initial signs of wear and tear that may lead to overheating. Some typical problems such as the leakage of fluid from the seals may compromise on the efficiency but maintaining Rack And Pinion will help to avoid these problems thus enhancing on its durability. This wonderful car equipment, known as the Cadillac Catera, characterized by luxurious elements and an impressive V6 engine, is one of the important episodes in Cadillac's history as the car demonstrated the company's focus on quality and innovative development. Hence by embedding the Rack And Pinion in this car Cadillac was not only increasing on the efficiency and safety of Catera but was also standing tall to its reputation of producing luxurious cars with reliability in their DNA. All in all, the Rack And Pinion can still be considered as one of the important factors in achieving the performance as well as comfort that Cadillac consumers seek.
Cadillac Catera Rack And Pinion Parts and Q&A
- Q: How to Replace the Front Rack and Pinion Steering Gear on Cadillac Catera?A:Start power steering Rack And Pinion replacement by taking off the Windshield Wiper assembly then disconnecting the three body harness electrical connectors and ecm from the electrical box. The first step is draining the cooling system while removing the upper Radiator Hose. The a/c system needs refrigerant evacuation before removal of the a/c evaporative line extension bolt. Start by draining power steering fluid from the reservoir before you detach the power steering fluid reservoir bracket bolt and remove the reservoir. Draw out brake fluid from the reservoir before unfastening the Brake Booster vacuum from the intake plenum and separating master cylinder brake pipes. Unplug the electrical connection at the master cylinder reservoir cap before taking out the sound insulator tabs and removing the sound insulation component. Steering coupler match-marking for splines on the steering Rack And Pinion is important when steering wheel reinstall for sir coil protection against damage. After bolt removal of the steering coupler lock down the steering wheel with a locking device then remove the key. The Steering Column can be removed from the steering Rack And Pinion after aligning the steering wheel directly ahead then locking it securely while using care to spread the clamp for moving the shaft. Remove the Brake Pedal from the brake power booster link rod using a clip removal tool then carefully drive the small pin out of its place. The driver knee bolster energy absorber and both relay panel and Fuse screws must be removed to reveal the upper Brake Booster nuts once the i/p panel is moved into position. Detach the vacuum booster containing the master cylinder by first unbolting all vacuum booster nuts located on the cowl's inner side. Remove the quick connect of the a/c evaporator line extension and the Power Steering Hoses from the steering Rack And Pinion before removing the electronic brake control module (EBCM) assembly. After removing the heat shield upper fastening bolt lift the vehicle then support it while removing the Pitman Arm nut and washer. Orient the components to check steering Rack And Pinion alignment when planning gear reuse. The universal Pitman Arm puller extracts the Pitman Arm after technicians remove the lower heat shield nuts and the steering Rack And Pinion lower bolts with washers. After vehicle lowering they can remove the heat shield. Start by disconnecting electrical power from the power steering fluid flow control valve actuator. Remove the upper steering Rack And Pinion bolt along with any shim(s) and keep notes of the positions for later reassembly. Finish by removing the steering Rack And Pinion. Install the stub shaft through stops using an 8 mm (5/16 inch) open-end wrench while counting rotations until returning half the total rotations while matching the stub shaft mark to the v mark on the steering Rack And Pinion case. Follow the fastener instructions upon installation of the steering Rack And Pinion and shim(s) before you start with the upper steering Rack And Pinion bolt but finish the installation with final bolt torques after installing the remaining hardware. The power steering fluid flow control valve actuator electrical connection should be restored before securing the heat shield with an upper heat shield bolt at 8 nm (71 inch lbs.). After raising and supporting the vehicle once again, fasten the lower steering Rack And Pinion bolts, nuts, and washers by applying a torque of 40 nm (30 ft. Lbs.) followed by tightening the lower heat shield nuts to 15 nm (11 ft. Lbs.). The Pitman Arm installation requires placement of the rubber steering Rack And Pinion shaft protector before aligning with steering Rack And Pinion marks and adding the Pitman Arm washer and tightening the nut to 160 nm (118 ft. Lbs.). When the vehicle is at its lowest point install the ebcm assembly before tightening the power steering Rack And Pinion inlet and outlet hoses to 28 nm (21 ft. Lbs.). New o-rings lubricated with mineral oil 525 viscosity should be used on the a/c evaporator line extension quick connect during installation before tightening the extension bolt to 20 nm (15 ft. Lbs.). Put back the upper Radiator Hose and reattach both the ecm mounting at the electrical box and the three body harness electrical connectors before restoring the Windshield Wiper assembly. Complete the engine cooling system with fluid before you bleed the power steering system and perform a complete a/c system check for leaks.
Related Cadillac Catera Parts
 Cadillac Catera Center Link
 Cadillac Catera Drag Link
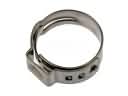 Cadillac Catera Fuel Line Clamps
 Cadillac Catera Idler Arm
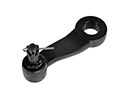 Cadillac Catera Pitman Arm
 Cadillac Catera Power Steering Hose
 Cadillac Catera Power Steering Pump
 Cadillac Catera Power Steering Reservoir
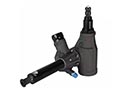 Cadillac Catera Steering Gearbox
 Cadillac Catera Tie Rod
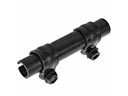 Cadillac Catera Tie Rod Adjusting Sleeve
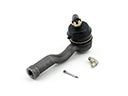 Cadillac Catera Tie Rod End