ChevyParts
My Garage
My Account
Cart
OEM 2001 Chevrolet Venture A/C Condenser
Air Conditioning Condenser- Select Vehicle by Model
- Select Vehicle by VIN
Select Vehicle by Model
orMake
Model
Year
Select Vehicle by VIN
For the most accurate results, select vehicle by your VIN (Vehicle Identification Number).
1 A/C Condenser found

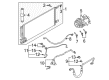
2001 Chevrolet Venture Condenser Part Number: 10339103
Product Specifications- Other Name: Condenser, A/C; A/C Condenser; Condenser A/C; Condenser, A/C Condenser
- Replaces: 10430003, 10315135, 10326292, 10420262, 10331989
- Item Weight: 13.70 Pounds
- Item Dimensions: 41.3 x 10.5 x 19.3 inches
- Condition: New
- Fitment Type: Direct Replacement
- SKU: 10339103
- Warranty: This genuine part is guaranteed by GM's factory warranty.
2001 Chevrolet Venture A/C Condenser
With a comprehensive array of OEM 2001 Chevrolet Venture A/C Condenser, from fuel pumps to door handles, our website is a one-stop-shop for your needs. All our genuine 2001 Chevrolet Venture A/C Condenser are backed by the manufacturer's warranty and are offered at competitive prices in the market. Rest assured, you can shop with complete confidence.
2001 Chevrolet Venture A/C Condenser Parts Questions & Experts Answers
- Q: How to replace the A/C Condenser in a system on 2001 Chevrolet Venture?A: A safe recovery process for refrigerant starts essential procedures before swapping the condenser. The first step requires brace removal from the lh and rh diagonal positions followed by the removal of the air cleaner assembly. Direct pipe contamination by immediately sealing open a/c lines with tape or caps. After evaporator inlet tube to condenser fitting bolt removal disconnect the evaporator inlet tube from the condenser. Take off the discharge hose to condenser connection nut before separating the hose from the condenser assembly. Start by removing the Radiator then unfasten the condenser's pipe to Radiator mounting bolt and its pair of condenser to Radiator mounting bolts before pulling the condenser away from the Radiator. By disconnecting receiver dehydrator upper bracket bolts and the receiver dehydrator to condenser mounting bolts workers can separate the receiver dehydrator from the condenser while removing its sealing washers. Before installing new seal washers users should clean both the condenser fittings and a/c line sealing surfaces and make sure that no mineral base 525 viscosity refrigerant oil gets onto the fresh-quality washers. The new receiver dehydrator sealing washers need mineral base 525 viscosity refrigerant oil application before their installation to the receiver dehydrator components before receiver dehydrator condenser connection. Apply 6 n.m (53 lb in) torque to the receiver dehydrator's condenser mounting bolts and 6 n.m (53 lb in) torque to its upper bracket bolts secured to the condenser. Tighten the condenser to Radiator mounting bolts to 6 n.m (53 lb in) then fasten the condenser pipe to Radiator mounting bolt to 2.5 n.m (22 lb in). Reinstall the Radiator before you install a sealing washer to the evaporator inlet fitting and connect the evaporator inlet tube to the condenser with its fitting bolt torqued to 16 n.m (12 lb ft). Position the sealing washer onto the discharge hose fitting before linking the discharge hose to the condenser unit. Finally tighten the discharge hose fitting nut to 16 n.m (12 lb ft). Reinstall the air cleaner assembly together with both lh and rh diagonal braces before performing refrigerant evacuation and recharging. Perform a leak test on component fittings with the halogen leak detector (J 39400-A).
Related 2001 Chevrolet Venture Parts
 2001 Chevrolet Venture Cabin Air Filter
 2001 Chevrolet Venture A/C Clutch
 2001 Chevrolet Venture A/C Compressor
 2001 Chevrolet Venture A/C Compressor Cut-Out Switches
 2001 Chevrolet Venture A/C Hose
 2001 Chevrolet Venture A/C Idler Pulley
 2001 Chevrolet Venture A/C Orifice Tube
 2001 Chevrolet Venture A/C Service Cap
 2001 Chevrolet Venture A/C System Valve Core
 2001 Chevrolet Venture Blower Motor Resistor
 2001 Chevrolet Venture Evaporator
 2001 Chevrolet Venture HVAC Pressure Switch