ChevyParts
My Garage
My Account
Cart
OEM 2003 Cadillac Escalade Oil Pan
Oil Drain Pan- Select Vehicle by Model
- Select Vehicle by VIN
Select Vehicle by Model
orMake
Model
Year
Select Vehicle by VIN
For the most accurate results, select vehicle by your VIN (Vehicle Identification Number).
1 Oil Pan found

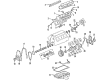
2003 Cadillac Escalade Oil Pan Part Number: 12579273
$313.43 MSRP: $538.29You Save: $224.86 (42%)Ships in 1-2 Business DaysProduct Specifications- Other Name: Pan, Engine Oil; Engine Oil Pan
- Replaces: 12573695, 12560393
- Item Weight: 22.50 Pounds
- Item Dimensions: 28.3 x 18.9 x 18.2 inches
- Condition: New
- Fitment Type: Direct Replacement
- SKU: 12579273
- Warranty: This genuine part is guaranteed by GM's factory warranty.
2003 Cadillac Escalade Oil Pan
With a comprehensive array of OEM 2003 Cadillac Escalade Oil Pan, from fuel pumps to door handles, our website is a one-stop-shop for your needs. All our genuine 2003 Cadillac Escalade Oil Pan are backed by the manufacturer's warranty and are offered at competitive prices in the market. Rest assured, you can shop with complete confidence.
2003 Cadillac Escalade Oil Pan Parts and Q&A
- Q: How to replace the oil pan on 2003 Cadillac Escalade?A: In replacing the Oil Pan first, if projected with the four-wheel drive (4WD), it is recommended to slide out the inner axle housing nuts and washers of the bracket and raise the front drive axle in a convenient way using a supportive jack position. Next, you have to remove differential carrier lower and upper mount bolts and nuts and then lower the front drive axle and remove the transmission cover bolt. If necessary, remove the Oil Pan skid plate by loosing its bolts, followed by the crossbar and its bolts. Drain off the engine oil and remove the engine Oil Filter and insert the Drain Plug and Oil Filter snug. For the vehicles with a 4l60-e automatic transmission, you need to remove transmission bolt and stud on the right side, and the bottom bolt on the left one. For those that use 4l80-e automatic transmission, they will remove the converter cover bolts. Unplug the oil level sensor electrical connector, remove the battery cable channel bolt, slide the channel pin out of the Oil Pan tab, and remove the positive battery cable clip bolt. Do proceed to remove the Oil Pan bolts and Oil Pan, and take care that no foreign material is brought into the oil passages. If so required, drill out the Oil Pan Gasket retaining rivets and remove the gasket, discarding the gasket and rivets. If necessary, clean and check the engine Oil Pan. For installation, a gm p/n 12378190 of equivalent amount of sealant should be placed in the respective tabs of the front and rear cover gaskets that extend into the Oil Pan surface on the engine block cortex. Make sure the oil gallery passages are aligned correctly with the Oil Pan Gasket, and pre-assemble the gasket to the pan, also installing the Oil Pan and gasket to the engine block with tightening the bolts just tight without over-tightening. If equipped with the 4l80-e automatic transmission, install the transmission converter cover bolts until snug, and for the 4l 60-e automatic transmission, install the transmission bolt, and stud on right side until snug. Next, ensure you tighten the bottom bolt on the left side, then tighten the bolts for the Oil Pan-to-front cover 25 nm (18 ft. Lbs.), for Oil Pan-to-rear cover 12 nm (106 inch lbs.), and for converter cover and transmission bolts/stud 50 nm (37 ft. Lbs.). Replace the positive battery cable clip bolt engaging and tightening it to 9 nm (80 inch lbs.), end in the Oil Pan tab and installing the battery cable channel bolt with engagement to 12 nm (106 inch lbs.). Connect the oil level sensor electrical connector, install transmission cover and bolt, tighten the bolt to 12 nm (106 inch lbs.) followed by the installation of crossbar and its bolts tightened 100 nm (74 ft. Lbs). Put in the Oil Pan skid plate and its bolts to 20 nm (15 ft. Lbs), followed by transmission cover bolt, tightened to 12 nm (106 inch lbs), if it's installed. Lift the front drive axle up into position, and if your vehicle is equipped with 4wd, thread the differential carrier upper mounting bolt and nut to threading without tightening, then thread the lower mounting bolt and nut, tightening them to 100 nm (75 ft. Lbs.). Lastly, install the inner axle housing washers and nuts onto the bracket and tighten them with a torque of 100 nm (75 ft. Lbs.), removing the jack from the front drive axle, and put on new engine oil and a new Oil Filter.
Related 2003 Cadillac Escalade Parts
 2003 Cadillac Escalade Timing Chain
 2003 Cadillac Escalade Camshaft
 2003 Cadillac Escalade Crankshaft Thrust Washer Set
 2003 Cadillac Escalade Engine Mount
 2003 Cadillac Escalade Exhaust Valve
 2003 Cadillac Escalade Intake Valve
 2003 Cadillac Escalade Piston Ring
 2003 Cadillac Escalade Pushrod
 2003 Cadillac Escalade Timing Cover
 2003 Cadillac Escalade Valve Cover Gasket
 2003 Cadillac Escalade Valve Cover Grommet
 2003 Cadillac Escalade Variable Timing Sprocket