Make sure this part fits

GM 12579273
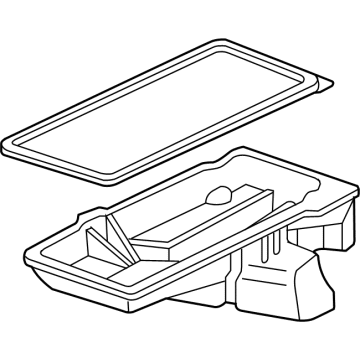
Oil Pan

1999-2007 GM

Customer Questions & Expert Answers (25)
GM 12579273 Oil Pan
  • Part Description
    Pan, Engine Oil; Engine Oil Pan
  • Replaces
    12573695, 12560393
  • Manufacturer
    General Motors
Make sure this part fits
$307.28 MSRP: $527.73
You Save: $220.45 (42%)
Ships in 1-2 Business Days
1
ADD TO CART
  • Related Parts
  • Product Specifications
  • Vehicle Fitment
  • Customer Questions & Expert Answers
  • Product Specifications

    BrandGenuine GM
    Manufacturer Part Number12579273
    Part DescriptionPan, Engine Oil; Engine Oil Pan
    Item Dimensions28.3 x 18.9 x 18.2 inches
    Item Weight22.50 Pounds
    ConditionNew
    Fitment TypeDirect Replacement
    Replaces12573695, 12560393
    ManufacturerGeneral Motors
    SKU12579273
    WarrantyThis genuine GM part is guaranteed by GM's factory warranty.
    Shipping & ReturnShipping Policy Return Policy
    Warning: California's Proposition 65
  • Vehicle Fitment

    Year Make Model Trim Engine
    2002-2006 Cadillac EscaladeBase8 Cyl 5.3 L GAS, 8 Cyl 6.0 L GAS
    2003-2006 Cadillac Escalade ESVBase8 Cyl 6.0 L GAS
    2002-2006 Cadillac Escalade EXTBase8 Cyl 6.0 L GAS
    2002-2006 Chevrolet Avalanche 1500Base, LS, LT, North Face, On Road Edition, WBH, Z66, Z718 Cyl 5.3 L FLEX, 8 Cyl 5.3 L GAS
    2002-2006 Chevrolet Avalanche 2500Base, LS, LT8 Cyl 8.1 L GAS
    2003-2007 Chevrolet Express 1500Base, LS, LT8 Cyl 5.3 L FLEX, 8 Cyl 5.3 L GAS
    2003-2007 Chevrolet Express 2500Base, LS, LT8 Cyl 4.8 L GAS, 8 Cyl 5.3 L GAS, 8 Cyl 6.0 L CNG, 8 Cyl 6.0 L GAS
    2003-2007 Chevrolet Express 3500Base, LS, LT8 Cyl 4.8 L GAS, 8 Cyl 6.0 L CNG, 8 Cyl 6.0 L GAS
    1999-2006 Chevrolet Silverado 1500Base, Hybrid, LS, LT, SS, WT, Z71 Off-Road8 Cyl 4.8 L GAS, 8 Cyl 5.3 L FLEX, 8 Cyl 5.3 L FULL HYBRID EV-GAS (FHEV), 8 Cyl 5.3 L GAS, 8 Cyl 6.0 L GAS
    2005-2006, 2001-2003 Chevrolet Silverado 1500 HDBase, LS, LT8 Cyl 6.0 L GAS
    View More
  • Customer Questions & Expert Answers

    Q:
    Is this 12579273 designed for my car? Posted by ChevyPartsGiant Specialist
    A:
    Please Select Your Vehicle model to see if part number 12579273 is suitable before ordering.
    Posted by ChevyPartsGiant Specialist
    Q:
    How to replace the oil pan on Cadillac Escalade? Posted by Customer
    A:
    First, if the spare part has a rotation system (4 WD) remove the front Differential followed by the vice motor Starter, engine shield bolts and engine shield. Depending on the situation, remove the Oil Pan skid plate by removing the bolts, and then remove the crossbar and its bolts. Next, remove the transmission cover bolt and cover, drain engine oil and remove engine Oil Filter remembering to replace Drain Plug and Oil Filter till it is snug. For a car that has the 4l60-e automatic transmission, the transmission bolt on the right side needs to be removed along with the right side stud and the left side bottom bolt. In case you have the 4l80-e automatic transmission, then pull out the converter cover bolts. Disconnect the oil level sensor electrical connector , remove the battery cable channel bolt, move the channel pin out of the Oil Pan tab , delete the engine wiring harness clip from the positive battery cable clip and positive battery cable clip from the positive battery cable clip then remove the engine oil cooler lines and positive battery cable clip bolt and clip. Numb all the Oil Pan bolts together with the Oil Pan while taking care not to introduce foreign material to the oil passages. If needed, drill out the Oil Pan gasket retaining rivets and remove the gasket, since they must be discarded. Jay clean and check the engine Oil Pan before installation in such a way that alignment is critical here as rear bolt positions here give mounting points for transmission bellhousing. Add 5 mm (0.20 inch) bead of sealant gm U.S. P/N 12378190, or equivalent, to the engine block on the tabs of the front and rear cover gaskets that extend into the Oil Pan surface. Align the oil gallery passages in the Oil Pan and the engine block with the Oil Pan gasket and then attach the pre-assembled gasket to the pan and attach the Oil Pan, gasket, and bolts to the engine block in a snug condition without over-tightening the bolts. When given the 4l80-e automatic transmission, fit the transmission converter cover bolt until tight, and in the 4l60-e automatic transmission, the transmission bolt is installed as well as the study on the right side, then the bottom bolt on the left side. Tighten Oil Pan, and Oil Pan to Oil Pan front cover bolts to 25 nm (18 ft. Lbs.), Oil Pan to rear cover bolt to 12 nm (106 inch lbs.) and bellhousing, converter cover and transmission bolts/stud to 50 nm (37 ft. Lbs). Reinstall the positive battery cable clip to the Oil Pan bolt screwing the clip bolt to 9nm (80 inch lbs), install the engine oil cooler lines, the engine wiring harness clip, and reinstall the positive battery cable clip to the positive battery cable clip. Slip the channel pin into the Oil Pan tab, fit the battery cable channel bolt and tighten it to 12n (106in lb). Check the oil level sensor "s, install the transmission cover and bolt with a tightness of 12 nm (106 inch lbs.), install crossbar and its bolts with a tightness of 100 nm (74 ft. Lbs.). In case it applies, fix the Oil Pan skid plate and its bolts, which need to be fixed at 20 nm (15 ft. Lbs) then the engine shield, which should also be tightly bolted, at 20 nm (15 ft. Lbs). Lastly, reinstall the Starter motor, the front Differential if also had 4wd, and change the engine oil as well as its Oil Filter.
    Posted by ChevyPartsGiant Specialist
    Q:
    How to replace the oil pan on Cadillac Escalade EXT? Posted by Customer
    A:
    Initially, in case it has four wheel drive (4WD) then you should remove its inner axle housing nuts and washers from the bracket, then you should use a suitable jack to support its front drive axle. Next demount the tier differential lower and upper mounting and the bolts, nuts, lower the front drive axle, and demount the transmission cover bolt. Remove, if needed, bolts that attach the Oil Pan skid plate and the skid plate, as well as the bolts attaching the crossbar and the crossbar. Take off the transmission cover bolt and cover, drain the engine oil and remove the engine Oil Filter and then return the drain plug and Oil Filter until it is tight. If there is a vehicle using the 4l60-e automatic transmission, one should remove the transmission bolt and stud on the right side and the bottom left one. If you have 4l80-e automatic transmission, take out the cover bolts of the converter. Unplug the oil level sensor electrical connector, remove the Battery Cable channel bolt, and slide the channel pin out of the Oil Pan tab, remove the engine wiring harness clip, positive Battery Cable clip, and engine oil cooler lines from the positive Battery Cable clip, also remove positive Battery Cable clip bolt and clip. Unscrew all the bolts of the Oil Pan and the Oil Pan itself, whilst making sure no foreign object gets into the oil paths. Drill out the Oil Pan o. G. Retaining rivets if necessary, and then remove and discard the gasket and rivets. Check the engine Oil Pan for any cleaning and perform an inspection as necessary. For installation, apply a beaed of sealant gm p/n 12378190 er equivalent to the engine block ont he tabs o the front and rearower cover gcxkets that extend into the Oil Pan surface. Arrange the oil gallery passages in the Oil Pan and engine block correctly with the new gasket then fasten the gasket onto the pan and the bolts through the area of the gasket. Install the Oil Pan along with the gasket and bolts to the engine block ensuring the Oil Pan bolts are screwed in without overtightening them. If the vehicle has the 4l80-e transmission, tighten the transmission converter cover bolts loosely. For automatic transmission 4l60-e, before snugging the bolt down to a transmission bolt, attached on the right side as well as the bottom bolt is the left side. Tighten the Oil Pan and Oil Pan-to Oil Pan front cover bolts to 25 nm (18 ft. Lbs), Oil Pan-to-rear cover bolts to 12 nm (106 inch lbs), and the bellhousing,converter cover, and the transmission bolts/stud to 50 nm (37 ft lbs). Install the positive Battery Cable clip and bolt to the Oil Pan tighten bolt to 9 nm (80 inch lbs) and install the engine oil cooler lines then to the positive Battery Cable clip then the engine wiring harness clip and positive Battery Cable clip. Slide the channel pin into the tab of Oil Pan, install the Battery Cable channel bolt and tighten 12 nm (106 inch lbs.). Connect the oil level sensor electrical connector , install the transmission cover and bolt, tighten bolt 12 nm (106 inch lbs.) , and then install the crossbar and tighten the crossbar bolts to 100 nm (74 ft. Lbs.). If available, mount and tighten the oil skid pan plate with its bolts at 20 nm (15 ft. Lbs.), then the transmission cover bolts at 12 nm (106 inch lbs.). Lift the front drive axle to position and install the differential carrier upper bolt and nut to tight without installing, and then install the differential carrier lower bolt and nut and tighten to 100nm (75 ft. Lbs.). Finally install the inner axle housing washers and nuts to bracket, torque to 100 nm (75 ft. Lbs.), remove the jack from the front drive axle, and install a new engine oil and a new Oil Filter.
    Posted by ChevyPartsGiant Specialist
    Q:
    How to replace the oil pan on Chevrolet Avalanche 1500? Posted by Customer
    A:
    First, if the car is equipped with four wheel drive (4WD) to remove the inner axle housing nuts as well as washers from the bracket and after that the system is supported by a proper jack. Afterwards, take off the differential carrier lower and upper mounting bolts and nuts, lower the front drive axle, and take off the transmission cover bolt. If necessary, remove the bolts from the Oil Pan skid plate and the skid plate itself, bolts in the crossbar, and the crossbar. Loose the transmission cover bolt and cover, drain the engine oil out, and remove the engine Oil Filter and then re-install the drain plug and Oil Filter until tight. In case of the 4l60-e automatic transmission, remove the transmission bolt and stud on the right hand side and the bottom bolt on the left hand side. For the owners of the 4l80-e automatic transmission, the converter cover bolts need to be removed. Take the break away electrical connection of oil level sensor and remove the battery cable channel bolt, pull out the channel pin from the Oil Pan tab, remove the cylinder engine wiring harness clip, positive battery cable clip and also the engine oil cooler lines from the positive battery cable clip then remove the positive battery cable clip bolt and clip. Do not lose the Oil Pan bolts and the pan while removing them as well as anything else should not enter the oil passages. If necessary, drill out the Oil Pan gasket retaining rivets and remove and discard the gasket and rivets. Clean and check the engine Oil Pan when necessary. For installation, a 5 mm (0.20 inch) bead of sealant, gm p/n 12378190 or equivalent, is installed into the engine block of the tabs on the front and rear cover gaskets that protrude into the Oil Pan surface. Position the oil gallery passages in the Oil Pan and the engine block correctly with regard to the new gasket, pre-assemble the new gasket to the pan, and fit the Oil Pan, gasket, and bolts to the engine block. Tighten the Oil Pan bolts until snug without over-tightening followed by the installation of the transmission converter cover bolts to snug, for the 4l80-e automatic transmission and the transmission bolt and stud on the right side, for the 4l60-e automatic transmission. Set the bottom bolt on left side and tighten it until tight, then the Oil Pan and Oil Pan-to-Oil Pan front cover to 25 nm (18 ft. Lbs.), Oil Pan-to- rear cover to 12 nm (106 inch lbs.), and bell housing, converter cover, and transmission bolts/stud-to 50 nm (37 ft. Lbs.). Mount the positive battery cable clip to the Oil Pan and bolt to 9 nm (80 inces lbs.) and plug in the engine oil cooler lines to the positive battery cable clip, then mount to the end the engine wiring harness clip followed by the positive battery cable clip. Nestle the chranel pin into the Oil Pan tab, screw the battery cable chranel bolt, and tighten it to 12 nm (106 inch lbs.). Connect the oil level sensor electrical connector , install the transmission cover and bolt then tighten the bolt to 12 nm (106 inch lbs.) , install crossbar and the bolts then tighten the bolts 100 nm (74 ft. Lbs.). If available, attach the Oil Pan skid plate with its bolts, tightened to the value of 20 nm (15 ft. Lbs.), and then the transmission cover bolts, which should be tightened to 12 nm (106 inch lbs). Lift up the front drive axle into its place, tighten differential carrier upper mounting bolt and nut until it is hand-tightened, then differential carrier lower mounting bolt and nut to 100 nm (75 ft. Lbs.). Lastly, bolt the inner axle washers and nuts onto the bracket and tighten to 100 nm (75 ft. Lbs) and remove the jack by the front drive axle and have the engine oil replaced and the Oil Filter, new.
    Posted by ChevyPartsGiant Specialist
    Q:
    How to replace the oil pan on Chevrolet Avalanche 2500? Posted by Customer
    A:
    Start the Oil Pan replacement process by making sure the crankshaft balancer does not raise the engine because this could cause damage. Start by removing the front Differential for four wheel drive (4WD) vehicles then proceed with Starter motor removal. Start by removing both the skid plate bolts and skid plate component. The Oil Pan replacement begins by removing the crossbar bolts and the crossbar on two wheel drive (2WD) models. For 4wd models, do the same. First drain the engine oil before you remove the oil level indicator and disconnect the oil level sensor electrical connector. The oil level sensor operation requires separation of the engine harness from the Oil Pan then removing the sensor. Disconnect the battery cable channel bolt then relocate the channel before you start removing the Oil Pan bolts. It is possible to use the same Oil Pan Gasket if it shows no signs of damage. You should apply gm 2346286 (Canadian P/N 10953472) sealant to four contact points on the sides of both front and rear crankshaft bearing caps. Install a new Oil Pan Gasket into the groove before putting in the Oil Pan and its attachment bolts. Start by torquing the bolts to 10 nm (89 inch lbs.) then finish by tightening them to 25 nm (18 ft. Lbs.). Fasten the battery cable channel using the bolt that requires 9 nm (80 inch lbs.) torque. Connect the oil level sensor to the Oil Pan and fasten it with 20 nm (15 ft. Lbs.) torque before installing the harness clip and restoring the oil level sensor electrical connection. Reinstall the oil level indicator and add oil to the engine while installing the crossbar and its bolts with a torque setting of 100 nm (74 ft. Lbs.). Repeat this procedure for adding the second crossbar installation only if required. Reinstall the Oil Pan skid plate before installing its bolts at 20 nm (15 ft. Lbs.) which should be followed by reinstallation of the Starter motor and the front Differential (if vehicle has 4WD).
    Posted by ChevyPartsGiant Specialist
    Q:
    How to replace the oil pan on Chevrolet Express 1500? Posted by Customer
    A:
    The first step for replacing the Oil Pan should begin with removing inner axle housing nuts and washers from the bracket if your vehicle has all wheel drive (AWD) and supporting the front drive axle with a suitable jack. When replacing the Oil Pan and awd system is present, remove both mounting bolts and nuts of the differential carrier before lowering the front drive axle. Start by unlinking transmission cover bolts and crossbar bolts and removing the crossbar. Afterwards dismantling transmission cover bolt and its cover. Empty the engine oil from the system before extracting the engine Oil Filter then tighten the Drain Plug and Oil Filter until they reach proper engagement. When working with 4l60-e automatic transmissions first remove both the right side transmission bolt and stud and the left side bottom bolt. 4l80-e transmission users should next take off their converter cover bolts as part of the sequence. You must perform these steps in order: disable the oil level sensor electrical connector then remove the battery cable channel bolt after moving the channel pin out of the Oil Pan tab and finally the positive battery cable clip bolt. The procedure continues by removing the Oil Pan bolts while keeping foreign material out of the oil passages. Drilling and removing all rivets which hold the Oil Pan Gasket will be required before extracting the gasket from the pan. Discard both the gasket and rivets. After proper inspection of the engine Oil Pan proceed with cleaning it as needed. Sealant gm p/n 12378190 should be applied as a 5 mm (0.20 inch) bead onto the tabs of front and rear cover gaskets that extend into the Oil Pan surface at the engine block. Properly position the oil gallery in both components before installing the gasket between the engine block and Oil Pan. Keep the Oil Pan Gasket under the pan as you pass the bolts through the gasket. Use the engine block to mount the Oil Pan and bolts with the gasket. Tighten all pan bolts into place but avoid torque overkill. Mount converter cover bolts until tight on vehicles equipped with the 4l80-e automatic transmission. When using the 4l60-e automatic transmission, begin by installing its transmission bolt and right-side stud until they are tight before proceeding with the left-side bottom bolt. Tighten Oil Pan-to-front cover bolts to 25 nm (18 ft. Lbs.) and Oil Pan-to-rear cover bolts to 12 nm (106 inch lbs.). Use 50 nm (37 ft. Lbs.) for converter cover and transmission bolts/stud torque. Place the positive battery cable clip bolt at 9 nm torque (80 inch lbs.), then insert the channel pin into the Oil Pan tab followed by the battery cable channel bolt installation. Torque the bolt to 12 nm (106 inch lbs.). First connect the oil level sensor electrical connector before you install the transmission cover with bolt and tighten it to 12 nm (106 inch lbs.). Continue by installing the crossbar and crossbar bolts while you tighten them to 100 nm (74 ft. Lbs.). To complete installation install the transmission cover bolt and tighten it to 12 nm (106 inch lbs.) then position the front drive axle and install awd differential carrier upper and lower mounting hardware snugly without tightening before finally tightening both bolts to 100 nm (75 ft. Lbs.). Place inner axle housing washers onto the bracket before tightening its nuts to 100 nm (75 ft. Lbs.). After removing the jack supporting the front drive axle, replace it with fresh engine oil and a new Oil Filter.
    Posted by ChevyPartsGiant Specialist
    Q:
    How to replace the oil pan on Chevrolet Silverado 2500? Posted by Customer
    A:
    Starting the Oil Pan replacement requires draining both engine block and cooling system contents unless the vehicle features regular production option (RPO) hp2. The procedure for 4wd models requires removal of the inner axle housing nuts and washers from the bracket before placing a suitable jack under the front drive axle. Remove the differential carrier lower and upper mounting bolts and nuts to finish the procedure. You should start by lowering the front drive axle then remove the transmission cover bolt and disconnect the Oil Pan skid plate when present by removing its bolts. Start by removing transmission crossbar elements along with its bolts. Then unfasten the transmission cover bolt and remove the cover. Pull out engine oil from the compartment before taking out the engine Oil Filter but tighten the Drain Plug and Oil Filter correctly. When servicing 4l60-e automatic transmissions the operator must first disconnect the right side transmission bolt and stud and the left side bottom bolt. When working on 4l80-e automatic transmissions you must first remove all bolts securing the converter cover. When working with vehicles that have manual transmissions you should first remove both bottom bolts that secure the bellhousing. Pull out the channel pin from the Oil Pan tab after disconnecting the oil level sensor electrical connector and removing the battery cable channel bolt. After detaching the engine wiring harness clip and positive battery cable clip from the positive battery cable clip you can remove the engine oil cooler lines and positive battery cable clip bolt and clip. After removing the Oil Pan bolts please extract the Oil Pan from its position while taking precautions to block outside objects from entering the oil channels. Then drill and remove all Oil Pan Gasket retaining rivets, getting rid of both the gasket and rivets. When required you should inspect and clean the engine Oil Pan. The installation process requires sealant gm p/n 12378190 (or equivalent) applied as a 5 mm (0.20 inch) bead on the engine block tabs where the front and rear cover gaskets extend into the Oil Pan surface. Connect the engine block and Oil Pan oil gallery passages correctly and install the assembled gasket on the pan before its mounting to the engine block. Torque the Oil Pan bolts to their initial snugness without over-torque, then torque the two bottom bellhousing bolts just enough for manual transmissions and the transmission converter cover bolts just enough for 4l80-e automatic transmissions. When installing a 4l60-e automatic transmission you must start by securing the transmission bolt and stud on the right side before proceeding to install the bottom bolt on the left side. Torque the Oil Pan bolts to 25 nm (18 ft.lbs.) as well as the larger bolts holding the Oil Pan to the front cover at 25 nm. The rear Oil Pan bolts require 12 nm torque. Similarly, tighten the bellhousing and converter cover bolts and transmission bolts/stud to 50 nm. Following Oil Pan installation fix the positive battery cable clip and bolt with 9 nm (80 inch lbs.) tension then attach wiring harness and engine oil cooler lines to the positive battery cable clip. Secure the channel pin within the Oil Pan tab while you install the battery cable channel bolt before tightening it to 12 nm (106 inch lbs.). The oil level sensor electrical connector needs installation before fitting the transmission cover along with its bolt. Tighten this bolt to 12 nm (106 inch lbs.) before adding the crossbone and its bolts. You should tighten those bolts to 100 nm (74 ft. Lbs.). First install the transmission cover bolts while tightness should reach 12 nm (106 inch lbs.) then move on to tighten the Oil Pan skid plate bolts to 20 nm (15 ft. Lbs.). Install the differential carrier upper mounting bolt first while leaving it loose then add the lower mounting bolt and nut before torquing both to 100 nm (75 ft. Lbs.). For vehicles with 4wd systems, install the inner axle housing washers and nuts onto the bracket before tightening it to 100 nm (75 ft. Lbs.). Afterwards detach the jack from the front drive axle and put fresh engine oil and a new Oil Filter. Each vehicle with rpo hp2 requires cooling system refilling.
    Posted by ChevyPartsGiant Specialist
    Q:
    How to replace the oil pan on Chevrolet Suburban 2500? Posted by Customer
    A:
    Before you begin with Oil Pan replacement make sure to lower the engine because the crankshaft balancer might cause damage when raised. The first task should be Differential removal in vehicles with 4wd systems followed by Starter motor separation. The process starts by removing all skid plate bolts followed by taking out the skid plate from the Oil Pan. Two wheel drive (2WD) owners need to start by unscrewing the crossbar bolt followed by removing the crossbar. The crossbar bolts and crossbar need removal when operating on 4wd models. Drain engine oil first while also removing the oil level indicator and then disconnecting the oil level sensor's electrical connector. Start by removing the engine harness clip from the Oil Pan before taking out the oil level sensor. The installation starts with the removal of battery cable channel bolt followed by repositioning the battery cable channel before unfastening the Oil Pan bolts. The undamaged Oil Pan Gasket can be reused so replace the Oil Pan together with the gasket. During installation apply gm sealant U.S. P/N 12346286 or canada P/N 10953472 or equivalent at four locations on the sides of front and rear crankshaft bearing caps. Place a new Oil Pan Gasket into the Oil Pan groove after which you can install the Oil Pan. Begin by tightening Oil Pan bolts in their proper sequence to 10 nm (89 inch lbs.) for the initial stage and then finish with a torque of 25 nm (18 ft. Lbs.). Fasten the battery cable channel bolt with a torque setting of 9 nm (80 inch lbs.) and position the battery cable channel. Mount the oil level sensor onto the Oil Pan while applying 20 nm (15 ft. Lbs.) torque before attaching the engine harness clip along with connecting the oil level sensor electrical connector. Put the oil level indicator in place before filling the engine with oil. Crossbar installation for 4wd vehicles requires a bolt torque of 100 nm (74 ft. Lbs.) while 2wd vehicles get the same bolt torque. Install the Oil Pan skid plate by tightening its bolts to 20 nm torque specification (15 ft. Lbs.) and put on the Starter motor and front Differential if installed.
    Posted by ChevyPartsGiant Specialist
    Q:
    How to replace the oil pan on Chevrolet Suburban 1500? Posted by Customer
    A:
    The procedure starts with disconnecting the negative Battery Cable when replacing the Oil Pan. A front Differential removal becomes necessary for cars equipped with four-wheel drive systems. Initial steps require the removal of the underbody shield combined with its matching Oil Pan shield then proceed to the cross brace according to installation requirements. First drain all engine oil then remove the engine Oil Filter. First disconnect the negative Battery Cable before removing the lower transmission-to-Oil Pan bolts and separating the oil level sensor electrical connector and removing the two front wiring harness retainer bolts and engine wiring harness retainer bolts from the engine Oil Pan. Clear the engine oil cooler pipe to Oil Pan bolt and the transmission oil cooler pipe retainer and bolt from the Oil Pan. Start by removing the Starter motor and left closeout cover bolt and emission control canister. Following this, take out the engine Oil Pan. While building your new assembly place a 5 mm (0.20 inch) bead of gm p/n 12378190 or equivalent sealant on the engine block and both front and rear cover gasket tabs that extend into the Oil Pan surface. Apply gm's p/n 12378190 or equivalent sealant to the engine block and Oil Pan tabs. Then assemble the gasket to the pan before mounting it to the engine block by hand-tightening the bolts until they reach their recommended torque specifications. Next secure the two lower bellhousing bolts with just enough force to place the Oil Pan in its proper position. Tighten all Oil Pan-to-block bolts to 25 n.m (18 lb ft). Use 25 n.m (18 lb ft) torque on the Oil Pan-to-Oil Pan front cover bolts while tightening the Oil Pan-to-rear cover bolts to 12 n.m (106 lb in). Complete the process by tightening the bellhousing bolts to 50 n.m (37 lb ft). Install the left closeout cover along with its bolt through proper torque application to 9 n.m (80 lb in) resistance. Afterward install the Starter motor followed by the transmission oil cooler pipe retainer and its bolt to the Oil Pan before installing the engine oil cooler pipe to Oil Pan bolt after which tighten the engine oil cooler pipe nut to 10 n.m (89 lb in). Fasten the engine wiring harness retainer bolts to the engine Oil Pan then connect the oil level sensor electrical connector and install and tighten the transmission to Oil Pan bolts at 55 n.m (41 lb ft). A four-wheel drive configuration requires reinstalling the front Differential before reinstalling the underbody shield on the vehicle. Lower the vehicle and fill the engine with oil then install the engine Oil Filter before reconnecting the battery's negative cable.
    Posted by ChevyPartsGiant Specialist
    Q:
    How to replace the oil pan on GMC Savana 2500? Posted by Customer
    A:
    To replace the Oil Pan, first (if equipped with all wheel drive (AWD)), unfasten and remove the inner axle housing nuts and washers from the bracket, and then holding the front drive axle with a proper jack soluble to the ground. Secondly, unscrew the differential carrier lower and upper mounting bolts and nuts, drop the front axle drive, unscrew the transmission cover bolt and crosstool mounts bolts then take out the crosstool. Next, unfasten the transmission cover bolt and cover, drain engine oil, remove the engine Oil Filter and reinstall the drain plug and Oil Filter until tight. For the vehicles with the 4l60-e automatic transmission, you need to remove the transmission bolt and stud on the right and the bottom bolt on the left side. In case of 4l80-e automatic transmission, get rid of the bolts of the transmission converter cover. Remove the oil level sensor electrical connector, the battery cable channel bolt, slide the channel pin out of the Oil Pan tab, and remove the positive battery cable clip bolt. Go ahead and take off the Oil Pan bolts and the Oil Pan itself with caution not to get any foreign material into the oil passages. Drill out the gasket retaining rivets of the Oil Pan if necessary, remove the gasket, and dispose of the gasket and rivets. Make sure and inspect the engine Oil Pan if necessary. For installation, put a 5mm(0.20inch)bead of sealant gm p/n united states 12378190 or equivalent on the engine block on the tab of front and rear cover gaskets that extend to the Oil Pan surface. Align the oil gallery passages to the Oil Pan Gasket correctly; pre-assemble the Oil Pan Gasket to the pan and then install the Oil Pan, the gasket, and the bolts to the engine block; tighten the bolts partially by twisting then until they are snug without over-tightening them. If the 4l80-e type of automatic transmission is installed, then install the transmission converter cover bolts until it becomes snug, if the 4l60-e type of the automatic transmission is installed then install the automatic transmission bolt and stud on the right side until it is snug and then the lower bolt on the left side. However, tighten the Oil Pan to-front cover bolts to 25 nm (18 ft. Lbs.), Oil Pan to-rear cover bolts to 12 (106 inch lbs.), converter cover, and transmission bolts/stud, to 50 nm (37 ft. Lbs.). Mount the positive battery cable clip bolt and tighten it to 9 nm (80 inch lbs.), slide the channel pin into the Oil Pan tab, then mount the batter cable channel bolt and tighten it to 12 nm (106 inch lbs.). Connect the oil level sensor electrical connector, then install the transmission cover and bolt to 12 nm (106 inch lbs.), then install the crossbar and crossbar bolts tightened to 100 nm (74 ft. Lbs.). Lastly, install on the transmission cover bolt tight at 12 nm (106 inch lbs.), raise the front drive axle on position, in case you have an awd, install the differential carrier upper mounting bolt and nut loosely and so is the lower mounting bolt and nut but torque them to 100 nm (75 ft. Lbs.) then bracket the washer and nut on the inner axle housing and tighten to 100 nm (75 ft. Lbs.). Remove the jack from the front drive axle, install new engine oil and a new Oil Filter.
    Posted by ChevyPartsGiant Specialist
    Q:
    How to Replace an Oil Pan on GMC Yukon XL 2500? Posted by Customer
    A:
    First, if you have a four wheel drive (4WD), you will need to pull out the inner axle housing nuts and washers from the bracket, and follow by supporting the front drive axle using a suitable jack. Then, remove differential carrier lower and higher mounting bolts and nuts, bring down the front drive axle, and remove the transmission cover bolt. If necessary, remove the Oil Pan skid plate bolts and the skid plate as well as the crossbar bolts and the crossbar. Pull off the transmission cover bolt and cover, drain off the engine oil and pull off the engine Oil Filter, then reinstall the Drain Plug and Oil Filter until it is tight. For vehicles with the 4l60-e auto transmission, remove the transmission bolt and stud at right-hand side and the bottom bolt at the left-hand side. Remove the transmission cover bolts for those with 4l80-e automatic transmission. Disconnect the oil level sensor electrical connector, the battery cable channel bolt, slide the channel pin out of Oil Pan tab, and remove the engine wiring harness clip and positive battery cable clip from the positive battery cable clip, remove the engine oil cooler lines and remove the positive battery cable clip bolt and clip. Drain the pan oil and remove the Oil Pan, being careful not to allow any foreign objects into the oil passages. If required , drill out the Oil Pan gasket retaining rivets and remove the gasket ditching the gasket and rivets. Clean and inspect the engine Oil Pan according to necessary. For installation, a 5 mm (0.20 inch) bead of sealant gm p/n 12378190 or equivalent should be fitted the engine block on the tabs of the front and rear cover gaskets that protrude onto the Oil Pan surface. Mount the oil gallery passages in the correct orientation with the Oil Pan gasket, assemble the pre-assembled gasket to the pan, and the latter, along with the bolts, to the engine block. Tighten the Oil Pan bolts without over-tightening, then you will install the transmission converter cover bolts and the transmission bolt and stud on the right until snug. Using factory-recommended sequence and torque values, tighten the bottom bolt on the left side, then the Oil Pan, Oil Pan-to-Oil Pan front cover bolts at 25 nm (18 ft. Lbs.), Oil Pan-to-Oil Pan front cover bolts at 12 nm (106 inch lbs.), bellhouse, converter cover, and transmission bolts/stud at 50 nm (37 ft. Lbs.). Install the positive battery cable clip, bolt to the Oil Pan, tighten bolt to 9 nm (80 inch lbs) then install the engine oil cooler lines and the engine wiring harness clip and positive battery cable clip to the positive battery cable clip. Insert the channel pin in the Oil Pan tab, install the battery cable channel bolt and tighten it to 12 nm (106 inch lbs). Finally, connect the oil level sensor electrical connector, mount the transmission cover and bolt and tighten the bolt to 12 nm (106 inch lbs) then mount the crossbar along with its bolts and tighten them to 100 nm (74 ft. Lbs). If installed, fit into position the Oil Pan skid plate with its bolts and tighten them to 20 nm (15 ft. Lbs.), followed by the transmission cover bolts, which should be set to 12 nm (106 inch lbs.). Lift the front drive axle into position, and for vehicles equipped with 4wd install the differential carrier upper mounting bolt and nut securely without tightening and then install the lower mounting bolt and nut and tighten to 100 nm (75 ft. Lbs.). Lastly, bolt the inner axle housing washers and nuts to the bracket, as well as tighten the nuts to 100 nm (75 ft. Lbs.), then take jack off front drive axle, and install new engine oil and new Oil Filter.
    Posted by ChevyPartsGiant Specialist
    Q:
    How to replace the oil pan on GMC Yukon XL 1500? Posted by Customer
    A:
    Replacing the Oil Pan requires the removal of four-wheel drive front Differential units and then Starter motors and engine shield bolts before removing the engine shield. The first step is to remove the Oil Pan skid plate by detaching its bolts if equipped so that you can take off the crossbar and its bolts afterward. Start by draining the engine oil after removing the transmission cover bolt and transmission cover. Then remove the engine Oil Filter and tighten the Drain Plug and Oil Filter until they become snug. Vehicles with the 4l60-e automatic transmission need right-side transmission bolt together with its stud and bolt removal from the bottom edge. If you have a 4l80-e automatic transmission you will need to remove the transmission converter cover bolts and if you have a manual transmission you need to remove the two bottom bellhousing bolts. Start by disconnecting the oil level sensor electrical connector before you remove the battery cable channel bolt. Slide the channel pin out of the Oil Pan tab. Unclip the engine wiring harness and the positive battery cable from the positive battery cable clip before removing the engine oil cooler lines and the positive battery cable clip bolt and clip. Remove the Oil Pan bolts and carefully take out the Oil Pan without letting any foreign material access the oil passages. You can use a drill to remove the Oil Pan Gasket retaining rivets after which you must discard the gasket as well as rivets. Engine Oil Pan examination should begin with preparation and then continues to structural Oil Pan alignment checks to prevent excessive blade extension above block and transmission area. Use 5 mm (0.20 inch) beads of gm p/n 12378190 or equivalent sealant to apply onto the engine block surface where front and rear cover gaskets extend into the Oil Pan area. Attach the Oil Pan Gasket to the pan before you install the pan combination with gasket and bolts onto the engine block while avoiding excessive tightness. When using a manual transmission install the two bottom bellhousing bolts tightly. For the 4l80-e automatic transmission, install the transmission converter cover bolts until snug; the transmission converter cover bolts of the 4l80-e automatic transmission should be installed until they reach proper tightness whereas the 4l60-e automatic transmission needs its bolt and stud on the right side tightened until similar. Tighten the Oil Pan while also securing both the Oil Pan and Oil Pan front cover bolts to 25 nm (18 ft. Lbs.) and the Oil Pan-to-rear cover bolts to 12 nm (106 inch lbs.) and bellhousing with converter cover and transmission bolts/stud to 50 nm (37 ft. Lbs.) at this time. After securement of the engine oil cooler lines and engine wiring harness clip and positive battery cable clip fit the channel pin into the Oil Pan tab then bolt and tighten the battery cable channel bolt to 12 nm (106 inch lbs.). After inserting the channel pin into the Oil Pan tab, attach the battery cable channel bolt and finish tightening it to 12 nm (106 inch lbs.). Connect the oil sensor electrical connector before installing the transmission cover with bolt; fasten both the cover bolt and crossbar bolts with a torque of 12 nm (106 inch lbs.). First install the Oil Pan skid plate and mount its bolts with a torque of 20 nm (15 ft.lbs.) before moving on to install the engine shield and its bolts with the same torque measurement of 20 nm (15 ft.lbs.). As a finale step install the Starter motor and the front Differential when equipped with 4wd before you add fresh engine oil together with a brand new Oil Filter.
    Posted by ChevyPartsGiant Specialist
    Q:
    What should be done for the 4L80-E automatic transmission after installing the oil pan for the 2003 Cadillac Escalade? Posted by Customer
    A:
    Install the transmission converter cover bolts until snug.
    Posted by ChevyPartsGiant Specialist
    See expert answers on similar Oil Pan
    Q:
    How should the new oil pan gasket be installed for the 2005 Chevrolet Express 2500? Posted by Customer
    A:
    Use a new oil pan gasket, ensuring it is installed while the adhesive is still wet, and position it into the oil pan groove.
    Posted by ChevyPartsGiant Specialist
    See expert answers on similar Oil Pan
    Q:
    What should be done with the front differential and crossmember for the 2004 Chevrolet Silverado 1500? Posted by Customer
    A:
    Reinstall them and tighten the bolts to 100 Nm (74 ft. lbs.).
    Posted by ChevyPartsGiant Specialist
    See expert answers on similar Oil Pan
    Q:
    What is the final step after installing the oil pan for the 2000 Chevrolet Suburban 1500? Posted by Customer
    A:
    Install the oil level sensor and tighten it to 13 Nm (115 lb in).
    Posted by ChevyPartsGiant Specialist
    See expert answers on similar Oil Pan
    Q:
    How should the oil filter be installed for the 2005 Chevrolet Silverado 1500? Posted by Customer
    A:
    Lubricate the oil filter gasket with clean engine oil, install the oil filter, and tighten it to 30 Nm (22 ft. lbs.).
    Posted by ChevyPartsGiant Specialist
    See expert answers on similar Oil Pan
    Q:
    What should be done after tightening the oil pan bolts for the 2006 Chevrolet Silverado 3500? Posted by Customer
    A:
    Install the positive battery cable clip and bolt to the oil pan, tightening the bolt to 9 Nm, then install the engine oil cooler lines and the engine wiring harness clip.
    Posted by ChevyPartsGiant Specialist
    See expert answers on similar Oil Pan
    Q:
    What is the first step to replace the oil pan if equipped with all-wheel drive (AWD) for the 2005 GMC Savana 2500? Posted by Customer
    A:
    Remove the inner axle housing nuts and washers from the bracket, then support the front drive axle with a suitable jack.
    Posted by ChevyPartsGiant Specialist
    See expert answers on similar Oil Pan
    Q:
    What is the next step after applying sealant to the engine block for the 2003 GMC Savana 3500? Posted by Customer
    A:
    Pre-assemble the oil pan gasket to the pan, install the oil pan, gasket, and bolts to the engine block, and tighten the oil pan bolts until snug without overtightening.
    Posted by ChevyPartsGiant Specialist
    See expert answers on similar Oil Pan
    Q:
    What is the next step after reinstalling the oil level indicator for the 2006 GMC Sierra 3500? Posted by Customer
    A:
    Fill the engine with oil.
    Posted by ChevyPartsGiant Specialist
    See expert answers on similar Oil Pan
    Q:
    What are the torque specifications for the oil pan bolts for the 2006 GMC Savana 3500? Posted by Customer
    A:
    Tighten the oil pan-to-front cover bolts to 25 Nm (18 ft. lbs.), the oil pan-to-rear cover bolts to 12 Nm (106 inch lbs.), and the converter cover and transmission bolts/stud to 50 Nm (37 ft. lbs.).
    Posted by ChevyPartsGiant Specialist
    See expert answers on similar Oil Pan
    Q:
    How should the drain plug be prepared for the 2006 GMC Sierra 1500? Posted by Customer
    A:
    Install a new drain plug O-ring seal onto the drain plug and tighten it to 25 Nm (18 ft. lbs.).
    Posted by ChevyPartsGiant Specialist
    See expert answers on similar Oil Pan
    Q:
    How do you remove the oil pan for the 2005 GMC Sierra 3500? Posted by Customer
    A:
    Remove the oil pan bolts and the oil pan itself, ensuring no foreign material enters the oil passages.
    Posted by ChevyPartsGiant Specialist
    See expert answers on similar Oil Pan
    Q:
    What is the procedure for cleaning and inspecting the engine oil pan for the 2007 GMC Savana 2500? Posted by Customer
    A:
    Clean and inspect the engine oil pan as needed.
    Posted by ChevyPartsGiant Specialist
    See expert answers on similar Oil Pan
    If you have any questions about this product, please don't hesitate to ask us. We will be happy to help you!

OEM GM 12579273, Excellent Performance and Perfect Fitment

To ensure reliability, purchase GM part # 12579273 Oil Pan. It is sometimes referred to as GM Oil Pan. Choosing OEM parts is the optimal decision for guaranteeing superior quality and perfect performance. These components undergo stringent quality checks and are carefully constructed to comply with GM's factory specifications, ensuring a smooth installation process.

ChevyPartsGiant.com is a leading supplier of genuine GM parts such as GM 12579273 Oil Pan. Our website boasts an extensive inventory of OEM GM parts, available at highly competitive prices in the market. Should you require any new genuine GM parts, rest assured we will deliver them swiftly and efficiently to your doorstep. Furthermore, all our parts come with the assurance of a manufacturer's warranty. For detailed Chevy parts information, click here.
Choose ChevyPartsGiant for discounted prices, exceptional service and fast delivery