ChevyParts
My Garage
My Account
Cart
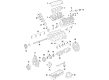
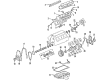
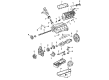
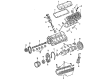
OEM 2005 GMC Sierra 3500 Oil Pan
Oil Drain Pan- Select Vehicle by Model
- Select Vehicle by VIN
Select Vehicle by Model
orMake
Model
Year
Select Vehicle by VIN
For the most accurate results, select vehicle by your VIN (Vehicle Identification Number).
4 Oil Pans found


2005 GMC Sierra 3500 Oil Pan Part Number: 98073535
$245.87 MSRP: $333.75You Save: $87.88 (27%)Product Specifications- Other Name: Pan, Engine Oil; Engine Oil Pan; Lower Oil Pan
- Replaces: 97329637, 97360794, 97220006
- Item Weight: 6.00 Pounds
- Item Dimensions: 7.2 x 15.3 x 14.0 inches
- Condition: New
- Fitment Type: Direct Replacement
- SKU: 98073535
- Warranty: This genuine part is guaranteed by GM's factory warranty.

2005 GMC Sierra 3500 Oil Pan Part Number: 12579273
$313.43 MSRP: $538.29You Save: $224.86 (42%)Ships in 1-2 Business DaysProduct Specifications- Other Name: Pan, Engine Oil; Engine Oil Pan
- Replaces: 12573695, 12560393
- Item Weight: 22.50 Pounds
- Item Dimensions: 28.3 x 18.9 x 18.2 inches
- Condition: New
- Fitment Type: Direct Replacement
- SKU: 12579273
- Warranty: This genuine part is guaranteed by GM's factory warranty.


2005 GMC Sierra 3500 Oil Pan Part Number: 97329702
$811.00 MSRP: $1281.81You Save: $470.81 (37%)Product Specifications- Other Name: Pan, Engine Oil
- Replaces: 97223614, 98073536
- Item Weight: 7.50 Pounds
- Item Dimensions: 25.4 x 17.0 x 9.5 inches
- Condition: New
- Fitment Type: Direct Replacement
- SKU: 97329702
- Warranty: This genuine part is guaranteed by GM's factory warranty.

2005 GMC Sierra 3500 Oil Pan Part Number: 12574833
Product Specifications- Other Name: Pan, Engine Oil
- Replaces: 12560248
- Item Weight: 14.80 Pounds
- Item Dimensions: 27.3 x 13.0 x 13.1 inches
- Condition: New
- Fitment Type: Direct Replacement
- SKU: 12574833
- Warranty: This genuine part is guaranteed by GM's factory warranty.
2005 GMC Sierra 3500 Oil Pan
With a comprehensive array of OEM 2005 GMC Sierra 3500 Oil Pan, from fuel pumps to door handles, our website is a one-stop-shop for your needs. All our genuine 2005 GMC Sierra 3500 Oil Pan are backed by the manufacturer's warranty and are offered at competitive prices in the market. Rest assured, you can shop with complete confidence.
2005 GMC Sierra 3500 Oil Pan Parts and Q&A
- Q: How to replace the oil pan on 2005 GMC Sierra 3500?A: First, if you are equipped with four wheel drive (4WD), remove inner axle housing nuts and washers from the bracket, then support the front drive axle using a suitable jack. Next, unbolt the differential carrier lower and upper bolts and nuts; lower the front drive axle; and unbolt the transmission cover bolt. Take out the bolts for the Oil Pan skid plate and the skid plate itself, the bolts for the crossbar and the crossbar itself if useable. Drain the engine oil, take off the engine Oil Filter, but replace the drain plug and Oil Filter loosely. Remove the transmission cover bolt and cover. Move the bolt and stud located on the right side for vehicle with 4l60-e automatic transmission as well as the bottom bolt of the left side. For everyone with automatic transmission 4l80-e; unbolt the cover of the transmission converter. Disconnect oil level sensor electrical connector the battery cable channel bolt and slid the channel pin out of the Oil Pan tab, remove the engine wiring harness clip and positive battery cable clip from the positive battery cable clip, remove the engine oil cooler lines and the positive battery cable clip bolt and clip. Unscrew the Oil Pan bolts and the Oil Pan, being careful not to introduce foreign matter into the oil passages. Drill out the Oil Pan Gasket retaining rivets when needed and remove and discard the gasket and rivets. Wash and check the engine Oil Pan if necessary. For installation place a 5 mm (0.208 inch) bead of sealant gm p/n 12378190 or equal to the engine block and tabs of the front and rear cover gaskets that extend into the Oil Pan surface. Properly align the oil gallery passages of the Oil Pan and the engine block with the new gasket, before fitting the latter on the pan and clinching it down with the Oil Pan bolts. Mount the Oil Pan and gasket and bolts onto the engine block, cinching the Oil Pan bolts just snuggly but not quite locking. If the car is equipped with 4l80-e going around and placing the transmission converter, cover bolts until snug, in case it is the 4l60-e automatic transmission, install the transmission bolt and stud on the right side until snug. Attach the bottom bolt to the left side until it is snug, and tighten the oil to the pan and pan-to-front pan cover bolts to 25 nm (18 ft. Lbs.), Oil Pan to rear cover bolts to 12 nm (106 inch lbs.), to the bellhousing, cover, and trans convert bolts/stud to 50 nm (37 f. Lbs.). Install the positive battery cable clip and bolt to the Oil Pan and tighten bond to 9 nm (80 inch lbs), then connect the engine oil cooler lines to the positive battery cable clip, followed by the clip of the engine wiring harness and the positive battery cable clip. Slide channel pin in the Oil Pan tab, install battery cable channel bolt concluding the tightening to 12 nm (106 inch lbs). Check the 12 oils level sensor electrical connector, fit the transmission front cover and bolt, tighten the bolt to 12 nm (106 inch lbs. ), fit the crossbar and tighten the 100 nm crossbar bolts (74 ft. Lbs.). Install the Oil Pan skid plate and the bolts with 20 nm (15 ft. Lbs.), then the transmission cover bolts with 12 nm (106 inch lbs.), if required. Next, lift the front drive axle into place and if you have a 4wd, install the upper mounting bolt and nut only to tighten them up against the axle tube, and then install the lower mounting bolt and nut and tighten them to 100 nm (75 ft. Lbs.). Last, mount the inner axle housing washers and nuts onto the bracket by rotating the nuts so that they tighten at 100 nm (75 ft. Lbs.), lift off the jack from the front drive axle and install new engine oil and new Oil Filter.
Related 2005 GMC Sierra 3500 Parts
 2005 GMC Sierra 3500 Cam Gear
 2005 GMC Sierra 3500 Crankshaft Gear
 2005 GMC Sierra 3500 Dipstick Tube
 2005 GMC Sierra 3500 Engine Mount
 2005 GMC Sierra 3500 Fuel Filter
 2005 GMC Sierra 3500 Harmonic Balancer
 2005 GMC Sierra 3500 Head Gasket
 2005 GMC Sierra 3500 Oil Pan Gasket
 2005 GMC Sierra 3500 Oil Pump Rotor Set
 2005 GMC Sierra 3500 Pushrod
 2005 GMC Sierra 3500 Timing Cover Gasket
 2005 GMC Sierra 3500 Valve Stem Oil Seal